
Are you a proud owner of a Mac computer looking to set up your Apple Mail and add email accounts? Look no further, as we’ve got you covered! Setting up Apple Mail on your Mac is a breeze and allows you to manage all your email accounts in one convenient location. Whether you have a personal or business email, you can easily configure them in a few simple steps. In this article, we’ll guide you through the process, providing you with all the necessary instructions to get your Apple Mail up and running in no time. Say goodbye to the hassle of switching between different email providers – with Apple Mail, you can stay organized and efficient. Let’s dive in and uncover the secrets of setting up Apple Mail on a Mac!
Inside This Article
- How to Set Up Apple Mail & Add Email Accounts on a Mac
- Configuring Apple Mail on your Mac
- Adding an Email Account using Automatic Setup
- Adding an Email Account using Manual Setup
- Managing Multiple Email Accounts in Apple Mail
- Conclusion
- FAQs
How to Set Up Apple Mail & Add Email Accounts on a Mac
If you have recently acquired a Mac and want to set up your Apple Mail, this article will guide you through the process. Apple Mail is a versatile and user-friendly email client that allows you to manage multiple email accounts in one place. Whether you have a personal or professional email account, setting up Apple Mail on your Mac is a quick and straightforward process. Let’s get started!
Setting Up Apple Mail on a Mac:
- Open the Mail app on your Mac. You can find it in the Applications folder or by using Spotlight search.
- Upon launching the app, you will be prompted to add an email account. If this does not happen, go to the “Mail” menu and select “Add Account.”
- Choose your email provider from the list (e.g., Google, Yahoo, Outlook, etc.) or select “Add Other Mail Account” to manually configure the settings for your custom email account.
- Enter your email address and password, then click “Sign In” or “Continue.”
- If two-factor authentication is enabled for your email account, enter the verification code when prompted.
- Apple Mail will attempt to automatically configure the server settings for your email account. In most cases, this process completes successfully, and you can start using your email account right away. However, if the automatic setup fails, you will need to enter the server details manually.
Adding an Email Account to Apple Mail:
- If you have multiple email accounts, you can add them to Apple Mail for easy access. To add another account, go to the “Mail” menu and select “Add Account.”
- Follow the on-screen prompts, entering the email address and password for the additional account. If necessary, manually configure the server settings.
- Repeat this process for each email account you wish to add to Apple Mail.
Configuring Mail Server Settings:
If the automatic configuration for your email account fails, or if you prefer to set up the server details manually, follow these steps:
- In the Mail app, go to “Preferences” from the “Mail” menu.
- Select the “Accounts” tab.
- Choose the email account you want to configure and click on the “Server Settings” button.
- Enter the incoming mail server (IMAP or POP) and outgoing mail server (SMTP) details provided by your email service provider.
- Save the changes and close the preferences window.
Troubleshooting Apple Mail Issues:
If you encounter any problems with Apple Mail, here are some troubleshooting tips:
- Ensure that you have a stable internet connection.
- Double-check your email address and password for any typos or errors.
- Verify that your email service provider’s server settings are correctly entered in the Mail app.
- Try quitting and relaunching the Mail app.
- If you still experience issues, contact your email service provider for further assistance.
Setting up Apple Mail and adding email accounts to your Mac is essential for efficient email management. With these simple steps and troubleshooting tips, you’ll be able to enjoy the benefits of Apple Mail’s seamless integration with your email accounts. Happy emailing!
Configuring Apple Mail on your Mac
Congratulations on setting up Apple Mail and adding your email accounts! Now, it’s time to configure Apple Mail to optimize your email experience on your Mac. Configuring Apple Mail involves customizing settings, managing mailboxes, and organizing your emails efficiently. In this section, we will guide you through the process of configuring Apple Mail on your Mac.
1. Customize General Settings:
Go to the Apple Mail application and click on “Mail” in the top menu bar. From the drop-down menu, select “Preferences.” In the preferences window, navigate to the “General” tab, where you can customize settings such as the default email reader, the sound notifications, and the behavior when replying to or forwarding emails.
2. Manage Mailbox Behavior:
To efficiently manage your mailboxes, go to the “Accounts” tab in the preferences window. Here, you will find a list of your email accounts. Select an account, and click on “Mailbox Behaviors.” You can set options for drafts, sent, junk, and trash mailboxes, such as deleting or storing deleted messages. Customize these settings according to your preferences to keep your mailbox organized and clutter-free.
3. Organize Emails with Rules:
Apple Mail allows you to set up rules to automatically organize incoming emails. To create a rule, go to the “Preferences” window and click on the “Rules” tab. Click on the “+” icon to add a new rule. Specify the conditions that trigger the rule, such as the sender, subject, or recipient. Then, define the actions to be performed, such as moving to a specific mailbox or applying a label. These rules will help you stay organized and manage your emails more efficiently.
4. Customize Message Viewer:
In the “Preferences” window, go to the “Viewing” tab to customize the message viewer. You can choose to display email conversations, show message threads, or adjust the preview pane layout. Experiment with these settings to find the configuration that suits your preferences and enhances your email reading experience.
5. Configure Advanced Settings:
If you are an advanced user, you can further customize Apple Mail by navigating to the “Advanced” tab in the “Preferences” window. Here, you will find options for storing and deleting messages, setting SSL encryption, adjusting server timeouts, and more. Make sure to consult your email service provider’s settings or seek technical support if you are unsure about any advanced configurations.
By following these steps and customizing your Apple Mail settings, you can optimize your email management experience on your Mac. Enjoy a clutter-free mailbox, organized emails, and a personalized interface that caters to your preferences.
Adding an Email Account using Automatic Setup
Adding an email account to Apple Mail on a Mac is a straightforward process, especially when using the automatic setup feature. With automatic setup, you can effortlessly configure your email account without the need for manual settings. Follow the steps below to add an email account using automatic setup:
- Launch the Apple Mail application on your Mac. You can find it in the Applications folder or by searching for it using Spotlight.
- In the menu bar at the top of your screen, click on “Mail” and then select “Preferences.”
- A new window will appear. Click on the “Accounts” tab at the top of the window.
- Next, click on the “+” button located at the bottom left corner of the window. A pop-up menu will appear.
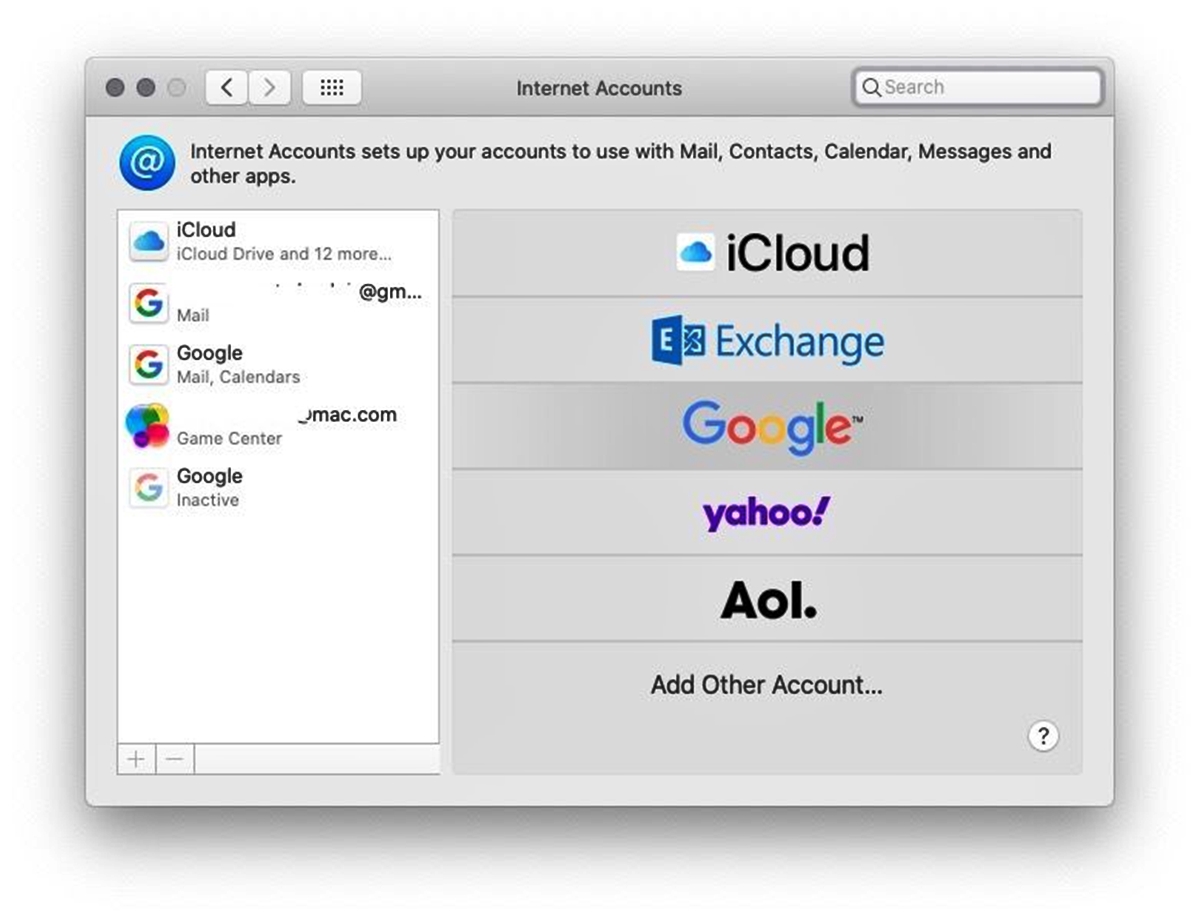
- From the pop-up menu, select the type of email account you want to add. Options include iCloud, Exchange, Google, Yahoo, AOL, and more.
- Enter your email address and password in the respective fields. If you have two-factor authentication enabled for your account, you may need to provide additional verification.
- Click on the “Sign In” button. Apple Mail will automatically attempt to configure your email account using the information provided.
- If the automatic setup is successful, you will see a confirmation message, and your email account will be added to Apple Mail. You can start sending and receiving emails right away.
Note: If the automatic setup fails or your email provider is not listed in the options, you may need to manually configure your email account settings. In such cases, you will need to gather the necessary information from your email provider and follow the steps for manual setup.
Adding an email account using the automatic setup feature in Apple Mail is incredibly convenient and time-saving. By following the simple steps outlined above, you can quickly set up your email account and manage all your communications from one centralized location.
Adding an Email Account using Manual Setup
Adding an email account to Apple Mail on your Mac is a breeze with the manual setup option. This option allows you to configure your email account manually, providing you with more control over the settings and customization options.
To begin, open the Apple Mail application on your Mac. If you haven’t set up any email accounts yet, you will be prompted to add one. If you already have email accounts set up, navigate to the top menu and click on “Mail” and then select “Add Account.”
Next, you will be presented with a list of popular email service providers, such as Gmail, Yahoo, and Outlook. However, if you have a different email service provider, you can choose the “Other Mail Account” option to configure your email account manually. Click on this option to proceed.
Now, you will need to enter your name, email address, and password in the provided fields. Make sure to double-check the accuracy of the information to avoid any errors. Once you have entered the required details, click on the “Sign In” button.
Apple Mail will then attempt to automatically configure your email account settings. However, if it fails to do so, a message will appear stating that the account settings could not be found. In this case, click on the “Next” button to proceed with the manual setup.
During the manual setup process, you will be asked to select the type of email account you have. This could be IMAP or POP. IMAP (Internet Message Access Protocol) allows you to access and manage your email messages on multiple devices, while POP (Post Office Protocol) downloads messages to a single device and removes them from the server.
Consult with your email service provider to determine which option is best for you. Once you have made your selection, click on the “Next” button.
Now, you will need to provide the incoming mail server and outgoing mail server settings for your email account. These settings are specific to your email service provider. You can usually find them by searching for “email settings” on your provider’s support website or by contacting their customer support.
Enter the incoming mail server and outgoing mail server addresses in the designated fields. If the server requires SSL (Secure Sockets Layer) or authentication, make sure to check the appropriate checkboxes. Once you have entered all the necessary details, click on the “Next” button.
Apple Mail will now verify your account and attempt to establish a connection with the mail server using the provided settings. If everything is configured correctly, you will see a message stating that the account has been added successfully. Click on the “Done” button to finish the setup process.
Congratulations! You have successfully added an email account to Apple Mail using manual setup. You can now start sending and receiving emails through the Mail application on your Mac.
Note: If you encounter any issues during the setup process or if you’re unable to connect to the mail server, double-check your settings and contact your email service provider for assistance.
Managing Multiple Email Accounts in Apple Mail
Apple Mail is a powerful email client that allows you to manage multiple email accounts in one convenient place. Whether you have a personal email, a work email, or multiple accounts for different purposes, Apple Mail can help you stay organized and streamline your communication.
Here are some best practices for managing multiple email accounts in Apple Mail:
- Set up each account separately: To manage multiple email accounts effectively, it’s important to set up each account separately in Apple Mail. This ensures that you can easily switch between accounts and keep your emails organized.
- Use color-coded labels: Apple Mail allows you to assign color-coded labels to your email accounts. This visual cue can help you quickly identify which account an email belongs to, making it easier to prioritize and respond to messages.
- Create separate folders: Organize your emails by creating separate folders for each email account. This way, you can keep your inbox tidy and easily find emails related to a specific account without having to search through a cluttered inbox.
- Set up rules and filters: Apple Mail offers the option to set up rules and filters to automatically sort incoming emails into specific folders based on predefined criteria. This can be especially useful for managing multiple email accounts as it helps automate the organization process.
- Enable unified inbox: If you prefer to view all your emails in one place, you can enable the unified inbox feature in Apple Mail. This feature combines the inboxes of all your email accounts into a single view, allowing you to see all your messages without switching between accounts.
- Manage notifications: Customize your notification settings for each email account to avoid being overwhelmed by constant notifications. You can choose to receive notifications only for important emails or set specific notification preferences for each account.
- Sync across devices: Apple Mail syncs your email accounts across all your Apple devices, including your Mac, iPhone, and iPad. This allows you to access and manage your emails seamlessly from any device, regardless of where you are.
- Regularly clean up: To keep your email accounts organized and prevent them from becoming cluttered, make it a habit to regularly clean up your inbox. Delete unnecessary emails, archive important ones, and unsubscribe from newsletters or mailing lists that you no longer find relevant.
By following these tips, you can effectively manage multiple email accounts in Apple Mail and ensure a seamless and efficient email experience. Take advantage of the features and customization options available in Apple Mail to stay organized and boost your productivity.
Conclusion
In conclusion, setting up Apple Mail and adding email accounts on a Mac is a straightforward process that can greatly improve your productivity and organization. With Apple Mail, you can easily manage multiple email accounts in one place, access your emails offline, and take advantage of advanced features like smart mailboxes and filtering options.
By following the steps outlined in this article, you can quickly get your email accounts up and running in Apple Mail, ensuring that you never miss an important message again. Whether you use iCloud, Gmail, Yahoo, or any other email service, Apple Mail provides a seamless and intuitive interface to keep all your emails in one convenient location.
So, what are you waiting for? Start enjoying the benefits of using Apple Mail on your Mac and streamline your email management today!
FAQs
1. How do I set up Apple Mail on my Mac?
Setting up Apple Mail on your Mac is quite simple. Here’s what you need to do:
- Open the Mail app on your Mac. You can find it in the Applications folder or in the Dock.
- Click on the “Mail” menu in the top-left corner of the screen and select “Preferences.”
- In the Preferences window, click on the “Accounts” tab.
- Click on the “+” button at the bottom-left corner to add a new email account.
- Select the type of email account you want to add: iCloud, Google, Yahoo, Exchange, etc.
- Follow the on-screen instructions to enter your email address, password, and other necessary details.
- Once you’ve entered all the required information, click “Next” or “Sign In.”
- Apple Mail will attempt to automatically configure your account settings. If successful, your email account will be added to the Mail app.
- You can repeat the process to add more email accounts if needed.
2. How do I add multiple email accounts to Apple Mail on my Mac?
To add multiple email accounts to Apple Mail on your Mac, follow these steps:
- Open the Mail app on your Mac.
- Click on the “Mail” menu in the top-left corner and select “Preferences.”
- In the Preferences window, click on the “Accounts” tab.
- Click on the “+” button to add a new email account.
- Repeat the process for each email account you want to add, providing the necessary information for each one.
3. Can I access my email accounts from multiple devices using Apple Mail?
Yes, you can access your email accounts from multiple devices using Apple Mail. Once you’ve set up your email accounts on your Mac, you can also add them to other Apple devices like iPhone or iPad. This allows you to have synchronized access to your emails across all your Apple devices, making it convenient to stay connected wherever you are.
4. How do I modify or delete an email account in Apple Mail?
To modify or delete an email account in Apple Mail on your Mac, here are the steps you need to follow:
- Open the Mail app and click on the “Mail” menu in the top-left corner. Select “Preferences.”
- In the Preferences window, go to the “Accounts” tab.
- Select the email account you want to modify or delete from the list on the left side.
- To modify account settings, make the necessary changes in the account details section.
- To delete an account, click on the “-” button at the bottom-left corner and confirm the deletion.
5. Is it possible to use a non-Apple email provider with Apple Mail?
Yes, you can use non-Apple email providers like Gmail, Yahoo, Outlook, and others with Apple Mail. When adding a new email account, select the appropriate account type (e.g., Google, Yahoo, Exchange) and enter the required information provided by your email provider. Apple Mail supports a wide range of email services, allowing you to conveniently manage all your email accounts in one place.