
Welcome to our comprehensive guide on setting up iMessages on your iOS device! iMessages is a powerful messaging service exclusive to Apple devices, allowing you to send texts, photos, videos, and more to your contacts with ease. Whether you’re new to iOS or just need a refresher, we’ve got you covered. In this article, we will walk you through the step-by-step process of setting up iMessages, ensuring that you can start sending and receiving messages with your loved ones in no time. From enabling iMessage on your device to managing your settings and customizing your experience, we’ll cover it all. So, let’s get started and unlock the full potential of iMessages on your iOS device!
Inside This Article
- Configuration Requirements
- Step 1: Activate iMessage
- Step 2: Link Apple ID
- Step 3: Verify Phone Number and Email
- Step 4: Adjust Message Settings
- Conclusion
- FAQs
Configuration Requirements
Before setting up iMessages on your iOS device, make sure you meet the following configuration requirements:
1. iOS Device: Ensure that you have an iPhone, iPad, or iPod touch running iOS 5 or later. iMessages is not available on devices running older versions of iOS.
2. Internet Connection: An active internet connection is necessary to use iMessages. Ensure that you are connected to either a Wi-Fi network or a cellular data network.
3. Apple ID: You need to have an Apple ID to use iMessages. If you don’t have one, you can create it easily during the setup process.
4. Updated Software: It’s crucial to have the latest version of iOS installed on your device. To check for updates, go to Settings > General > Software Update and install any available updates.
Once you have confirmed that you meet these configuration requirements, you’re ready to proceed with the setup process for iMessages.
Step 1: Activate iMessage
If you’re new to iOS devices or just haven’t used iMessage before, activating it is the first step to start enjoying the seamless messaging experience. iMessage allows you to send texts, photos, videos, and even make voice and video calls to other iOS users, all for free using your internet connection.
To activate iMessage, follow these simple steps:
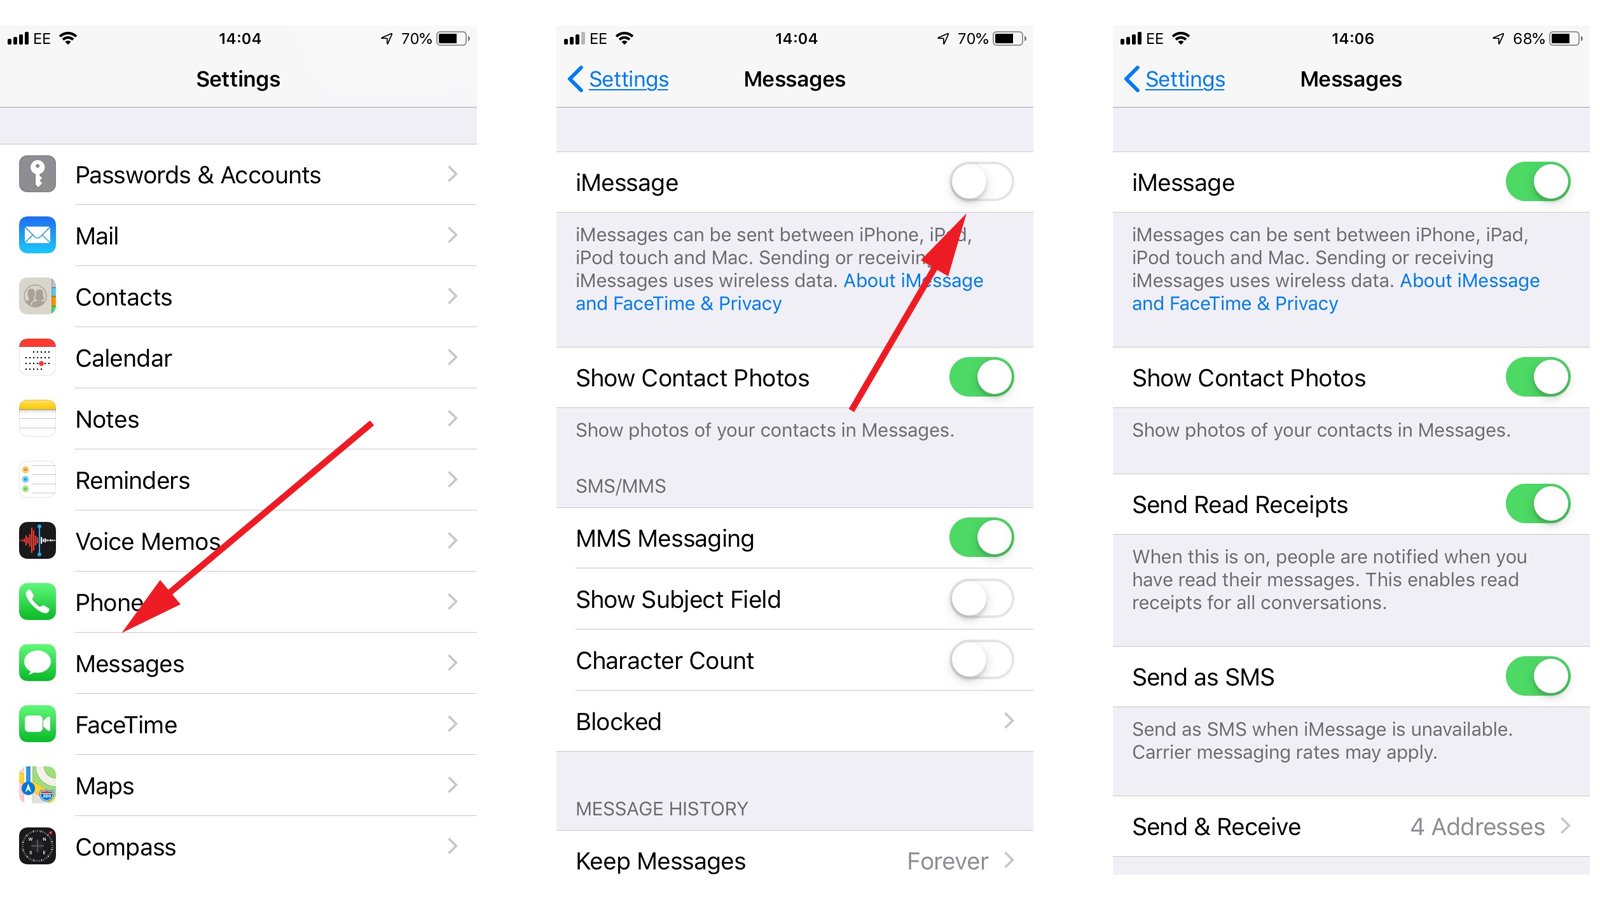
- Open the “Settings” app on your iPhone or iPad.
- Scroll down and tap on “Messages.”
- In the Messages settings, toggle the switch next to “iMessage” to turn it on. The switch should turn green, indicating that iMessage is now activated.
Once activated, your device will automatically use iMessage whenever possible to send messages to other iMessage users. It will seamlessly switch between SMS and iMessage depending on the recipient’s device and network availability.
Now that you have successfully activated iMessage, you can start enjoying all the features it offers, including read receipts, typing indicators, and the ability to send messages over Wi-Fi and cellular data. It’s a convenient way to stay connected and communicate with friends and family without incurring any additional messaging charges.
Step 2: Link Apple ID
In order to fully utilize the iMessage feature on your iOS device, you need to link your Apple ID to your iMessage account. This ensures that your messages are synced across all your Apple devices, allowing you to seamlessly send and receive messages from your iPhone, iPad, and Mac.
Linking your Apple ID to iMessage also enables additional functionalities, such as syncing your contacts, iCloud backups, and iCloud storage for media shared through iMessage. To link your Apple ID, follow the steps below:
- Open the “Settings” app on your iOS device. It’s represented by the gear icon.
- Scroll down and tap on “Messages.”
- Under the “iMessage” section, you will see a list of options. Look for the “Send & Receive” option and tap on it.
- You will see your Apple ID displayed at the top of the screen.
- If you are not signed in, tap on the “Sign In” option and enter your Apple ID and password. If you don’t have an Apple ID, tap on the “Create New Apple ID” option and follow the on-screen instructions to create one.
- After signing in, you will see a list of phone numbers and email addresses linked to your Apple ID. These are the contact methods where you can receive iMessage messages.
- To add or remove contact methods, tap on the “Add Email” or “Add Phone Number” options, or toggle the switches to enable or disable existing contact methods.
- Once you have linked your Apple ID and set up your contact methods, you can customize your iMessage settings further by configuring options like read receipts, message effects, and more.
Linking your Apple ID to iMessage is a crucial step in ensuring that your messages seamlessly sync across your devices. It also allows you to take advantage of additional features and functionalities that iMessage offers. By following the simple steps outlined above, you’ll be able to link your Apple ID to iMessage in no time.
Step 3: Verify Phone Number and Email
Verifying your phone number and email is an essential step to fully activate and use iMessages on your iOS device. By linking these contact details to your Apple ID, you can ensure a seamless messaging experience across all your Apple devices. Here’s how you can verify your phone number and email:
1. Open the Settings app on your iPhone: Locate the Settings app on your home screen and tap on it to launch the app.
2. Scroll down and tap on “Messages”: In the Settings menu, look for the “Messages” option and tap on it. This will open the Messages settings page.
3. Tap on “Send & Receive”: On the Messages settings page, you will find the “Send & Receive” option. Tap on it to proceed.
4. Add your phone number and email: Under the “You Can Be Reached By iMessage At” section, you will see your phone number and email addresses. Make sure that the phone number and email you want to use are listed here. If not, tap on “Add Another Email” or “Add Another Phone Number” to include them.
5. Verify your phone number: To verify your phone number, tap on it, and you will receive a confirmation code via SMS. Enter the code in the provided field to complete the verification process.
6. Verify your email: If you added an email address, an email will be sent to that address with a verification link. Open the email, click on the link, and your email will be verified.
7. Set message preferences: Once your phone number and email are verified, you can set your preferences for sending and receiving iMessages. You can choose which email addresses and phone numbers should be used to start new conversations and receive replies. You can also choose to enable or disable read receipts and control how messages appear on different devices.
By following these steps to verify your phone number and email, you will unlock the full potential of iMessages on your iOS device. Enjoy seamless and secure messaging with friends, family, and colleagues across all your Apple devices!
Step 4: Adjust Message Settings
Once you have activated iMessage and linked your Apple ID, the next step is to adjust the message settings to ensure a seamless and personalized messaging experience on your iOS device. Here’s how you can do it:
1. Open the “Settings” app on your iPhone or iPad.
2. Scroll down and tap on “Messages” from the list of available settings.
3. In the Messages settings, you will find various options to customize your messaging preferences. Let’s explore some of the key settings:
Send Read Receipts: By default, this setting is turned on, which means that the sender of a message will be notified when you have read their message. If you prefer not to send read receipts, you can toggle this setting off.
Text Message Forwarding: This setting allows you to receive and send SMS and MMS messages on your iPad, iPod touch, and Mac that are associated with your Apple ID. You can enable this feature by selecting the devices you want to enable message forwarding to.
MMS Messaging: Enable this setting if you want to send and receive multimedia messages, such as photos and videos, through the Messages app.
Filter Unknown Senders: This setting is useful in managing spam and unknown messages. When enabled, the Messages app will filter and sort messages from unknown senders into a separate tab.
Siri & Dictation: If you use Siri or dictate messages, this setting allows you to choose whether to allow Siri to access your message content for improved accuracy and voice recognition.
Blocked Contacts: At times, you may want to block certain contacts from messaging you. In the Messages settings, you can access the “Blocked Contacts” list and add the phone numbers or email addresses of the contacts you want to block.
4. After adjusting the desired message settings, you can now exit the Messages settings and start enjoying your fully customized messaging experience on your iOS device.
By taking a few moments to configure the message settings according to your preferences, you can enhance your messaging experience and make it more personalized and tailored to your needs. So, go ahead and explore the different options available and make the most out of your iMessage on your iPhone or iPad. Happy messaging!
Conclusion
In conclusion, setting up iMessages on your iOS device is a straightforward process that allows you to seamlessly communicate with friends and family using your Apple ID. By following the steps outlined in this guide, you can ensure that your iMessage settings are correctly configured and maximize the functionality of this powerful messaging platform.
Remember to enable iMessage in your device settings, sign in with your Apple ID, and tweak the options according to your preferences. Enjoy the benefits of sending text messages, photos, videos, and more, all within the iMessage ecosystem.
With iMessages at your fingertips, you can stay connected and engaged with your contacts, enhancing your communication experience on your iOS device. Whether you’re chatting one-on-one or participating in a group chat, iMessages offers a reliable and feature-rich messaging platform that keeps you connected with the people that matter most.
So, go ahead and set up iMessages on your iOS device today to start enjoying the convenience and versatility of this powerful messaging tool.
FAQs
Q: Can I use iMessages on my Android phone?
A: No, iMessages is an exclusive messaging platform developed by Apple and is only available on Apple devices such as iPhones, iPads, and Macs.
Q: How do I set up iMessages on my iPhone?
A: Setting up iMessages on your iPhone is simple. Just follow these steps:
- Go to the Settings app on your iPhone.
- Scroll down and tap on “Messages”.
- Toggle the iMessage switch to turn it on.
- You may be prompted to sign in with your Apple ID or create a new one.
- Once signed in, you can customize your iMessage settings and start using the iMessages app.
Q: Can I use iMessages on multiple Apple devices?
A: Yes, you can use iMessages on multiple Apple devices. To set up iMessages on additional devices:
- Go to the Settings app on the device you want to add.
- Tap on “Messages”.
- Toggle the iMessage switch to turn it on.
- Sign in with the same Apple ID used on your other devices.
- Your messages will sync across all your Apple devices.
Q: Can I send SMS messages with iMessages?
A: Yes, iMessages can send both iMessages (blue bubbles) and SMS messages (green bubbles). iMessages will be sent when the recipient has an active internet connection, whereas SMS messages will be used when the recipient does not have iMessage or an internet connection.
Q: How do I know if my message was sent as an iMessage or SMS?
A: When you send a message through iMessages, the text bubble will appear blue. If it appears green, it means the message was sent as an SMS.