
Are you wondering how to attach a photo to an email on your iPhone? Well, you’re in luck! In this article, we will walk you through the step-by-step process of attaching photos to your emails using your iPhone. Whether you want to send photos of a memorable vacation, share a funny picture with friends, or include an image in a work-related communication, we’ve got you covered.
Attaching photos to emails on an iPhone is a simple and quick process that can be done in just a few taps. We will guide you through the native Mail app on your iPhone, as well as alternative methods using third-party email apps. So, grab your iPhone, follow our instructions, and start sending those photos with ease!
Inside This Article
- How To Attach A Photo To Email On iPhone
- Option 1: Attaching a Photo from the Photos App
- Option 2: Attaching a Photo from the Mail App
- Option 3: Attaching a Photo from the Files App
- Option 4: Attaching a Photo from the Notes App
- Conclusion
- FAQs
How To Attach A Photo To Email On iPhone
Sending photos through email is a common task for iPhone users. Whether you want to share a memorable moment captured on your iPhone camera or send an important document, attaching photos to an email is quick and easy. In this guide, we will walk you through three different methods to attach a photo to an email on your iPhone. Let’s get started!
Method 1: Attaching a Photo from the Photos App
The first method involves attaching a photo directly from the Photos app on your iPhone.
- Open the Photos app on your iPhone.
- Navigate to the album or photo that you want to attach to your email.
- Tap on the photo to open it.
- Tap on the Share icon, which looks like a square with an arrow pointing upwards.
- From the Share menu, select “Mail”.
- A new email draft will open with the selected photo attached. Enter the recipient’s email address, add a subject, and write your message.
- Tap on the “Send” button to send your email with the attached photo.
Method 2: Attaching a Photo from the Mail App
If you prefer to compose your email first and then attach a photo, you can use this method:
- Open the Mail app on your iPhone.
- Tap on the “Compose” button to create a new email.
- Enter the recipient’s email address, add a subject, and write your message.
- Tap and hold in the body of the email until the contextual menu appears.
- Tap on the right arrow in the menu to access the option to insert a photo or video.
- Select “Choose Existing Photo” if the photo you want to attach is already in your Photos app, or select “Take Photo or Video” to capture a new photo.
- Once you have selected or taken the photo, it will be inserted into your email.
- Tap on the “Send” button to send your email with the attached photo.
Method 3: Attaching a Photo from the Files App
If your photo is saved in a different location, such as the Files app or a cloud storage service, you can use this method to attach it to your email:
- Open the Files app on your iPhone.
- Navigate to the location where your photo is saved. This could be in the “Recents” folder, a specific folder, or a cloud storage service.
- Tap and hold on the photo to select it.
- Tap on the “More” button (represented by three dots) in the top-right corner of the screen.
- Select “Share” from the menu.
- Tap on the “Mail” option.
- A new email draft will open with the selected photo attached. Enter the recipient’s email address, add a subject, and write your message.
- Tap on the “Send” button to send your email with the attached photo.
Now you know three different methods to attach a photo to an email on your iPhone. Whether you want to share a picture or send an important document, these methods will make sure your photos are attached seamlessly. Start attaching those memories and sharing them with your loved ones!
Option 1: Attaching a Photo from the Photos App
The Photos app on your iPhone is a convenient way to manage and organize your photos. It also allows you to easily attach photos to your emails. Here’s how you can do it:
1. Open the Photos app on your iPhone.
2. Browse through your albums or tap on “Photos” at the bottom to view all your photos.
3. Find the photo you want to attach to your email and tap on it to open it.
4. Once the photo is open, tap on the share icon at the bottom left corner of the screen.
5. A menu will appear with various sharing options. Scroll through the options and tap on “Mail”.
6. The Mail app will open with your selected photo attached to a new email. Enter the recipient’s email address, subject, and any additional text you want to include in the body of the email.
7. Once you have composed your email, tap on the “Send” button at the top right corner of the screen to send the email with the attached photo.
That’s it! You have successfully attached a photo from the Photos app to an email on your iPhone.
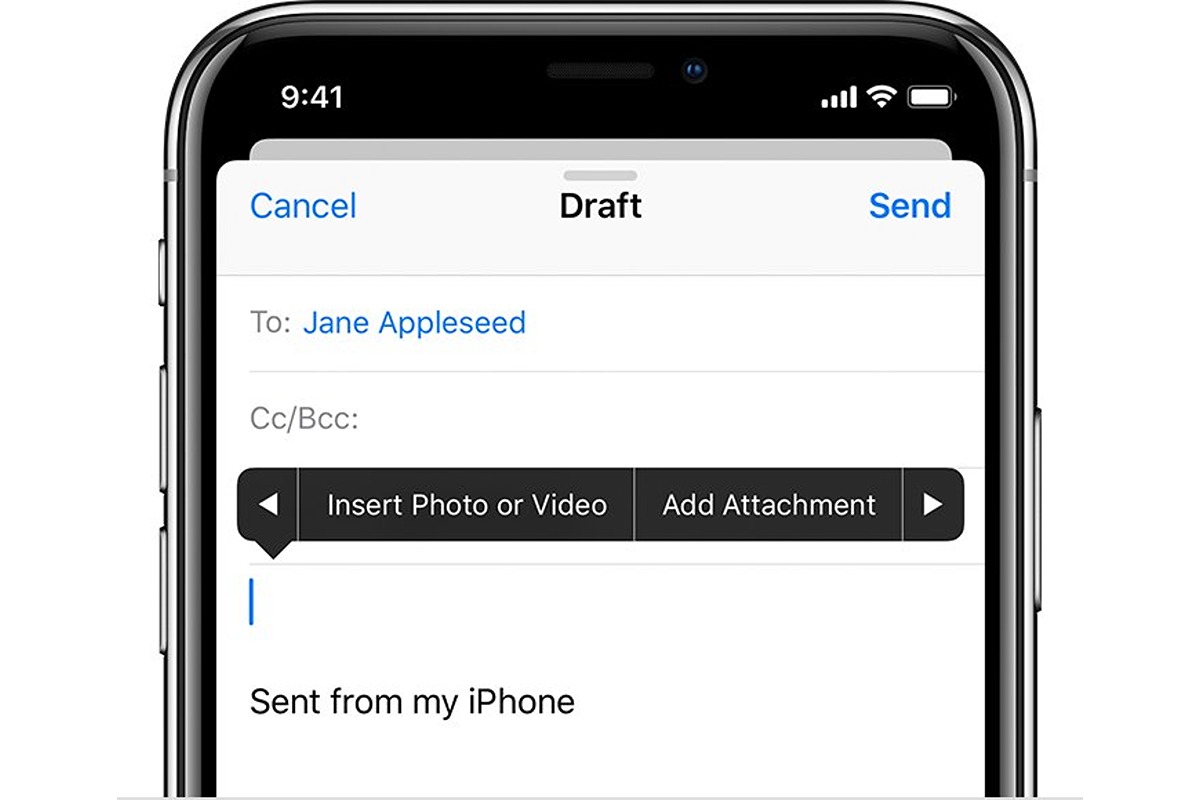
Option 2: Attaching a Photo from the Mail App
Attaching a photo to an email using the Mail app on your iPhone is a straightforward process. Follow these steps:
- Open the Mail app on your iPhone by tapping on its icon. The Mail app usually comes pre-installed on your device.
- Tap on the “Compose new email” button, which is usually represented by a pencil and paper icon located in the bottom right corner of your screen.
- In the new email message, enter the recipient’s email address in the “To” field.
- Add a subject for your email in the “Subject” field. This step is optional, but it can help the recipient understand the purpose of your email.
- Tap on the body of the email to bring up the keyboard.
- Position the cursor where you want to insert the photo.
- Tap on the arrow icon in the toolbar above the keyboard. This will bring up the menu options.
- From the menu options, tap on the “Insert Photo or Video” button. It looks like a camera icon.
- The Photos app will open, allowing you to choose the photo you want to attach. Navigate through your albums and tap on the photo you wish to attach.
- After selecting the photo, the Mail app will return you to the email composition screen with the attached photo displayed.
- Continue composing your email, adding any text or additional attachments if necessary.
- When you are ready to send the email, tap on the Send button, usually represented by an arrow pointing upwards.
That’s it! The photo is now attached to your email, ready to be sent to the recipient’s inbox.
Using the Mail app to attach a photo offers a convenient way to share images with others directly from your iPhone. Whether it’s a memorable moment captured on the go or an important document, you can easily add visuals to your emails using this method.
Option 3: Attaching a Photo from the Files App
If you have a photo saved in the Files app on your iPhone, you can easily attach it to an email. The Files app allows you to organize and access files stored locally or in cloud services like iCloud Drive, Dropbox, and Google Drive. Here’s how you can attach a photo from the Files app to an email on your iPhone:
1. Open the Mail app on your iPhone and start composing a new email.
2. Tap and hold in the body of the email until the contextual menu appears.
3. Select the “Insert Photo or Video” option from the menu.
4. In the Files app, navigate to the location where your photo is saved. You can select a file from the local storage or any cloud service you have connected.
5. Tap on the photo you want to attach. You can also select multiple photos by tapping on each one.
6. Once you have selected the photo(s), tap the “Choose” or “Insert” button, depending on the version of iOS you are using.
7. The selected photo(s) will be inserted into your email as attachments. You can add a subject, recipient, and additional text to your email, and then send it as usual.
Attaching a photo from the Files app is a convenient way to send files saved in different locations. Whether it’s a picture stored locally or on a cloud service, you can easily include it in your email using this method.
Option 4: Attaching a Photo from the Notes App
If you prefer using the Notes app to compose your email, you’ll be happy to know that it’s also possible to attach photos directly from the app. This method offers a convenient way to gather all your thoughts, add photos, and send them together in one seamless process.
To attach a photo from the Notes app, follow these steps:
- Open the Notes app on your iPhone.
- Select the note you want to attach the photo to or create a new note.
- Tap the “+” button at the bottom of the screen to reveal a menu of options.
- From the menu, tap “Photo” to launch the photo picker.
- Select the photo you want to attach from your photo library. You can also take a new photo using the camera option in the picker.
- Tap “Choose” to select the photo.
- The selected photo will now be inserted into your note.
- Tap the share icon within the note, usually represented by a square with an arrow pointing outwards.
- From the share menu, tap “Mail” to open a new email with the note contents and the attached photo.
- Proceed to fill in the recipient’s email address, subject, and any additional message you want to include.
- Tap “Send” to send the email with the attached photo from the Notes app.
Attaching a photo from the Notes app is a simple and efficient way to share visuals along with your email content. Whether you’re sending a quick snapshot or a collection of images, this method allows you to curate your email and add a personal touch.
Conclusion
In conclusion, attaching a photo to an email on your iPhone is a simple and straightforward process that can be done in just a few steps. Whether you want to send a memorable moment or share important documents, the iPhone’s email functionality allows you to easily attach photos and send them to your desired recipients with ease.
By following the steps outlined in this article, you can confidently attach photos to your emails on your iPhone and share them with friends, family, or colleagues. Remember to consider the file size of the photos you want to attach to ensure a smooth sending process.
With the ability to attach photos and other files, your iPhone becomes a powerful tool for communication and sharing. So the next time you need to send a photo via email, you can do it like a pro on your iPhone!
FAQs
1. How do I attach a photo to an email on my iPhone?
To attach a photo to an email on your iPhone, follow these steps:
- Open the Mail app on your iPhone and compose a new email.
- In the body of the email, tap on the screen to bring up the editing menu.
- Tap the arrow button to access the additional options.
- Choose ‘Insert Photo or Video’ from the menu.
- Select the photo you wish to attach from your iPhone’s photo library.
- Tap “Choose” to insert the photo into the email.
- Finally, you can add a caption or description if desired and send the email as usual.
2. Can I attach multiple photos to an email on my iPhone?
Yes, you can attach multiple photos to an email on your iPhone by following these steps:
- Open the Mail app on your iPhone and compose a new email.
- In the body of the email, tap on the screen to bring up the editing menu.
- Tap the arrow button to access the additional options.
- Choose ‘Insert Photo or Video’ from the menu.
- Select multiple photos from your iPhone’s photo library by tapping on each photo.
- Tap “Choose” to insert all the selected photos into the email.
- You can add captions or descriptions to each photo if desired.
- Once you have selected all the desired photos, send the email as usual.
3. Can I send full-resolution photos in an email on my iPhone?
By default, the Mail app on iPhone will automatically resize photos to a smaller resolution when attached to an email. This is done to reduce the file size and make it quicker to send and receive emails. However, you have the option to send the original full-resolution photo if desired. To do this, follow these steps:
- Open the Settings app on your iPhone.
- Scroll down and tap on ‘Mail’.
- Under the ‘Compose’ section, tap on ‘Include Attachments’.
- Select the ‘Actual Size’ option to send full-resolution photos in your emails.
4. Are there any limits to the size of the photos I can attach to an email on my iPhone?
Yes, there are limitations to the size of the photos you can attach to an email on your iPhone. Most email providers have a maximum size limit for attachments to prevent large files from congesting the recipient’s inbox. The size limit can vary depending on the email service you are using. Generally, it is recommended to resize or compress your photos before attaching them to an email to ensure they are within the acceptable size range. There are also alternative methods for sending large files, such as using cloud storage services or file-sharing platforms.
5. Can I attach photos from third-party apps to an email on my iPhone?
Yes, you can attach photos from third-party apps to an email on your iPhone. Many apps, such as social media platforms, photo editing apps, and cloud storage services, allow you to share photos directly from within the app to the Mail app. Simply open the third-party app, select the photo you wish to share, and choose the option to share via email. This will open a new email in the Mail app with the photo already attached. From there, you can add recipients, subject, and any additional content before sending the email.