
Are you tired of searching through a cluttered desktop on your Mac to find the files you need? The good news is that you can create smart folders to organize and simplify your file management process. By setting up smart folders, you can automatically gather and store files based on specific criteria, making it easier to locate and access them whenever you need to. Whether you want to group your documents by file type, sort them by date, or organize them by keyword, creating a smart folder on your Mac is an effective way to streamline your workflow. In this article, we will guide you through the simple steps to create a smart folder on a Mac, helping you stay organized and efficient in a digitally demanding world.
Inside This Article
- Overview
- Step 1: Accessing Finder Preferences
- Step 2: Creating a New Smart Folder
- Step 3: Customizing Smart Folder Criteria
- Step 4: Saving and Managing Smart Folders
- Conclusion
- FAQs
Overview
Creating a Smart Folder on a Mac is a powerful way to organize and access your files more efficiently. Smart Folders are dynamic folders that automatically update based on specific criteria you define. They provide a convenient way to quickly locate files and documents that meet certain conditions, such as file type, date modified, or file name.
By creating a Smart Folder, you can save time and effort when searching for files on your Mac. Instead of manually sorting and filtering files, the Smart Folder does the work for you, presenting all relevant files in one place.
In this article, we will guide you through the process of creating a Smart Folder on a Mac. We’ll show you how to access Finder preferences, create a new Smart Folder, customize the criteria, and manage your Smart Folders effectively.
So, let’s dive in and discover how easy it is to create and utilize Smart Folders on your Mac!
Step 1: Accessing Finder Preferences
When it comes to customizing your Mac’s Finder to suit your needs, accessing Finder Preferences is the first step. Finder Preferences allows you to make changes to the way files and folders are displayed and organized on your Mac. Here’s how you can easily access Finder Preferences:
1. Start by opening a new Finder window. You can do this by clicking on the Finder icon located in the Dock, which is the icon with a smiley face.
2. With the Finder window open, look at the top left corner of your screen. In the menu bar, you will see the word “Finder” listed, next to the Apple logo. Click on the word “Finder” to bring down a drop-down menu.
3. In the drop-down menu, locate and click on the option that says “Preferences”. This will open up the Finder Preferences window.
4. Alternatively, you can also access Finder Preferences by pressing the Command key and comma (,) on your keyboard simultaneously. This keyboard shortcut will instantly open the Finder Preferences window.
Once you have successfully accessed the Finder Preferences window, you are now ready to move on to the next step and create a new smart folder.
Step 2: Creating a New Smart Folder
Now that you have accessed Finder Preferences, you are ready to create a new smart folder on your Mac. This feature allows you to gather files that meet specific criteria, making it easier to organize and access your data.
To create a new smart folder, simply follow these steps:
- Click on the File menu in the Finder menu bar.
- Select New Smart Folder. A new Finder window will open with the search criteria options.
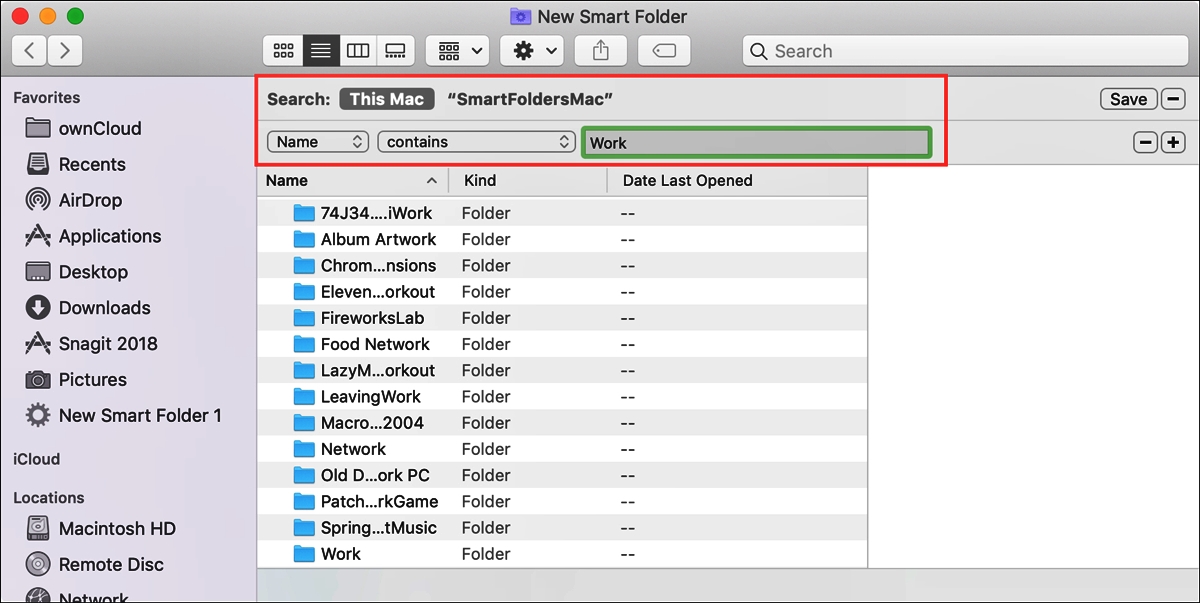
- In the top-right corner of the Finder window, you will see a search bar with a series of options next to it. These options include “Kind,” “Last Opened Date,” “Created Date,” and more. These criteria help you filter and narrow down the search results for your smart folder.
- Click on the “+” button next to the search bar to add your first criteria.
- A drop-down menu will appear, allowing you to select a search attribute. For example, you can choose “Name,” “File Extension,” or “Kind” to specify the type of files you want to include in your smart folder.
- After selecting your attribute, you can then choose how you want it to be compared. Options include “contains,” “is,” “is not,” and more.
- Enter the value or keyword you want to search for in the text box next to the attribute and comparison options. This will define the specific files that will be included in your smart folder.
- Repeat steps 4 to 7 to add additional criteria if needed.
- Once you have set up all the criteria for your smart folder, click on the “Save” button in the top-right corner of the Finder window.
- A pop-up window will appear, allowing you to give your smart folder a name and specify where you want to save it. Choose a name that reflects the purpose or theme of the smart folder, and select the desired location for it on your Mac.
- Click on the “Save” button to create the smart folder. It will now appear in the sidebar of your Finder window, making it easily accessible whenever you need to access the specific group of files.
Congratulations! You have successfully created a new smart folder on your Mac. You can now enjoy the convenience of having your files organized based on specific search criteria. Smart folders are a powerful tool for enhancing your productivity and efficiency, especially when dealing with large amounts of data on your computer.
Continue to the next step to learn how to customize the criteria for your smart folder and refine the search results even further.
Step 3: Customizing Smart Folder Criteria
Once you have created a new Smart Folder on your Mac, the next step is to customize its criteria. This will allow you to specify the exact files and folders that should appear in the Smart Folder based on specific conditions or attributes.
To customize the criteria of a Smart Folder, follow these steps:
- With the Smart Folder selected, click the “File” menu in the top menu bar and choose “Show Search Criteria”. Alternatively, you can use the keyboard shortcut Command + Option + S.
- A new window will appear, displaying the current search criteria for the Smart Folder. Here, you can add, remove, or modify the criteria to suit your needs.
- Click the “+” button to add a new criterion. This will open a dropdown menu with various search options, such as file name, kind, date modified, and more.
- Select the desired criterion from the dropdown menu. For example, if you want to create a Smart Folder that displays all images, choose “Kind” from the dropdown menu.
- Depending on the criterion you selected, additional options may appear. For example, if you selected “Kind,” you can specify the file type, such as JPEG or PNG.
- Once you have set the desired criterion, click the “Add” button to add it to the Smart Folder. You can add multiple criteria to further refine the search.
- You can also remove a criterion by clicking the “-” button next to it or modify the criteria by clicking on it and selecting a different search option.
- After customizing the criteria to your satisfaction, click the “Save” button in the top right corner of the window.
- Give your Smart Folder a name and choose its location. By default, the Smart Folder will be saved in the “Saved Searches” folder within your user library, but you can choose a different location if desired.
- Click the “Save” button once again to save your changes and exit the search criteria window.
By customizing the criteria of your Smart Folder, you can create a powerful and tailored search tool that helps you find exactly what you’re looking for on your Mac.
Step 4: Saving and Managing Smart Folders
Once you have customized your smart folder with the desired criteria, it’s time to save and manage it. Saving and managing smart folders on a Mac is a simple process that allows you to easily access and organize your files.
To save your smart folder, follow these steps:
- Click on the “Save” button located at the top right corner of the smart folder window.
- A “Save Smart Folder” dialogue box will appear.
- Choose the location where you want to save the smart folder.
- Enter a descriptive name for the smart folder in the “Save As” field.
- Click on the “Save” button to save the smart folder.
Once you have saved the smart folder, you can easily access it from the Finder sidebar or by using Spotlight search. Simply click on the smart folder’s name to view the files that meet the specified criteria.
If you need to manage your smart folders, you have several options:
- To rename a smart folder, right-click on the smart folder and select “Rename” from the context menu. Enter the new name and press Enter.
- To delete a smart folder, right-click on the smart folder and select “Move to Trash” from the context menu. Alternatively, you can select the smart folder and press Command+Delete.
- To edit the criteria of a smart folder, right-click on the smart folder and select “Show Search Criteria” from the context menu. Make the necessary changes and click on the “Done” button to save the changes.
By saving and managing your smart folders effectively, you can easily organize and access your files on your Mac. Whether you use smart folders for work, personal files, or organizing your photo collection, the ability to quickly find and manage files can greatly enhance your productivity and efficiency.
Conclusion
Creating a Smart Folder on a Mac is a simple and effective way to organize your files and improve your productivity. By following the steps outlined in this guide, you can easily set up Smart Folders tailored to your specific needs.
Smart Folders offer a convenient way to access and manage files that meet specific criteria, allowing you to quickly find and work with relevant documents. Whether you’re organizing your photos, music, or work files, Smart Folders can save you time and effort.
By taking advantage of the powerful search capabilities and customizable options that Smart Folders offer, you can streamline your workflow and keep your files organized. Whether you’re a student, professional, or casual computer user, integrating Smart Folders into your Mac experience can make a significant difference in your productivity and efficiency.
So why wait? Start creating Smart Folders on your Mac today and experience the benefits of having a clutter-free and well-organized digital workspace.
FAQs
FAQ 1: Can I Create a Smart Folder on a Mac?
Yes, you can easily create a Smart Folder on a Mac. Smart Folders are a great way to organize your files and quickly access specific content based on search criteria.
FAQ 2: How Do I Create a Smart Folder on a Mac?
To create a Smart Folder on a Mac, follow these simple steps:
- Open the Finder application on your Mac.
- Go to the File menu and select “New Smart Folder” or use the keyboard shortcut Command + Option + N.
- A new Finder window will open with the Smart Folder options panel.
- Define your search criteria by selecting the desired parameters such as file name, file type, date modified, and more.
- Click the “+” button to add additional search criteria.
- Once you’ve set your desired search filters, click the “Save” button to create the Smart Folder.
- Give your newly created Smart Folder a name and choose where you want to save it.
- The Smart Folder will now appear in the sidebar of your Finder window, providing easy access to all files that match your search criteria.
FAQ 3: Can I Edit the Search Criteria of a Smart Folder?
Yes, you can easily edit the search criteria of a Smart Folder. Simply right-click on the Smart Folder in the sidebar of your Finder window and select “Show Search Criteria”. This will open the Smart Folder options panel, allowing you to modify the search criteria as needed.
FAQ 4: Can I Delete a Smart Folder?
Yes, you can delete a Smart Folder when you no longer need it. Right-click on the Smart Folder in the sidebar of your Finder window and select “Remove from Sidebar”. This will remove the Smart Folder from your sidebar, but the actual Smart Folder file will still remain in its original location on your Mac. If you want to completely delete the Smart Folder file, you can do so by moving it to the Trash and emptying the Trash.
FAQ 5: Can I Customize the Display of a Smart Folder?
Yes, you can customize the display of a Smart Folder. Right-click on the Smart Folder in the sidebar of your Finder window and select “Show View Options”. This will open a panel where you can customize the appearance of the Smart Folder, including the icon size, grid spacing, sort order, and more. You can also choose to display the Smart Folder as a list or in columns, depending on your preference.