
Are you looking for information on how to delete your Facebook business page on mobile? Well, you’ve come to the right place! In this article, we will guide you through the step-by-step process of deleting your Facebook business page directly from your mobile device.
Facebook provides a convenient and user-friendly platform for businesses to connect with their customers and promote their products or services. However, there may come a time when you no longer need your business page and want to remove it from your mobile device.
Deleting a Facebook business page on mobile can be a bit tricky, as the options and settings may vary slightly depending on the operating system of your device. But don’t worry, we will cover the instructions for both iOS and Android devices, ensuring that you can confidently delete your Facebook business page with ease.
Inside This Article
- Step 1: Open the Facebook app
- Step 2: Go to your Facebook business page
- Step 3: Access the Settings menu
- Step 4: Locate the General section
- Step 5: Choose the “Remove Page” option
- Step 6: Confirm the deletion
- Step 7: Provide feedback (optional)
- Conclusion
- FAQs
Step 1: Open the Facebook app
Deleting a Facebook business page on a mobile device is a straightforward process. To begin, you need to open the Facebook app on your mobile device. Whether you have an Android or iOS device, you can easily find and launch the Facebook app from your home screen or app drawer.
Once you have located the Facebook app, tap on it to open it. The app will load, and you will be directed to the Facebook login page if you are not already logged in. Enter your login credentials and tap on the “Log In” button to access your Facebook account.
After successfully logging into your Facebook account, you will be taken to your News Feed. From here, you can navigate to your Facebook business page, which is the page you want to delete. The process to access your business page may vary depending on the version of the Facebook app you are using.
Typically, Facebook provides easy access to your business page by including it in the “Explore” or “Pages” section of the app. Look for a dedicated section where you can find all the pages you manage. Tap on the appropriate section to proceed.
Step 2: Go to your Facebook business page
Once you have opened the Facebook app on your mobile device, the next step is to go to your Facebook business page. To do this, tap on the menu icon (usually three horizontal lines) located at the top right corner of the screen. This will open the navigation menu.
Scroll down the menu until you see the “Pages” tab. Tap on it to access your Facebook business pages. If you have multiple pages, they will be listed here. Simply choose the one you want to delete.
Alternatively, you can also search for your business page by typing its name in the search bar located at the top of the menu. The search results will display all related pages, and you can select your business page from there.
Once you have found your business page, tap on it to open it. You will now be on your Facebook business page dashboard, where you can manage all aspects of your page.
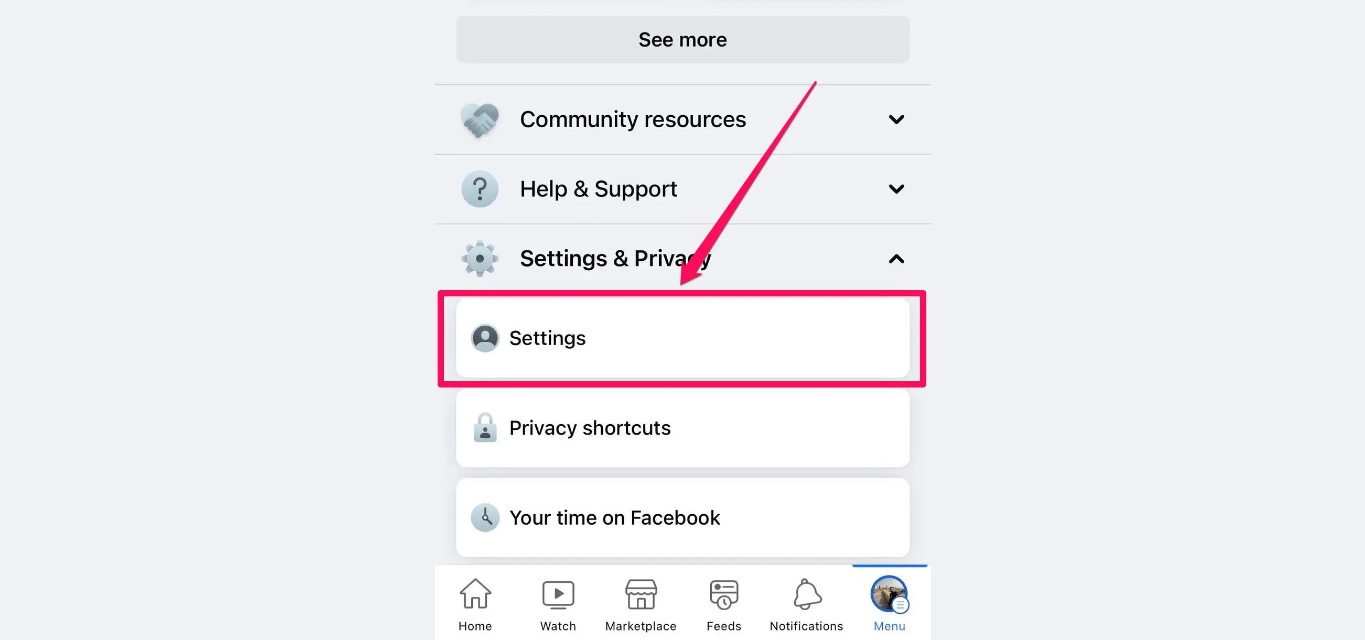
Step 3: Access the Settings menu
Once you’re on your Facebook business page, the next step is to access the Settings menu. This is where you’ll find all the customization options and controls for your page.
To access the Settings menu, look for the three dots (…) usually located at the top-right corner of your screen. Give it a tap, and a drop-down menu will appear with various options.
Scroll through the menu until you find the option labeled “Settings”. It is usually located towards the bottom of the list. Tap on it to proceed.
Once you’re in the Settings menu, you’ll see a range of options that allow you to customize and manage your Facebook business page. From here, you can make changes to your page’s privacy settings, notifications, page roles, and much more.
Take your time to explore the various settings available and familiarize yourself with the options. It’s important to have a clear understanding of the settings before proceeding with any changes or deletions.
Now that you have successfully accessed the Settings menu, you’re ready to move on to the next step in deleting your Facebook business page.
Step 4: Locate the General section
After accessing the Settings menu, the next step is to locate the General section. This section contains various options and settings related to your Facebook business page. To find it, you need to scroll down the settings menu until you see the section titled “General”.
Once you have located the General section, you can tap on it to expand the options within. Here, you will find important settings such as page visibility, page name, username, and more. It’s worth noting that the exact layout and options may vary slightly depending on the version of the Facebook app you are using, but the General section should be easily identifiable.
Within the General section, you may need to scroll further to find the specific option to delete your business page. Sometimes, this option might be labeled as “Remove Page” or something similar. Take your time to carefully navigate through the different settings options within the General section until you find the option you are looking for.
It’s important to remember that deleting a Facebook business page is a permanent action and cannot be undone. Therefore, make sure you are certain about your decision before proceeding. If you are unsure or want to take a break from managing your page, you can consider disabling it temporarily instead of deleting it.
Step 5: Choose the “Remove Page” option
Once you have accessed the General section of your Facebook business page, you will find a list of options related to your page’s settings. Scroll down until you locate the “Remove Page” option. This is the critical step that will initiate the process of deleting your Facebook business page.
Before proceeding with the deletion, it’s important to note that this action is irreversible. Once you remove your Facebook business page, you will lose all the content, photos, videos, and followers associated with it. Therefore, it is crucial to assess whether deleting your page is the appropriate decision for your business.
If you’ve carefully considered your decision and are certain that you want to proceed with removing your page, click on the “Remove Page” option. Facebook may prompt you with a notification or warning message, reminding you about the consequences of deleting your page. Be sure to read and understand the message before proceeding.
Facebook may also require you to reconfirm your identity by entering your password. This extra layer of security ensures that the page is being deleted by the rightful owner. Once you’ve entered your password, click on the confirmation button to proceed.
It’s important to note that the “Remove Page” option may not be immediately visible in the General section for all users. If you don’t see this option, try accessing it through the “Settings” menu or the “Page Info” section of your Facebook business page. Facebook occasionally updates its interface, so the exact location of the “Remove Page” option may vary over time.
After confirming the deletion, Facebook will begin the process of permanently removing your business page. This may take some time, and during this period, your page will be inaccessible to others. Once the page has been successfully deleted, you will receive a notification from Facebook confirming the removal.
Remember, deleting your Facebook business page should be a carefully considered decision. Make sure to back up any important content and inform your followers or customers before proceeding with the deletion. It’s also recommended to explore alternative options for preserving your online presence, such as redirecting your audience to a new website or social media platform.
Step 6: Confirm the deletion
Once you have made the decision to delete your Facebook business page, the next step is to confirm the deletion. It is important to note that this action is irreversible, so be sure that this is the course of action you want to take.
When you are in the Settings menu of your Facebook business page, scroll down until you find the “Remove Page” option. Tap on it to proceed with the deletion process.
A confirmation message will appear, asking if you are sure you want to delete your page. This is the final checkpoint to ensure that you do not delete your page by accident. Take a moment to review your decision before proceeding.
If you are ready to proceed, tap on the “Delete” button to confirm the deletion of your Facebook business page.
Facebook may ask for your password as an additional security measure to prevent unauthorized deletion of your page. Enter your password if prompted, and then tap on the “Confirm” button to finalize the deletion.
Once confirmed, your Facebook business page will be permanently deleted. All the content, photos, videos, and posts associated with the page will be removed and cannot be recovered. Make sure to back up any important data before proceeding with the deletion.
Deleting your Facebook business page may take some time to process. You may receive a notification indicating that the deletion is in progress. Once the deletion is complete, you will no longer have access to the page and it will no longer be visible to others.
Step 7: Provide feedback (optional)
After deleting your Facebook business page, you have the option to provide feedback on your experience. This step is completely optional, but it can be helpful in letting Facebook know your reasons for deleting the page and any suggestions for improvement.
To provide feedback, follow these steps:
- On the confirmation screen for deleting your page, you will see a section labeled “Tell us why you’re deleting this Page” or something similar.
- Tap on the text box provided to enter your feedback.
- You can share your reasons for deleting the page, such as lack of engagement, changing business priorities, or any other relevant factors.
- If you have any suggestions for Facebook to improve its platform or features, you can include them as well.
Remember, providing feedback is optional, and you can choose to skip this step if you prefer. However, if you believe that your feedback can help Facebook enhance their services, it’s worth taking a moment to share your thoughts.
Once you’re done entering your feedback, you can either proceed to submit it or simply close the window. Your feedback will be sent to Facebook for review and consideration.
Keep in mind that providing feedback does not impact the deletion of your Facebook business page. Regardless of whether you choose to provide feedback or not, your page will be permanently removed from the platform.
Providing feedback is an opportunity to express your thoughts and contribute to the ongoing improvements of Facebook. Whether it’s expressing your satisfaction or highlighting areas for enhancement, your feedback can help shape the future of the platform.
Now that you’ve completed the steps to delete your Facebook business page and provided any optional feedback, you can rest assured that your page is no longer active and visible on the platform.
Conclusion
Deleting a Facebook business page on your mobile device is a simple and straightforward process. By following a few steps, you can remove your page and free up your resources for other opportunities. With the increasing importance of mobile devices in our daily lives, it’s essential to have the ability to manage our social media accounts on the go.
Whether you’re looking to rebrand your business, shift your focus, or simply want to close your page, knowing how to delete your Facebook business page on mobile can save you time and effort. Remember to consider any potential consequences such as losing your page followers and the content associated with your page.
Once you’ve made the decision to delete your Facebook business page, simply navigate to the settings menu, locate the page you want to delete, and follow the prompts. With the information provided in this guide, you can confidently take control of your online presence and make the necessary adjustments to align with your business goals.
So why wait? Take the necessary steps to remove your Facebook business page on mobile today and move forward with your digital strategy.
FAQs
1. Can I delete my Facebook business page from my mobile device?
Yes, you can delete your Facebook business page directly from your mobile device. Facebook has made it convenient for users to manage their pages on the go by providing mobile-friendly options for page administrators.
2. How do I delete my Facebook business page on my mobile device?
To delete your Facebook business page on your mobile device, follow these steps:
- Open the Facebook app on your mobile device and log in to your account.
- Navigate to your Facebook business page.
- Tap on the three-dot menu icon at the top right corner of the screen.
- Scroll down and tap on “Settings & Privacy”.
- Tap on “Settings”.
- Scroll down and select “Page Removal”.
- Tap on “Delete [Page Name]”.
- Follow the prompts to confirm the deletion of your Facebook business page.
3. What happens when I delete my Facebook business page?
When you delete your Facebook business page, it will be permanently removed from the platform. This means that all the content, posts, photos, and videos associated with your page will be deleted and cannot be recovered. Additionally, any followers or likes that your page had will also be lost.
4. Can I recover a deleted Facebook business page?
No, once you delete your Facebook business page, it cannot be recovered. Facebook does not provide an option to restore deleted pages, so it’s essential to be certain before proceeding with the deletion process.
5. Is there an alternative to deleting my Facebook business page?
If you no longer want to use your Facebook business page but want to keep your content and followers, you have the option to unpublish your page instead of deleting it. Unpublishing your page will make it inaccessible to the public, but you can still access it and restore its visibility at any time.