Your iPhone does not only aid you in getting your everyday tasks done. It also lets you call for help during an emergency. But what if you do not have the luxury of time to dial your emergency contacts or rescue services? That is where the Emergency SOS feature of an iPhone comes in handy.

Here we will help you get familiarized with Emergency SOS. This tutorial is great if you have not experienced using the feature yet or want to learn more about it.
Also read: How to Fix Emergency Calls Only Error on Any Phone
Inside This Article
Emergency SOS on iPhone, Explained
What is Emergency SOS, then? Upon seeing the feature’s name, you will have an idea of what it is for, but that is not the whole picture yet.
Emergency SOS is a built-in function on iPhones. That is not to say it is 100% configured already; you still have to do some things to finish setting it up. As long as it is configured properly or as you intended on your mobile device, it is ready to call local emergency numbers of services when prompted.
Because Apple knows that professional responders are not the only people you might need, Emergency SOS can notify your trusted contacts (relatives, guardians, or anyone you trust to extend a helping hand) about your situation. As a result, you can get help faster. Note that Emergency SOS uses your Health app’s registered contacts list for the said function to work.
How to Set Up Emergency SOS on iPhone
Now that you know what Emergency SOS on your iPhone is, it’s time for our walkthroughs. Here’s what you need to do beforehand so that you can experience all the perks of the feature when it works. Setting up Emergency SOS is not complicated, which is imperative given the feature’s use. Who wants something difficult to toggle or configure anyway?
Register Emergency Contacts on Health App
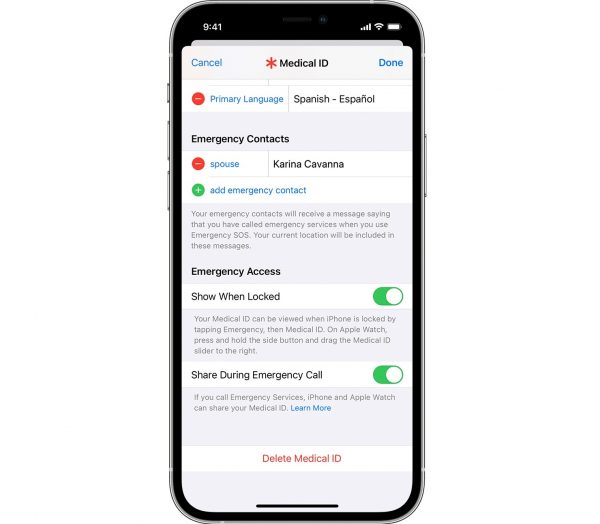
For Emergency SOS to fully work on an iPhone, you must register all the emergency contacts you think you need on your iPhone’s Health app. More than one person is better because nobody knows when someone might be busy to attend to your emergency. Furthermore, make sure that your prospect contacts are people you can expect to help. That gives you better chances to receive aid faster. Better yet, inform whoever they are that you set them as your emergency responders, so they can be alert and prepared for unexpected situations. With these relevant tips and reminders laid out, we will now explain the process of adding emergency contacts.
Follow these instructions:
1. Navigate to the Health app from your iPhone’s app dashboard.
2. On the app’s home interface, press your avatar.
3. Find and select the Medical ID option.
4. Hit the Edit button afterward.
5. Swipe your screen upwards until you see the Emergency Contacts section.

6. Hit the Add Emergency Contact option (plus icon), then select the specific iPhone contact to register.
7. On the interface you are seeing, specify your relationship with the registered contact (e.g. sibling, spouse, parent, etc.).
8. Press the Done button to confirm contact registration.
Also read: How to Transfer Contacts from iPhone to iPhone Easily
Check and Update Emergency Contact List Regularly
If you have mistakenly added and/or plan to remove someone from your emergency list, no need to fret. Deleting an emergency contact is possible and good for keeping your list accurate and up-to-date. Emergency contact removal is as fast as the registration process.
Do the following procedures:
1. Head to your Health app’s Emergency Contacts section.
*To find the section, you may just refer to the previous tutorial’s first five steps.
2. On your emergency contacts list, tap the name to remove.
3. Press the minus icon beside the entry to delete.
4. Confirm the action by hitting the Delete button.
5. Press Done afterward.
Guide to Using Emergency SOS on iPhone
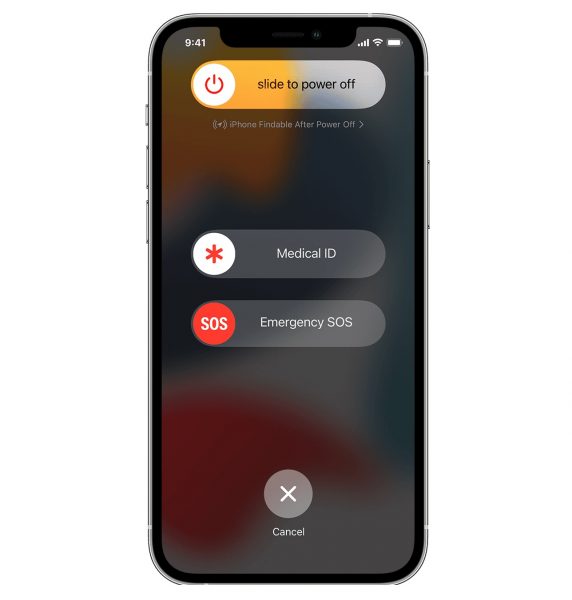
Done filling or updating your emergency contacts list? You’re ready to learn how to access the Emergency SOS interface of your iPhone. Do the following steps in case there is an emergency:
On iPhone 8 and Newer Models
1. Hold the side button and any of the volume rockers of your iPhone.
2. Release the buttons once the on-screen slider for Emergency SOS appears or keep on holding those.
3. Swipe the Emergency SOS slider (if you did the first option in Step 2) or wait for your iPhone to finish its on-screen countdown before releasing the buttons (if the second option).

4. Your iPhone should dial the local emergency number afterward.
On iPhone 7 and Older Models
1. Quickly press your iPhone’s side or top button five times (global) or three times (India).
2. Swipe the on-display Emergency SOS slider.
3. Your gadget should already be making the local emergency call for you.
Apple states that depending on your region, though, you might need to click the specific local emergency service you want to reach out to. Still, it’s good that some iPhone users can do away with an extra swipe or click. The button-holding method factors in that you might be unable to navigate your iPhone further during an emergency.
What about reaching your emergency contacts, you ask? Emergency SOS on iPhone already sends an SMS instantly to your registered relatives or emergency contacts once the local emergency service call is made. The message will indicate your present location, although your iPhone’s Location Services feature might be off. There is also a follow-up SMS that will be sent to your emergency contacts in case you have been moved to a different place, say, the nearest hospital or first-aid station. That’s another step already taken care of for you. Also, it is a better alternative to making your emergency contact persons manually locate you or teaching them how to find someone’s location via a cellphone number.
How to Reconfigure Emergency SOS Shortcut on iPhone
Sometimes, easy is not easy for everyone. If you think the default shortcut for triggering the Emergency SOS of your iPhone is still a bit tedious, worry not. It can be toggled, particularly in newer iPhones.
You can use Emergency SOS on your iPhone 8, X, 11, 12, or 13 like how it is done on the iPhone 7 and older versions.
Follow this quick guide:
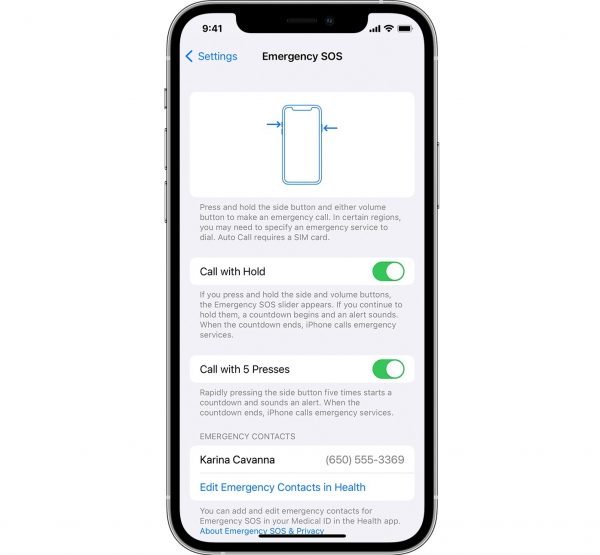
1. On your iPhone’s app dashboard, click the Settings icon.
2. Select Emergency SOS on the menu.

3. Swipe the slider beside Call With 5 Presses to enable the shortcut.
That’s it! Convenient, right? Once the slider you toggled becomes green, you can now trigger an Emergency SOS call on your iPhone by pressing the side button fast five times. Even if you have changed the shortcut, how the feature contacts your local emergency responders or contacts remains the same.
FAQs About Emergency SOS on iPhone

Because the tutorial part is over, you might have questions in mind you want to ask. So, we put an FAQs section here for you. Below are some of the usual queries Apple device users like you have regarding Emergency SOS.
1. Is Touch ID affected by using the feature?
Touch ID restricts your access to your iPhone right from the touchscreen by asking for your fingerprint. So, yes, it is affected by Emergency SOS. If you have used the feature’s shortcuts on your gadget (despite the call possibly not going through), Apple says you have to input your passcode to activate Touch ID again.
2. Can an Emergency SOS call be canceled?
Given that Emergency SOS is easy to use, accidental clicks to your shortcuts can likely happen. You don’t want to be the boy who cried “wolf” when no accident or danger is happening, right? So, know that it is possible to cancel an Emergency SOS call. You can do that by releasing the shortcut buttons before the countdown goes zero or tapping the on-screen Stop and Stop Calling buttons.
If it is too late and the call is already ongoing, explain to the responder politely that it was an accidental call. That is to not waste the responder’s time verifying your call and situation. That way, he or she can give attention to the people who really are needing immediate help. Once done, you can drop the call via the red phone icon.
3. Can location sharing for Emergency SOS be stopped?
As we have mentioned, Emergency SOS on iPhone sends your real-time coordinates to your responders. And the only way it could do that is to tap on the Location Services feature, which it can switch on by itself. However, not many users realize that Location Services is left activated after an emergency call unless they get notified by their iPhones. If you want to and can switch off Location Services even before the prompts, do so. Select the stop option for location sharing on the Emergency SOS status bar.
4. Is it possible to disable Emergency SOS on iPhone?
There is a workaround but no direct method to switch off Emergency SOS. That is by toggling the “Auto Call” and “Call With Side Button” sliders off. You already have an idea how to get to those sliders if you have read through all our tutorials here. Once done, there is no way you can accidentally press the shortcuts triggering Emergency SOS on your iPhone. In a way, it is already like switching off the feature completely.
5. Is Emergency SOS useable on other Apple devices?
As of this writing, Emergency SOS is also accessible on an Apple Watch. It is set up via the Watch app’s Emergency SOS interface. From there, you can toggle the “Hold Side Button to Dial” slider. Like on the iPhone, the feature is used via button shortcuts. To be more specific, by long-pressing your wearable’s side button. After that, there should be a mini version of the slider interface you’re used to — including the slider labeled Emergency SOS. If you don’t stop pressing, an on-screen countdown will appear. Whichever method you prefer, your Apple Watch will contact local responders and text everyone on your emergency list.
Note that only Apple Watches that are cellular can use Emergency SOS without a synced iPhone nearby or a WiFi network connection and WiFi Calling enabled.
6. Does Emergency SOS function when roaming?
Yes, the Emergency SOS on supported Apple devices works even if you are in a different region, but it has limited functionality. It can call the local service in the foreign country you are in but cannot transmit SMS to your registered contacts from the region you were originally from. If you have trustworthy friends or relatives in the place you are visiting, it is better to register them temporarily as emergency contacts.
7. What to do if Emergency SOS can’t be set up or has errors?
If you cannot add and remove your contacts for Emergency SOS, the feature has errors on its functions you can test. If it did not work during a past emergency, contact the Apple Support team. The experts in iOS troubleshooting can help get your iPhone’s functions up and running. You can either use the Apple Support app or the official website to chat with a customer representative and technician. You will find your problem disappearing in a breeze when you do. So, do not hesitate to ask for expert tips and solutions when necessary.
Emergency SOS is a Lifesaver
During emergencies, response time is a matter of life and death. That is why it is a must to set up your Emergency SOS on your iPhone. The feature is a lifesaver indeed. With it, there is no need to fiddle with too many settings or browse through a long contacts list just to make a call. You are only a button press or a few clicks away from getting help, wherever you may be.
