
Taking and editing photos on your iPhone has never been easier. With improved camera technology and an array of powerful editing apps, you can transform your ordinary snapshots into stunning masterpieces right from the palm of your hand. Whether you’re a professional photographer looking to enhance your portfolio or just a casual smartphone user wanting to spruce up your social media feed, learning how to edit photos on iPhone is a skill worth acquiring. In this article, we’ll explore the different tools and techniques you can use to edit photos on your iPhone, from basic adjustments to advanced retouching. So grab your iPhone and let’s dive into the world of mobile photography and editing.
Inside This Article
- Importing Photos to iPhone
- Choosing an Editing App
- Basic Editing Tools and Features
- Applying Filters and Effects
- Adjusting Exposure, Contrast, and Saturation
- Cropping and Straightening Photos
- Removing Blemishes and Imperfections
- Enhancing and Retouching Portraits
- Adding Text and Overlays
- Saving and Sharing Edited Photos
- Conclusion
- FAQs
Importing Photos to iPhone
Your iPhone is not just a device for capturing amazing photos; it also serves as a convenient platform for importing and storing your precious memories. With various methods available, you can easily transfer photos from your computer or other devices to your iPhone. Let’s explore the different ways you can import photos to your iPhone.
1. Using iCloud Photo Library
iCloud Photo Library provides a seamless way to keep your photos in sync across all your Apple devices. To import photos using iCloud:
- Ensure that you have enabled iCloud Photo Library on your iPhone and your other devices.
- On your computer, go to iCloud.com and sign in with your Apple ID.
- Click on Photos and select the photos you want to import.
- Click on the Download button (cloud with an arrow pointing downward) to import the photos to your computer.
- Now, open the Photos app on your iPhone, and the imported photos will be synced automatically.
2. Using iTunes
If you prefer to import photos from your computer to your iPhone using iTunes, follow these steps:
- Connect your iPhone to your computer using a USB cable.
- Launch iTunes and select your device.
- Click on the Photos tab.
- Check the “Sync Photos” option and select the folder or application you want to import photos from.
- Click the “Apply” button to start the syncing process.
- Once the synchronization is complete, the imported photos will be available in the Photos app on your iPhone.
3. Using AirDrop
AirDrop allows you to wirelessly transfer photos between Apple devices. To import photos using AirDrop:
- Ensure that both your iPhone and the device you want to import photos from have Wi-Fi and Bluetooth turned on.
- On the source device, open the Photos app and select the photos you want to transfer.
- Tap on the Share button, select your iPhone from the list of available devices in AirDrop.
- On your iPhone, tap Accept to receive the photos.
- The photos will be transferred instantly and saved in the Photos app on your iPhone.
4. Using third-party apps
There are various third-party apps available on the App Store that allow you to import photos to your iPhone. These apps offer additional features and flexibility in managing your photos. Some popular apps include Google Photos, Dropbox, and OneDrive.
With these options at your disposal, you can easily import photos to your iPhone and continue capturing and cherishing your special moments with ease.
Choosing an Editing App
When it comes to editing photos on your iPhone, having the right editing app can make a world of difference. There are countless photo editing apps available on the App Store, each with its own unique features and capabilities. But with so many options to choose from, how do you know which one is right for you? Here are a few factors to consider when selecting an editing app:
- Features: The first thing you should look for in an editing app is the range of features it offers. Does it have basic editing tools like cropping, adjusting exposure, and enhancing colors? Can you add filters, effects, and text to your photos? Look for an app that offers a comprehensive set of editing features that align with your specific needs.
- User-Friendliness: Editing apps should be intuitive and easy to navigate, even for beginners. Look for apps that have a clean and user-friendly interface, where you can easily access and apply the editing tools without feeling overwhelmed. Some apps even offer tutorial guides or walkthroughs to help you get started.
- Compatibility: Ensure that the editing app you choose is compatible with your iPhone model and operating system. Some apps may have specific requirements or limitations, so check the compatibility information before downloading and installing.
- Integration with the iPhone Photos App: It can be convenient to choose an editing app that seamlessly integrates with the built-in Photos app on your iPhone. This allows you to easily access and edit your photos without the need to import them into a separate app. Look for apps that offer direct integration, allowing you to edit photos right from your camera roll.
- Reviews and Ratings: Before committing to an editing app, take the time to read reviews and check the ratings. Look for apps that have positive feedback and high ratings from other users. This can give you valuable insight into the app’s performance, reliability, and overall user satisfaction.
Considering these factors can help you narrow down your options and choose an editing app that suits your needs and preferences. Remember, the right editing app can elevate your photos and unleash your creativity, so don’t be afraid to try out different apps and explore their features. Whether you’re a casual photographer or a professional looking to fine-tune your images, finding the perfect editing app can take your iPhone photography to the next level.
Basic Editing Tools and Features
When it comes to editing photos on your iPhone, there are several basic tools and features that can help you enhance your images. Whether you want to adjust the exposure, crop the photo, or add some filters, these tools are a great starting point to elevate your photography skills.
1. Adjusting Exposure and Contrast: One of the essential editing tools is the ability to adjust the exposure and contrast of your photos. This allows you to control the brightness and darkness levels, ensuring that your image is properly exposed. With just a few simple adjustments, you can bring out the details and make your photos look more vibrant.
2. Enhancing Colors: If you want your photos to pop, playing around with the color settings is a must. Most editing apps provide options to enhance saturation, vibrance, and color balance. You can experiment with these features to create a more visually appealing image that reflects your artistic vision.
3. Editing with Filters: Filters are a fun and easy way to add some flair to your photos. Many editing apps offer a wide range of filters, from vintage to modern and everything in between. By applying a filter, you can instantly transform the mood and style of your photo.
4. Adding Effects and Text: To add a personal touch to your photos, consider adding effects or text. With effects, you can apply various artistic elements such as vignettes, blurs, or even light leaks. Additionally, adding text can be useful for captions, quotes, or to create personalized greeting cards.
5. Cropping and Resizing: Sometimes, you may want to crop your photo or adjust its size to focus on a particular subject or fit it into a specific aspect ratio. Cropping allows you to eliminate any unnecessary elements and create a more balanced composition. Resizing is handy when you need to optimize your image for different platforms or applications.
6. Removing Blemishes and Red-Eye: No one wants blemishes or red-eye in their photos. Luckily, editing apps offer tools to help you eliminate these imperfections. With a few taps, you can easily remove unwanted spots, smooth skin, and fix red-eye issues to present a flawless image.
These are just a few of the basic editing tools and features available on most photo editing apps for your iPhone. Once you become familiar with these tools, you can start exploring advanced techniques to take your editing skills to the next level. Remember, the key is to experiment, have fun, and let your creativity shine through!
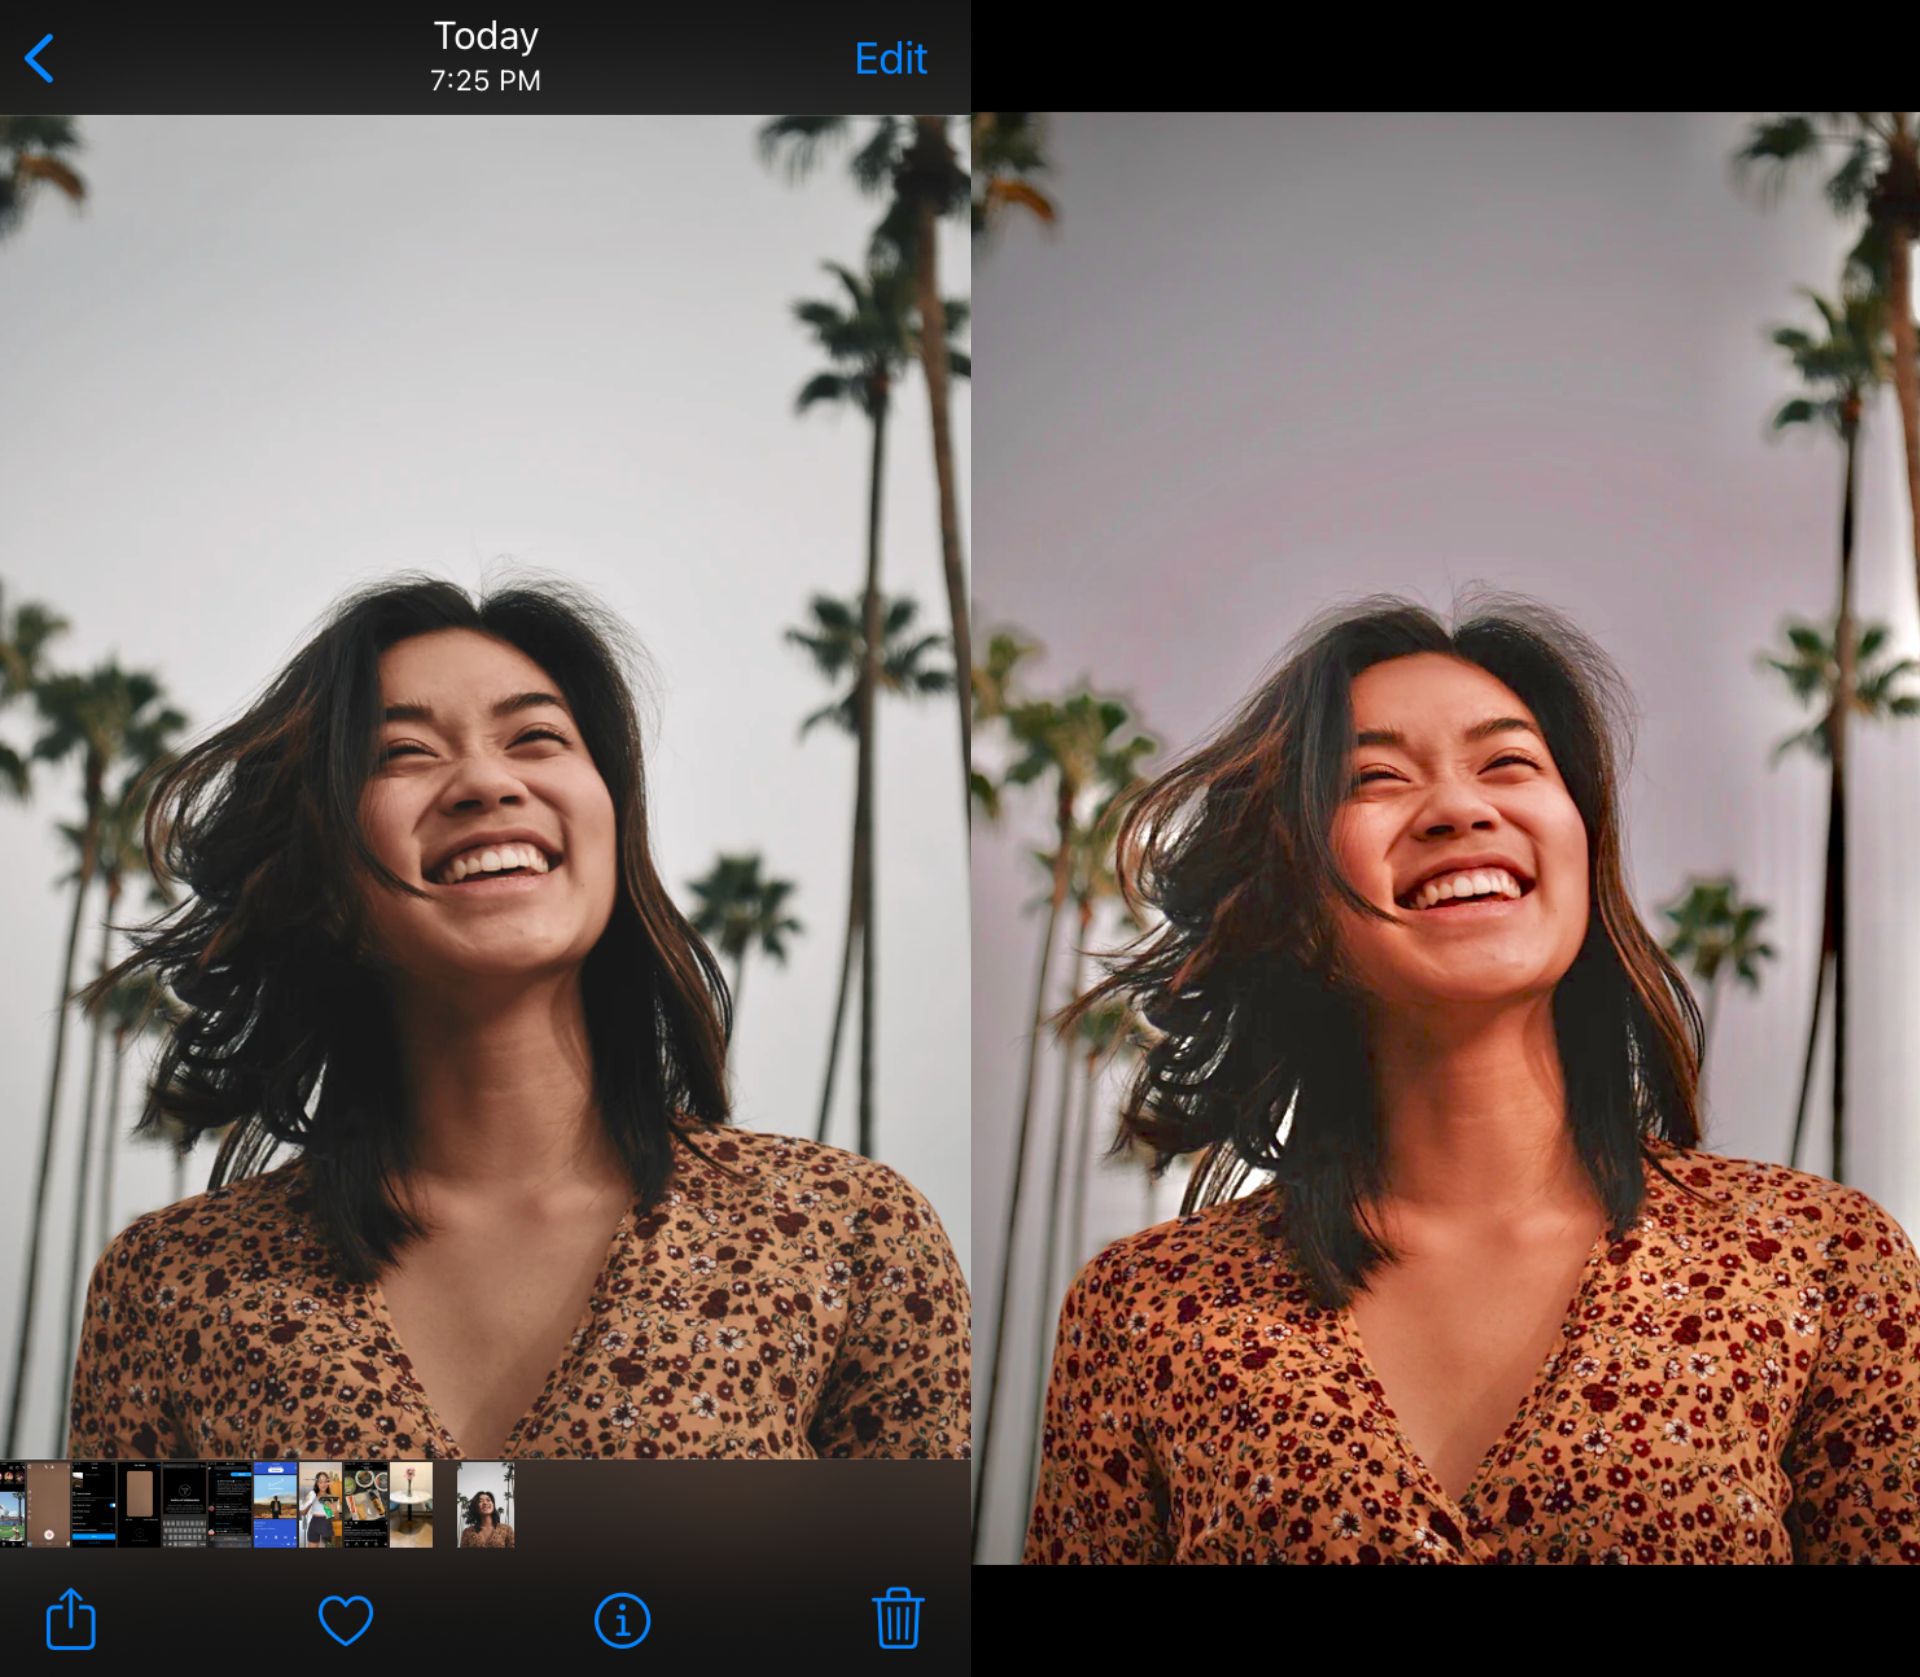
Applying Filters and Effects
Adding filters and effects to your photos can transform them into true works of art. Thankfully, there are a plethora of options available on iPhone editing apps that allow you to apply filters and effects with just a tap.
Filters are preset adjustments that can alter the colors, tones, and overall mood of your photos. They can range from basic options like black and white or sepia, to more creative choices like vintage, cinematic, or HDR. Experimenting with different filters can give your photos a unique and captivating look.
In addition to filters, you can also apply various effects to enhance your photos. Some popular effects include vignette, which darkens the edges of the photo to draw attention to the center, or tilt-shift, which creates a miniature-like effect by selectively blurring certain areas of the image.
When applying filters and effects, it’s important to strike a balance and avoid overdoing it. Aim for a natural and visually pleasing result that enhances the overall composition of your photo.
One of the advantages of using editing apps is that they often provide a range of customization options for filters and effects. You can adjust the intensity, blend modes, and even layer multiple effects for a more unique look.
As always, it’s a good practice to experiment with different combinations and settings to find the ones that best suit your style and the specific photo you’re editing. Don’t be afraid to get creative and push the boundaries!
Once you’re satisfied with the filters and effects you’ve applied, remember to save a copy of your edited photo. Most editing apps allow you to save the final image to your device’s camera roll or share it directly to social media platforms.
Keep in mind that filters and effects are just tools to enhance your photos, and they should be used to complement the subject matter and tell the story you want to convey. With practice and experimentation, you’ll develop a keen eye for when and how to best utilize these features to create stunning images.
Adjusting Exposure, Contrast, and Saturation
When it comes to photo editing, the ability to control the exposure, contrast, and saturation of your images can make a significant difference in the final result. Luckily, with your iPhone, you have powerful tools at your fingertips to make these adjustments.
Exposure refers to the overall brightness or darkness of your photo. If a photo is too bright, it may appear overexposed, washing out the details. On the other hand, if it is too dark, it may lack definition and clarity. In order to adjust the exposure, open your editing app and locate the exposure slider. Slide it to the right to increase the brightness or to the left to decrease it, finding the desired balance.
Contrast, on the other hand, refers to the difference between the light and dark areas in an image. By adjusting the contrast, you can make the colors and details pop. If an image appears flat, lacking depth, increasing the contrast can bring out the highlights and shadows. Similarly, if the contrast is too high, it can result in harsh, unrealistic looking images. Use the contrast slider in your editing app to find the sweet spot and enhance the overall visual appeal.
Saturation is the intensity of the colors in your photo. By adjusting the saturation, you can make the colors more vibrant or dial them down for a more muted look. Increase the saturation if you want the colors to pop, but be careful not to overdo it, as it can result in an unnatural appearance. Decreasing the saturation can be useful to create a more moody or vintage effect.
Experiment with the exposure, contrast, and saturation sliders in your editing app to find the perfect balance for each photo. Remember that different images may require different adjustments, so don’t be afraid to play around until you achieve the desired outcome.
Cropping and Straightening Photos
One of the key aspects of photo editing is the ability to crop and straighten photos. Cropping allows you to remove unwanted areas in an image, while straightening corrects any tilt or alignment issues. Here’s how you can effectively crop and straighten photos on your iPhone:
- Open the Photo: Launch the editing app or open the Photos app on your iPhone and locate the photo you want to edit.
- Select the Crop Tool: Look for the Crop icon, usually represented by a square or two overlapping right angles.
- Adjust the Frame: Use your fingers to adjust the corners of the crop frame to include only the desired area. Drag the edges or corners inward or outward to crop the photo. If needed, you can also rotate the photo to fix any alignment issues.
- Straighten the Photo: Look for the straighten or level tool, usually represented by a grid or a horizontal line. Use this tool to straighten the photo by aligning it with a reference point or by manually adjusting the angle.
- Preview and Confirm: Once you’re satisfied with the crop and straighten adjustments, preview the result and confirm the changes. Save the edited photo to your camera roll or gallery.
By cropping and straightening your photos, you can highlight the subject, remove distractions, and improve the overall composition. It’s a simple yet effective way to enhance the visual appeal of your images.
Remember, when cropping and straightening photos, it’s essential to maintain the aspect ratio and consider the rule of thirds. The rule of thirds suggests that you should place the main subject or points of interest along the intersecting lines or at the points where the lines meet. This can create a more balanced and visually pleasing composition.
Furthermore, it’s important to strike a balance between cropping too much and leaving enough space to retain context. Be mindful of the resolution and quality of the final image, especially if you plan to print or enlarge it.
Experiment with different cropping ratios and straightening angles to see what works best for your specific photo and artistic vision. Don’t be afraid to try different perspectives and orientations to add creativity and uniqueness to your edited photos.
After mastering the art of cropping and straightening, you’ll be able to transform ordinary photos into visually captivating images that tell a compelling story.
Removing Blemishes and Imperfections
One of the key aspects of photo editing is the ability to remove blemishes and imperfections in your photos. Whether you have a small acne spot on your face or a distracting object in the background, photo editing apps on your iPhone can help you fix these issues with ease. Here are some techniques you can use to remove blemishes and imperfections:
- Spot Healing: Many photo editing apps feature a spot healing tool that allows you to remove small blemishes. Simply select the spot healing tool, brush over the blemish, and watch as it magically disappears. This tool works well for acne, scars, and other minor imperfections.
- Clone Stamp: The clone stamp tool is useful when you need to remove larger imperfections or objects from your photos. It allows you to sample a specific area of the image and clone that area onto the blemish or unwanted object. This tool requires a bit more precision and practice, but it can yield great results.
- Healing Brush: Similar to the spot healing tool, the healing brush allows you to remove imperfections, but with more control. It lets you manually select the source area you want to use to fix the blemish. This tool is particularly useful for areas with complex textures or patterns.
When using these tools, be careful not to overdo it and make the edited area look unnatural. Take your time to blend the changes into the surrounding area for a seamless result. Additionally, adjust the brush size and opacity settings to achieve the desired effect.
In addition to removing blemishes and imperfections on your subjects, you can also use the editing app to eliminate unwanted elements in the background. For instance, if there’s a distracting object or a person you want to remove from the photo, you can use the same techniques mentioned above to achieve a clean and polished image.
Remember, photo editing is all about enhancing the beauty of your photos and telling a story. Don’t be afraid to experiment with different tools and techniques to achieve the desired effect. With practice and patience, you’ll soon become proficient at removing blemishes and imperfections, taking your photos to the next level.
Enhancing and Retouching Portraits
Portraits capture the essence and beauty of a person, and with the right editing techniques, you can enhance and retouch portraits to make them even more striking. Here are some tips on how to enhance and retouch portraits using your iPhone:
- Smoothing Skin: Use the healing brush or spot correction tool to remove any blemishes, acne, or skin imperfections on the subject’s face. Be careful not to overdo it and maintain a natural look.
- Brightening Eyes: The eyes are the windows to the soul, so make them shine. Use the dodge tool to brighten the whites of the eyes and the iris, giving them a more vibrant and captivating look.
- Whitening Teeth: A bright and confident smile can make a portrait truly captivating. Use the brush tool with a teeth whitening effect to enhance the subject’s smile and give their teeth a pearly white look.
- Adding a Pop of Color: Sometimes portraits can benefit from a touch of color enhancement. Use the saturation tool to selectively boost the intensity of certain colors in the photo, making them more vibrant and eye-catching.
- Enhancing the Background: If the background of the portrait is dull or distracting, you can use the selective editing tools to make it more visually appealing. Blur the background slightly or adjust the brightness and contrast to bring more focus to the subject.
- Smoothing Wrinkles and Fine Lines: With the help of the smoothing tool, you can subtly reduce the appearance of wrinkles and fine lines on the subject’s face. Just be careful not to completely erase the natural texture of the skin.
- Adding Depth with Portrait Mode: If your iPhone supports it, use the Portrait Mode feature to create a stunning depth-of-field effect. This will blur the background and keep the subject in sharp focus, mimicking the look of professional portrait photography.
- Playing with Lighting and Shadows: Experiment with the lighting and shadow adjustments to create different moods and effects in your portraits. Adjust the exposure, highlights, and shadows to add depth and dimension to the photo.
- Applying Vignette: Adding a vignette can draw the viewer’s attention towards the subject and create a more dramatic and artistic look. Use the vignette tool to darken the edges of the photo, making the subject stand out even more.
- Saving and Sharing: Once you are satisfied with your portrait edits, save the photo in high resolution to maintain its quality. You can then easily share it with others on social media or through messaging apps.
Remember, enhancing and retouching portraits is a subjective process, and it ultimately depends on your personal style and the desired outcome. Don’t be afraid to experiment and try different editing techniques until you achieve the desired look. With practice, you can transform ordinary portraits into extraordinary works of art right from your iPhone!
Adding Text and Overlays
In addition to the various editing tools and effects available on your iPhone, you can also add text and overlays to further customize your photos. Whether you want to add a caption, a quote, or simply enhance the visual appeal of your image, adding text and overlays can be a fun and creative way to make your photos stand out.
There are several apps available on the App Store that specialize in adding text and overlays to your photos. One popular app is Over, which offers a wide range of fonts, styles, and graphics to choose from. With Over, you can easily add text to your photos, adjust the size and position, and even apply various effects to make it blend seamlessly with the image.
To get started, simply open Over and select the photo you want to edit. Choose the Text tool and type in your desired text. You can then customize the font, size, color, and alignment to suit your taste. Over also provides a vast collection of graphics and illustrations that you can add as overlays to your photos. These overlays can be resized, rotated, and positioned to achieve the desired effect.
If you’re looking for more advanced text and overlay editing options, you can also consider using Canva. Canva is a powerful design tool that allows you to create stunning graphics, posters, and social media content. It provides a wide range of text styles, shapes, illustrations, and background templates to choose from.
To add text and overlays using Canva, start by selecting the photo you want to edit. From there, you can browse through the extensive library of design elements and choose the ones that best complement your photo. You can easily adjust the size, position, and opacity of the text and overlays to achieve the desired look.
Once you’ve added the text and overlays, you can further enhance them by applying various filters and effects available in these apps. This will allow you to create a unique and visually captivating final image.
Adding text and overlays to your photos not only adds a personal touch but also allows you to convey a message or story. Whether you’re creating social media posts, personalized greeting cards, or even professional graphic designs, these editing tools provide you with endless possibilities to unleash your creativity and make your photos truly standout.
Saving and Sharing Edited Photos
Once you are done editing your photos on your iPhone, it is time to save and share your masterpiece with the world. Here are some simple ways to save and share your edited photos.
Saving Your Edited Photos
When you have finished editing your photo, you will want to save the changes you have made. Fortunately, this is quite straightforward on your iPhone.
- Open the photo editing app and go to the edited photo.
- Click on the “Save” or “Export” button, usually located in the top-right corner of the screen.
- Choose the desired save location, such as the Camera Roll or a specific photo album.
- Tap “Save” to confirm and save the edited photo.
Sharing Your Edited Photos
Sharing your edited photos is a great way to showcase your artistic talent or simply share memorable moments with friends and family. Here are a few methods you can use to easily share your photos.
1. Social Media
The most popular way to share photos is through social media platforms like Instagram, Facebook, Twitter, and Snapchat. Simply open the app, select the edited photo, add a caption if desired, and post it.
2. Messaging Apps
If you prefer a more private way to share your photos, you can use messaging apps such as WhatsApp, iMessage, or Facebook Messenger. Open the app, select the recipient, attach the edited photo, and send it.
3. Cloud Storage Services
If you want to share your edited photos with someone who doesn’t have access to social media or messaging apps, you can upload them to a cloud storage service like iCloud, Google Drive, or Dropbox. Once uploaded, you can generate a shareable link and send it directly to the intended recipient.
4. Email
For a more traditional approach, you can share your edited photos via email. Simply compose a new email, attach the edited photo, add a subject and message if desired, and send it to the recipient’s email address.
5. Printing
If you would like to have a physical copy of your edited photo, you can use a photo printing service. Many online platforms, like Shutterfly or Snapfish, allow you to upload your edited photo and order prints to be delivered to your doorstep.
Remember to respect the privacy and copyright of others when sharing your edited photos. Be mindful of the platform’s terms of service and the preferences of the people involved in your photos before sharing them.
With these simple steps, you can easily save and share your edited photos, allowing you to showcase your creativity and share precious moments with friends and family.
Conclusion
In conclusion, editing photos on your iPhone has never been easier or more accessible. With the wide range of powerful editing tools and intuitive apps available, you have the ability to transform your ordinary photos into stunning works of art. Whether you want to enhance the colors, adjust the lighting, remove blemishes, or add creative effects, the options are virtually limitless.
Not only does editing your photos on your iPhone allow you to create visually appealing images, but it also gives you the convenience of doing so right on your device. You can edit your photos anytime, anywhere, without the need for any additional equipment or software.
So, unleash your creativity and take your photography to the next level by exploring the various photo editing options available for your iPhone. Experiment with different techniques, play around with filters and adjustments, and let your imagination run wild. With a few simple taps, you can transform your snapshots into stunning masterpieces that will impress your friends and family.
So why wait? Start exploring the world of photo editing on your iPhone today and let your inner artist shine.
FAQs
Q: Can I edit photos on my iPhone?
A: Absolutely! The iPhone comes with a powerful built-in photo editing tool that allows you to enhance your pictures right on your device.
Q: What editing features does the iPhone offer?
A: The iPhone offers a range of editing features, including the ability to adjust brightness, contrast, saturation, and sharpness. You can also crop, rotate, and straighten your photos, apply filters, and even remove red-eye.
Q: How do I access the photo editing tool on my iPhone?
A: To access the photo editing tool, simply open the Photos app, select the photo you want to edit, and tap on the “Edit” button. This will bring up a range of editing options for you to choose from.
Q: Are there any third-party photo editing apps available for iPhone?
A: Yes, there are numerous third-party photo editing apps available for iPhone on the App Store. These apps offer advanced editing tools, special effects, and more creative options for those looking to take their photo editing skills to the next level.
Q: Can I undo any changes I make to a photo during the editing process?
A: Yes, you can easily undo any changes you make to a photo while editing. Simply tap on the “Revert” button, and your photo will revert back to its original state. This allows you to experiment with different edits without worrying about permanently altering your original image.