
As an iPhone user, you’re likely aware of the amazing camera capabilities that come with your device. With each new iPhone release, Apple continues to push the boundaries of smartphone photography, giving users the power to capture stunning images right from their pockets. But what if you could take your iPhone photos to the next level with some simple editing tools? One such tool that can greatly enhance your iPhone photography is the Black Point tool. In this article, we’ll delve into how to use the Black Point tool to edit your iPhone photos and explore why it’s a valuable tool to have in your editing arsenal. So, whether you’re an aspiring photographer looking to improve your shots or simply someone who wants to make their iPhone photos pop, let’s dive into the world of the Black Point tool and discover its potential.
Inside This Article
How to Use the Black Point Tool to Edit iPhone Photos & Why You May Want To
When it comes to editing photos on your iPhone, there are various tools and features that can transform your images from ordinary to extraordinary. One such tool is the Black Point tool, which allows you to adjust the black levels in your photos to enhance contrast and add a touch of drama. In this article, we will explore how to use the Black Point tool to edit iPhone photos and why you may want to incorporate it into your editing process.
Before diving into the specifics of the Black Point tool, it’s important to understand what it does. The Black Point tool helps you adjust the darkest areas of your image, known as the shadows, by increasing or decreasing their intensity. By manipulating the black levels, you can add depth and richness to your photos, making them more visually appealing.
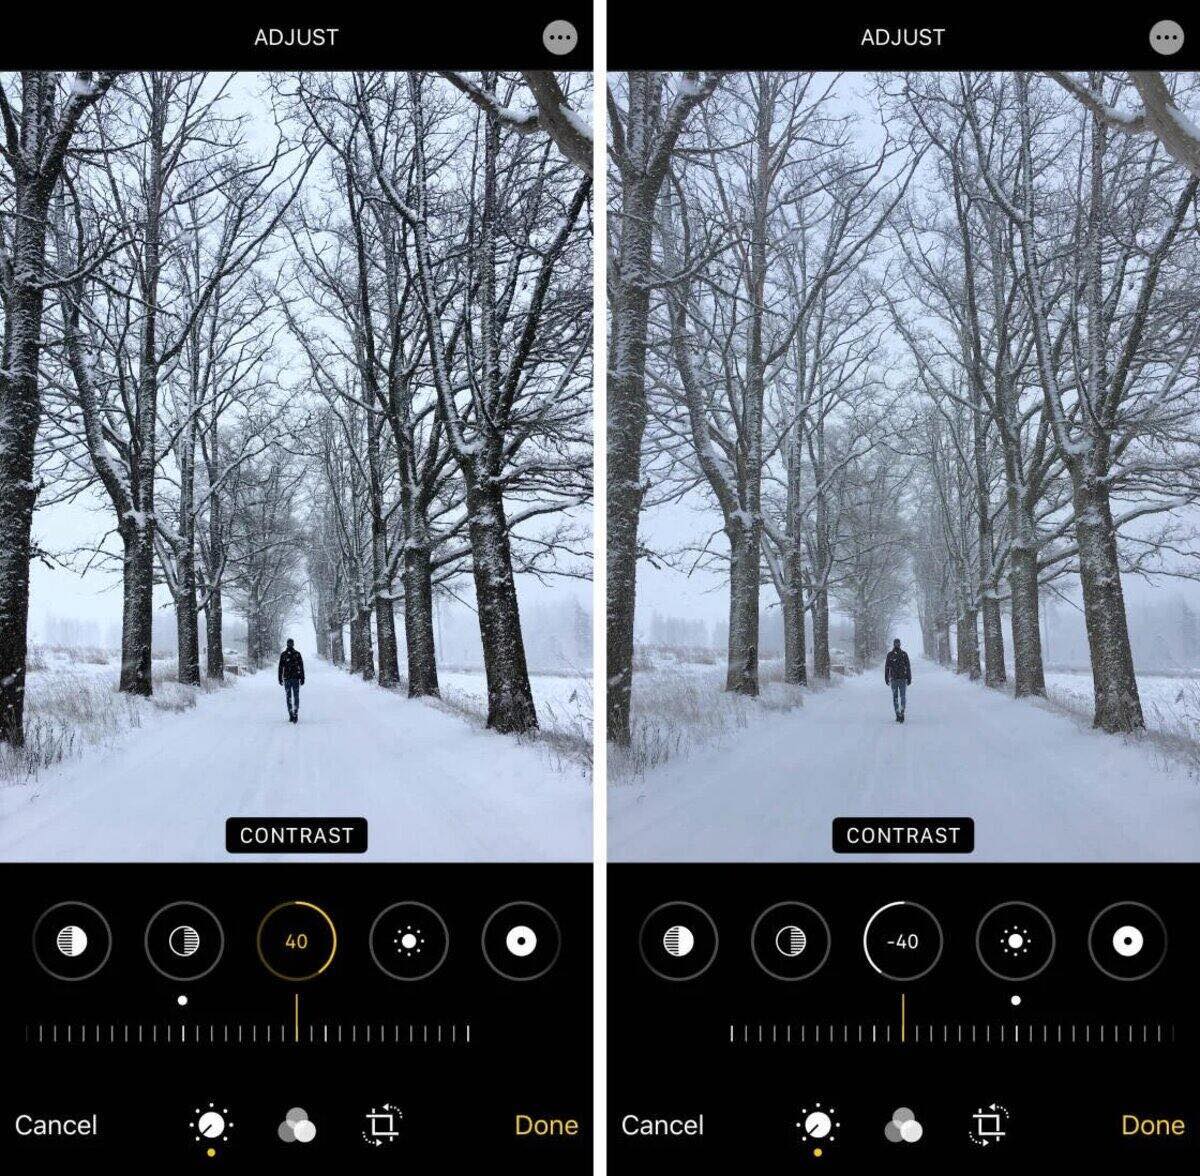
Using the Black Point tool in iPhone photos is simple and can be done within the built-in Photos app. Here’s a step-by-step guide on how to use this tool:
- Open the Photos app on your iPhone and select the photo you want to edit.
- Tap on the Edit button at the top right corner of the screen.
- At the bottom of the editing screen, you’ll see several adjustment options. Swipe left until you find the Black Point tool.
- Once you’ve found the Black Point tool, you can start adjusting the black levels of your photo by sliding your finger left or right on the screen.
- As you make adjustments, you’ll notice the dark areas of your photo becoming more pronounced or subdued, depending on the direction you slide.
- Continue experimenting with the Black Point tool until you achieve the desired effect.
- Once you’re satisfied with the edit, tap on the Done button to save your changes.
The Black Point tool offers several benefits when editing iPhone photos. Here are a few reasons why you may want to consider using this tool:
- Enhanced contrast: By adjusting the black levels, you can create a stronger contrast between the highlights and shadows in your photos, resulting in a more dynamic and visually striking image.
- Add drama and mood: Increasing the intensity of the shadows can add a touch of drama and create a moody atmosphere in your photos. This is especially useful for capturing the emotions and ambiance of a particular scene.
- Highlight details: Decreasing the black levels can bring out hidden details in the darker areas of your photos, making them more visible and adding depth to the overall composition.
- Professional-looking edits: The Black Point tool allows you to achieve professional-looking edits with just a few simple adjustments. It’s a powerful tool that can make a significant difference in the visual impact of your photos.
- Experimentation and creativity: The Black Point tool provides an opportunity for creative experimentation. By playing with the black levels, you can explore different moods, aesthetics, and artistic expressions in your photos.
So, the next time you’re editing photos on your iPhone, don’t forget to give the Black Point tool a try. It’s a valuable tool that can elevate your images and unleash your creativity. Start experimenting with the black levels and discover the incredible impact it can have on your iPhone photos.
Conclusion
In conclusion, learning how to use the Black Point Tool to edit your iPhone photos can greatly enhance the quality and visual appeal of your images. This powerful tool allows you to adjust the shadows and highlights in your photos, bringing out hidden details and creating a more balanced and dynamic composition. Whether you are a professional photographer or just a hobbyist looking to enhance your Instagram feed, the Black Point Tool is a valuable resource.
By following the steps outlined in this article and experimenting with different settings, you can unlock the full potential of your iPhone’s camera and take your photography skills to the next level. So, next time you find yourself with a photo that lacks depth or needs some fine-tuning, don’t forget to give the Black Point Tool a try. Your images will thank you!
FAQs
1.
What is the Black Point Tool? How does it work?
The Black Point Tool is a powerful feature available in many photo editing apps for iPhone. It allows you to adjust the darkest areas of your photos, adding depth and enhancing details. By dragging the black point slider, you can darken shadows, create a moody atmosphere, or even recover lost details in poorly lit images. This tool works by adjusting the black levels, effectively modifying the contrast and overall tonality of your photos.
2.
Which photo editing apps offer the Black Point Tool?
There are several popular photo editing apps that offer the Black Point Tool for iPhone users. Some notable options include Adobe Lightroom Mobile, Snapseed, and VSCO. These apps provide a wide range of features to enhance your photos, including the ability to adjust exposure, temperature, saturation, and more. Whether you are a professional photographer or just an enthusiast, these apps can help you take your mobile photography skills to the next level.
3.
Can I use the Black Point Tool to edit photos taken with other smartphones?
While the Black Point Tool is commonly associated with iPhone photo editing, it is not exclusive to Apple devices. Many photo editing apps that offer this feature are also available for Android and other operating systems. Therefore, you can certainly use the Black Point Tool to edit photos taken with other smartphones as well.
4.
Are there any risks of using the Black Point Tool?
Using the Black Point Tool to edit your photos does not come with any inherent risks. However, like any editing tool, it is essential to use it judiciously and with consideration to the specific requirements of your image. Overusing the tool or aggressively increasing the black levels can result in unnatural-looking photos with excessive contrast. Therefore, it is recommended to experiment with different settings and find the right balance to achieve the desired effect while preserving the overall integrity of your image.
5.
Can the Black Point Tool be used to fix poorly exposed photos?
Yes, one of the benefits of the Black Point Tool is its ability to salvage details from poorly exposed photos. By carefully adjusting the black levels, you can brighten up the shadows and reveal hidden details that would otherwise be lost. While it may not be a magical solution for extremely underexposed images, it can significantly improve the overall quality and make the photo more visually appealing.