
Procreate is a powerful digital art software that allows artists to unleash their creativity on their iPad and iPhone. With Procreate, you can create stunning illustrations, paintings, and designs with its wide array of tools and features. One of the key functionalities of Procreate is the ability to move and manipulate text within your artwork.
If you want to add a text layer to your artwork or simply want to reposition existing text, Procreate makes it easy to do so. In this article, we will explore the various methods and techniques to move text on Procreate. Whether you’re a beginner or an experienced Procreate user, you’ll find valuable tips and tricks to enhance your text positioning skills.
Inside This Article
- Moving Text in Procreate
- Method 1: Using the Transform Tool
- Method 2: Using the Selection Tool
- Method 3: Using the Drag and Drop Function
- Method 4: Using the Cut, Copy, and Paste Commands
- Conclusion
- FAQs
Moving Text in Procreate
Procreate is a powerful digital painting and illustration app that allows artists to create stunning artwork on their tablets or smartphones. While Procreate is primarily known for its advanced drawing features, it also offers users the ability to add and manipulate text within their compositions. In this article, we will explore different methods of moving text in Procreate, allowing you to enhance your designs and create dynamic compositions.
Method 1: Using the Transform Tool
To move text using the Transform tool in Procreate, follow these steps:
- Select the text layer by tapping on it in the layers panel.
- Tap on the transform button, which looks like two arrows forming a square, located in the top menu.
- Adjust the size, rotation, and position of the text by dragging the bounding box handles or rotating the text using the rotation wheel.
- Once you are satisfied with the new position, tap the checkmark button to apply the changes.
Method 2: Using the Selection Tool
Another way to move text in Procreate is by using the selection tool:
- Tap on the selection tool in the top menu. It looks like a dotted rectangle.
- Draw a selection around the text you want to move.
- Tap and hold inside the selection until the text lifts off the canvas.
- Drag the text to the desired location and release your finger to drop it.
Method 3: Using the Cut, Copy, and Paste Functions
Procreate also allows you to move text by using the cut, copy, and paste functions:
- Select the text layer by tapping on it in the layers panel.
- Tap on the “Actions” wrench icon in the top menu.
- Select either “Cut” or “Copy”.
- Navigate to the desired location and tap on the “+” button to create a new layer.
- Tap on the empty layer and select “Paste” to place the text in the new location.
Method 4: Using the QuickMenu Options
Lastly, you can also move text quickly using the QuickMenu options:
- Select the text layer by tapping on it in the layers panel.
- Swipe left with two fingers to bring up the QuickMenu.
- Tap and hold on the “Move” option.
- Drag the text to the desired location and release your finger to drop it.
With these methods, you can easily move text within your Procreate compositions, allowing for better placement and arrangement. Experiment with different techniques to achieve the desired effect and take your digital art to the next level.
Method 1: Using the Transform Tool
Procreate is a powerful digital drawing app that is widely used by artists and designers. One of the essential features of Procreate is the ability to move text easily within your canvas. Whether you want to reposition a single word or an entire block of text, the Transform Tool in Procreate is your go-to tool. In this section, we will guide you step-by-step on how to move text using the Transform Tool in Procreate.
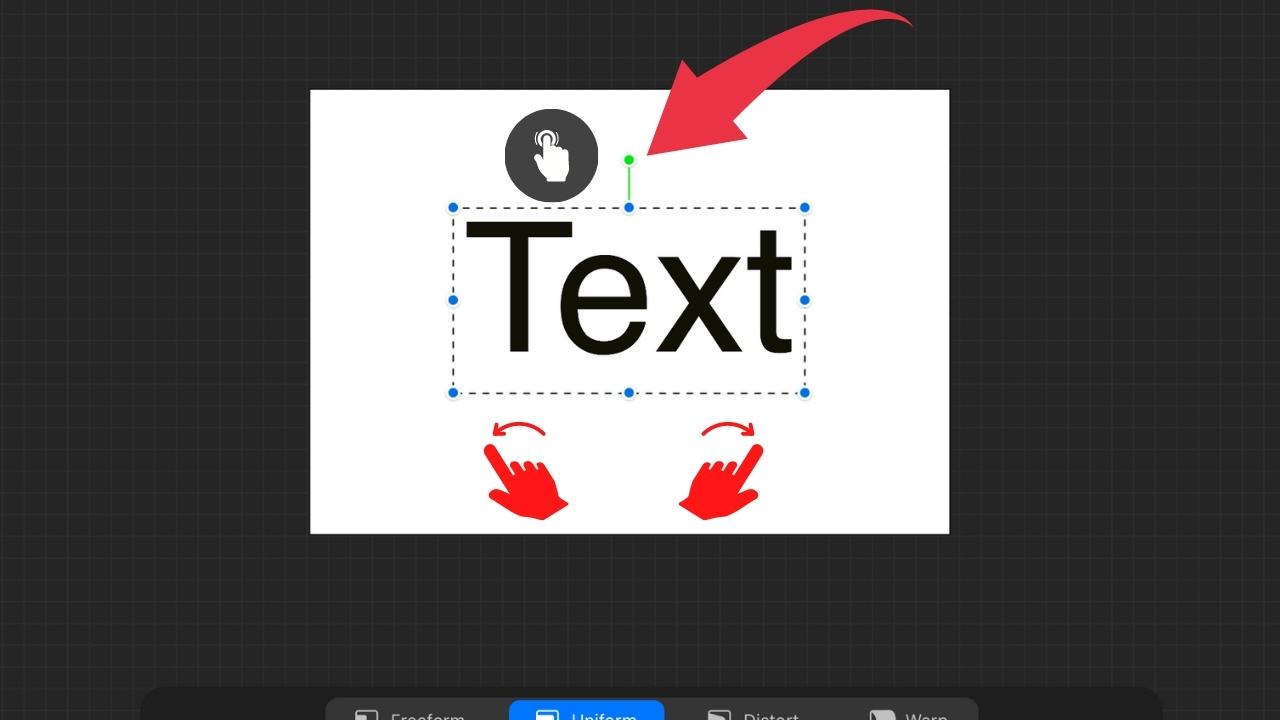
To begin, open your Procreate canvas and select the layer that contains the text you want to move. Next, tap on the Transform Tool from the toolbar located on the top right corner of your screen. The Transform Tool is represented by a square with small squares on each corner.
Once you have selected the Transform Tool, you will notice a bounding box surrounding your text. This bounding box indicates that the text is now ready to be transformed. You can now use two fingers to pinch, zoom, rotate, or move the text within the canvas. To move the text, simply place your two fingers on the screen and drag the text to your desired position.
If you want to ensure more precise movement, you can use the Arrow Keys feature in Procreate. To access this feature, tap on the Transform Tool and look for the Arrow Keys icon in the toolbar that appears at the bottom of the screen. By tapping on the Arrow Keys icon, you can now move your text precisely using the arrow keys on your device’s keyboard.
Moreover, the Transform Tool also allows you to resize your text. To do this, tap on the bounding box and drag any of the corner squares inward or outward to increase or decrease the size of the text. You can also maintain the original aspect ratio by holding down the Shift key while resizing.
Once you are satisfied with the new position and size of the text, tap anywhere outside the bounding box to finalize the transformation. Your text is now successfully moved using the Transform Tool in Procreate. Remember to save your work regularly to ensure that your changes are preserved.
In summary, the Transform Tool in Procreate makes it easy to move and resize text within your canvas. With just a few simple steps, you can reposition your text to achieve the desired composition in your artwork. Experiment with different placements and sizes to find the perfect arrangement. So go ahead and unleash your creativity with Procreate’s Transform Tool and elevate your digital art to new heights.
Method 2: Using the Selection Tool
If you want to move text on Procreate with precision and control, the selection tool is your best friend. It allows you to select specific portions of your text and then move it freely to your desired location. Here’s how you can use the selection tool to move text on Procreate:
1. Open your Procreate project and locate the text layer that you want to move.
2. Tap on the “Selection” tool from the toolbar. It is represented by a dotted square icon.
3. Use your finger or the Apple Pencil to draw a selection around the text that you want to move. Ensure that the selection encompasses the entire text layer.
4. Once you have made the selection, you will see a bounding box around the selected area. Tap and hold within the box to activate the move function.
5. Drag your finger or Apple Pencil to move the selected text to your desired position. As you move it, you will see the text being repositioned in real-time.
6. Release your finger or Apple Pencil to drop the text in its new location.
The selection tool in Procreate offers precise control over moving text. You can resize your selection by dragging the handles on the bounding box, rotate it by using the rotate gesture with two fingers, or even duplicate it by tapping on the “Duplicate” option in the toolbar. This tool allows you to move text with accuracy and make any necessary adjustments if needed.
Now that you know how to use the selection tool to move text on Procreate, you can easily rearrange your text elements, create unique compositions, and refine your designs with ease. Happy creating!
Method 3: Using the Drag and Drop Function
Another convenient method for moving text on Procreate is by utilizing the drag and drop function. This feature allows you to effortlessly move text from one location to another within your canvas.
To use the drag and drop function, follow these simple steps:
- Start by selecting the text layer you want to move. You can do this by tapping on the layer in the Layers panel.
- Once the text layer is selected, press and hold your finger on the text until it becomes draggable.
- While still holding your finger on the text, drag it to the desired location on your canvas. You will see a preview of the text as you move it.
- Release your finger to drop the text in the new position.
The drag and drop function is particularly useful when you want to rearrange the placement of text without going through the process of copying and pasting. It saves you time and allows for a seamless text editing experience on Procreate.
Remember, you can also use this method to move text between different layers. Simply select the text layer you want to move, use the drag and drop function to position it in the desired layer, and release your finger to drop it.
Procreate’s drag and drop function is intuitive and user-friendly, making it a convenient option for moving text within your artwork. It adds flexibility and precision to your creative process, allowing you to arrange text elements with ease.
Method 4: Using the Cut, Copy, and Paste Commands
Another efficient way to move text on Procreate is by utilizing the cut, copy, and paste commands. These commands work similarly to those found in other software programs, making it easy to transfer and rearrange text within your Procreate project.
To start, select the text you want to move. You can do this by tapping and dragging your finger over the text or using the selection tool. Once the text is selected, a toolbar will appear at the top of the screen.
In the toolbar, you will find the option to cut or copy the selected text. The “cut” command will remove the text from its original location, while the “copy” command will create a duplicate of the selected text.
After cutting or copying the text, navigate to the desired location where you want to move it. Tap and hold the screen until the contextual menu appears. From the menu, select the “paste” option to insert the text at the new location.
Procreate allows for precise placement of pasted text. You can adjust the position by dragging the text with your finger or using the arrow keys for fine-tuning. This flexibility ensures that your text fits seamlessly into your design.
Using the cut, copy, and paste commands in Procreate not only allows you to move text within your project but also gives you the freedom to duplicate text and create variations easily. This method is particularly useful when you need to replicate text components, such as headers or subheadings, while maintaining consistent styling.
Remember to save your work regularly to avoid losing any changes you make while moving text. Procreate offers automatic saving, but it’s always a good practice to save manually as well.
By mastering the cut, copy, and paste commands in Procreate, you can efficiently move and manipulate text to perfect your designs and achieve the desired layout. Experiment with these commands to unlock the full potential of your Procreate projects.
Conclusion
Procreate is a powerful digital art tool that offers numerous possibilities for artists to create stunning illustrations and designs. Throughout this article, we have explored the various methods to move text on Procreate, enabling artists to add dynamic and engaging typography to their artwork.
By utilizing features such as the Move tool, Transform options, and layer adjustments, Procreate provides artists with the flexibility to manipulate and position text with ease. Whether you want to resize, rotate, or reposition your text, Procreate offers intuitive controls that streamline the design process.
With a combination of creativity, experimentation, and the techniques discussed in this article, you can take your text-based artwork to the next level on Procreate. So go ahead, unleash your imagination, and explore the endless possibilities of moving text on Procreate to create captivating and visually appealing designs.
FAQs
1. Can I move text on Procreate?
Yes, you can move text on Procreate. Procreate is a powerful graphic design and illustration app that provides various tools and features to manipulate text. Whether you want to reposition, resize, or rotate text, Procreate has the capabilities to make it happen.
2. How do I move text in Procreate?
To move text in Procreate, follow these simple steps:
- Select the text layer you want to move by tapping on it in the layers panel.
- Tap and hold on the text using the Transform tool (the arrow icon located on the toolbar).
- Drag the text to the desired position on the canvas.
- Release your finger when the text is in the desired position.
You can now move the text freely around the canvas in Procreate.
3. Can I change the size of text in Procreate?
Absolutely! Procreate offers the ability to adjust the size of the text to suit your needs. To change the size of the text:
- Select the text layer.
- Tap on the Text tool (the capital A icon located on the toolbar).
- Tap on the font size menu located at the top of the screen.
- Adjust the slider or enter a specific value to resize the text.
By following these steps, you can easily modify the size of your text in Procreate.
4. Is it possible to rotate text in Procreate?
Yes, you can rotate text in Procreate. To rotate text:
- Select the text layer.
- Tap and hold on the text using the Transform tool.
- Use two fingers to rotate the text to the desired angle.
- Release your fingers when the text is in the desired rotation.
With this functionality, you can freely adjust the rotation of your text in Procreate.
5. Are there any other text manipulation features in Procreate?
Procreate offers a wide range of text manipulation features to enhance your designs. Along with moving, resizing, and rotating text, you can also adjust the opacity, apply various blend modes, change the font, modify the letter spacing, and even add special effects to your text. These features give you the flexibility to create unique and visually appealing text elements in Procreate.