
Are you a digital artist looking to add a unique touch to your designs? Look no further than Procreate, the popular digital art app that offers a plethora of tools and features. One of the most fascinating features that Procreate provides is the ability to curve text, allowing you to create eye-catching and dynamic typography for your artwork.
In this article, we will delve into the process of curving text in Procreate. Whether you want to add a curved title to your digital painting or create a whimsical quote design, we will guide you through the steps to achieve the desired effect. So, grab your Apple Pencil, fire up Procreate, and let’s get started on transforming your typography and taking your artwork to the next level!
Inside This Article
- Understanding the Curving Text Feature in Procreate
- Step-by-Step Guide to Curving Text in Procreate
- Exploring Advanced Techniques for Text Curving in Procreate
- Conclusion
- FAQs
Understanding the Curving Text Feature in Procreate
If you’re a creative individual who loves digital art, you may already be familiar with Procreate, a powerful and popular drawing and painting app for iPad. With its wide range of features and tools, Procreate allows artists to bring their imagination to life on a digital canvas. One such feature that can add a unique touch to your artwork is the ability to curve text.
The curving text feature in Procreate allows you to bend and shape your text to follow a specific path or contour. This can be especially useful when you want to add text to curved or circular designs, such as logos, typography compositions, or digital illustrations. By curving the text, you can seamlessly integrate it into the overall composition, creating a more dynamic and visually appealing artwork.
Understanding how this feature works in Procreate is essential to make the most out of it. When you select the Text tool in Procreate, you’ll notice a curved arrow icon, indicating the curving text option. Once you activate this feature, you can manipulate the text box by dragging the handles or using the Transform tool to adjust the curve’s shape and angle.
Procreate offers different options to control how the text curves. You can choose between a Bezier curve, which allows for more precise adjustments, or a simple curve, which offers a more fluid and organic look. Additionally, you can modify the text’s spacing, alignment, and size to ensure it fits perfectly along the curve.
It’s important to note that the curving text feature is not limited to just one path. With Procreate, you can create multiple curves and shapes at once, allowing for intricate and complex designs. This versatility opens up a world of possibilities for experimenting with text arrangements and layouts.
Another advantage of the curving text feature in Procreate is the ability to edit and modify the text even after it has been curved. This means you can easily make changes to the content, font, or style without affecting the curve itself. This flexibility saves you time and effort, giving you more freedom to fine-tune your artwork.
Whether you’re a graphic designer, digital artist, or illustrator, understanding how to work with the curving text feature in Procreate can elevate the impact of your creations. By mastering this tool, you’ll have the ability to add a professional touch to your designs, making them stand out and leave a lasting impression on your audience.
Step-by-Step Guide to Curving Text in Procreate
Curving text can add flair and creativity to your digital artwork, making it visually appealing and unique. Procreate, the popular digital art app for iPad, offers a simple and intuitive way to curve text. In this step-by-step guide, we’ll walk you through the process of curving text in Procreate, helping you unlock a world of possibilities for your artwork.
1. Open Procreate: Launch the Procreate app on your iPad and create a new canvas or open an existing artwork where you want to add curved text.
2. Create a new text layer: Tap on the brush icon at the top toolbar and select the Text option. A text box will appear on your canvas. Type in the desired text that you want to curve.
3. Adjust the placement: Use your fingers to move and resize the text box according to your preference. Ensure that the text is positioned correctly before proceeding to the next step.
4. Access the Transform tool: In the toolbar, tap on the wrench icon, which represents the Transform tool. This tool allows you to manipulate and modify the selected layer.
5. Bend the text: With the Transform tool active, tap and hold on any of the four corners of the text box. Now, swipe your finger left or right to bend the text along the desired curve. You can experiment with different angles and shapes to achieve the desired effect.
6. Fine-tune the curve: If needed, you can further refine the curve by using the Edit Shape option. Tap on the blue dot located at the center of the text box and drag it up or down to adjust the curve’s arc.
7. Customize text attributes: Procreate allows you to customize the font, size, color, and other text attributes. To make these adjustments, select the Text option from the toolbar, and then choose the desired settings from the available options.
8. Apply additional effects: Take your curved text to the next level by applying additional effects. Procreate offers a wide range of artistic tools and filters that can be used to enhance your artwork further. Explore the various options and experiment with different effects to add a personal touch to your curved text.
9. Save and export: Once you are satisfied with the curved text, it’s time to save and export your artwork. Tap on the wrench icon to access the Actions menu, and then select the desired saving or sharing option. Procreate allows you to save in various formats, including PNG, JPEG, and PSD.
With these simple steps, you can now easily curve text in Procreate and elevate your digital art to new heights. Unleash your creativity and explore the endless possibilities of curved text in Procreate.
Exploring Advanced Techniques for Text Curving in Procreate
Once you have mastered the basic text curving feature in Procreate, you may be eager to take your designs to the next level. In this section, we will explore some advanced techniques that will allow you to create more dynamic and impactful curved text effects. So, let’s dive in!
1. Customizing the Curvature: Procreate offers advanced tools to give you more control over the shape and curvature of your text. By selecting the text layer and using the Transform tool, you can manually adjust the curve by dragging the handles. Experiment with different angles and lengths to achieve the desired effect.
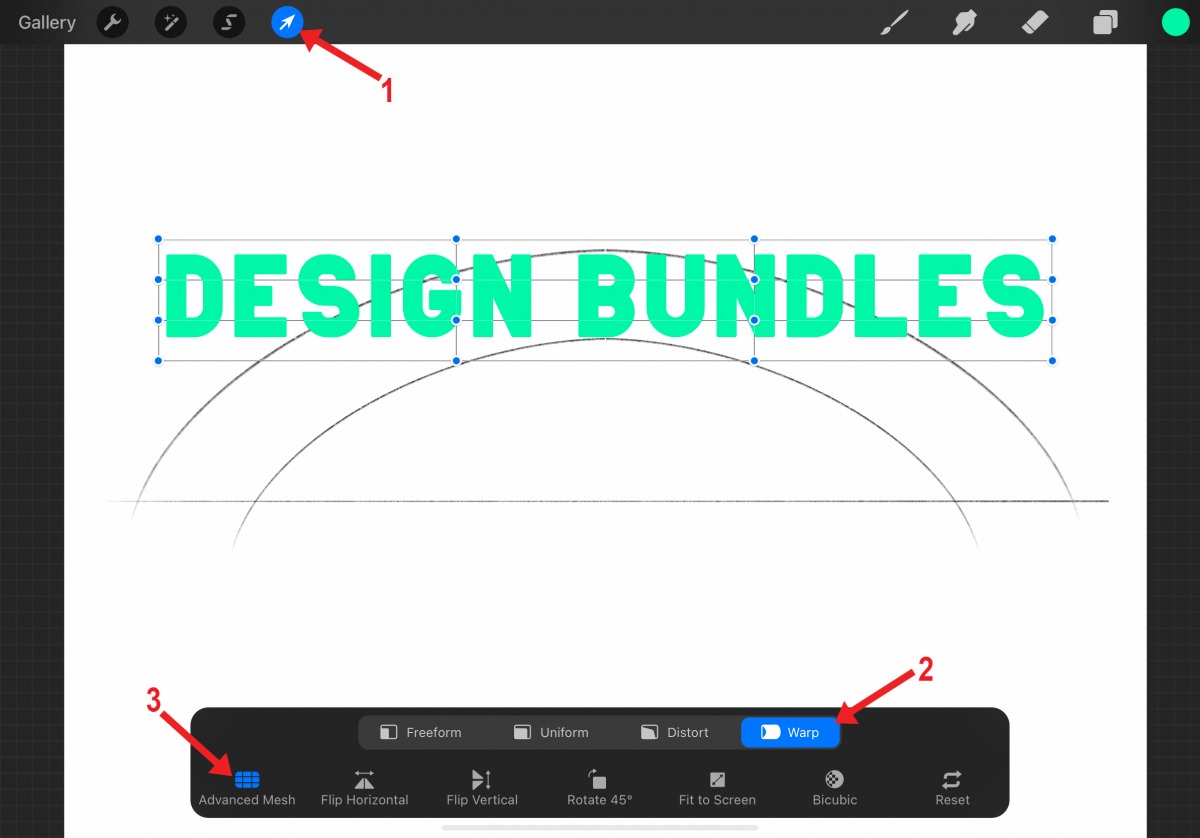
2. Creating Text Ribbons: If you want to make your curved text look like it’s flowing or wrapping around an object, you can create text ribbons. Start by curving your text and duplicating it. Then, use the Warp tool to distort the duplicate text in a way that mimics the shape of the object. This technique can add depth and dimension to your designs.
3. Adding Shadows and Highlights: Enhancing your curved text with shadows and highlights can make it pop and appear more three-dimensional. After curving your text, create a new layer below it and use the Brush tool to add shadows on one side and highlights on the other side. Experiment with different opacities and blend modes to achieve the desired effect.
4. Combining Text Effects: Don’t be afraid to combine different text effects to create a unique look. For example, you can curve your text and then apply a gradient fill or a texture overlay. You can also experiment with blending modes to merge your curved text with other design elements seamlessly.
5. Using Masks: Masks can be a powerful tool when working with curved text. By adding a layer mask to your curved text layer, you can selectively reveal or hide parts of the text. This technique allows you to create interesting compositions and manipulate the appearance of the curved text to fit your design concept.
6. Experimenting with Typography Styles: Different typography styles can bring a whole new dimension to your curved text. Try exploring various fonts, sizes, and letter spacing options to find a combination that complements the curvature of the text. This experimentation can add personality and flair to your designs.
As you delve into these advanced techniques, remember to experiment, practice, and let your creativity flow. Procreate offers a wide range of tools and features that allow you to push the boundaries of what you can achieve with curved text. So, unleash your imagination and create stunning designs that captivate your audience.
Conclusion
Curving text in Procreate is a powerful feature that can add a dynamic and eye-catching element to your digital artworks. Whether you want to create curved titles, decorative text elements, or incorporate text into complex shapes, Procreate provides an intuitive and versatile toolset to achieve your desired effects.
By leveraging the Liquify and Warp tools, along with the ability to manipulate individual anchor points, you can easily shape and curve your text in Procreate. Additionally, the wide range of customization options for fonts, sizes, and spacing ensures that you have full creative control over your curved text.
Experiment with different curve styles, adapt your text to fit any shape or layout, and explore various arrangements to elevate your digital designs to the next level. Whether you’re a professional artist or a hobbyist, Procreate’s flexibility and ease of use make it the ideal software for creating stunning curved text effects.
So go ahead, unleash your creativity, and start curving text in Procreate to add that extra flair and visual interest to your digital artwork!
FAQs
1. Can I curve text in Procreate?
Absolutely! Procreate has a fantastic feature that allows you to curve text effortlessly. With this feature, you can add a curved text effect to your artwork and designs, giving them a unique and eye-catching look.
2. How do I curve text in Procreate?
Curving text in Procreate is a breeze. To do so, follow these simple steps:
- Open Procreate and create a new canvas or open an existing one.
- Select the “Text” tool from the toolbar on the left-hand side.
- Type in the desired text in the text box.
- Tap and hold on the text layer until a menu appears.
- Select the “Edit Layer” option.
- Tap on the “Transform” option.
- Pinch the text by placing two fingers on the screen and moving them closer or farther apart to adjust the curve.
- Once you’re satisfied with the curve, tap on “Done” to apply the changes.
And there you have it! Your text is now beautifully curved in Procreate.
3. Can I adjust the size and position of the curved text in Procreate?
Absolutely! Procreate offers a wide range of customization options for your curved text. After curving the text using the steps mentioned above, you can easily adjust its size and position.
To resize the text, simply select the text layer and use the transform handles to make it smaller or larger. To reposition the text, select the layer and drag it to your desired location on the canvas.
4. Can I change the font and color of the curved text in Procreate?
Yes, you can easily modify the font and color of the curved text. Procreate provides a vast selection of fonts for you to choose from, allowing you to find the perfect style for your design. You can also experiment with different text colors to achieve the desired effect. To make these adjustments:
- Select the curved text layer.
- Tap on the “Fonts” option from the toolbar.
- Browse through the available font options and select the one you prefer.
- To change the text color, tap on the “Color” option and pick a color from the color wheel.
With these options at your disposal, you can create stunning and customized curved text designs in Procreate.
5. Can I animate the curved text in Procreate?
While Procreate is primarily a tool for static artwork, it does not offer built-in animation features. However, you can export your curved text design as a GIF or MP4 file and import it into a video editing software to add animation effects. This way, you can bring your curved text to life and create engaging and dynamic visuals.