
The Procreate app has revolutionized the digital art world, giving artists a powerful tool to create beautiful illustrations and designs right on their iPads. One of the key features that sets Procreate apart is its extensive library of brushes. These brushes allow artists to add unique textures, effects, and strokes to their artwork, unleashing their creativity to new heights.
However, if you’re new to Procreate, you might be wondering how to download brushes and take advantage of this vast collection. Don’t worry, we’ve got you covered! In this article, we’ll guide you step by step on how to download brushes to Procreate and unlock a world of artistic possibilities. Whether you’re a seasoned artist or just starting your digital art journey, this guide will help you add new brushes to your Procreate toolkit and enhance your artistic endeavors.
Inside This Article
- Overview of Procreate
- Understanding Brushes in Procreate
- Step-by-Step Guide to Downloading Brushes in Procreate
- Finding Brushes on Procreate’s Brush Library
- Downloading Brushes from External Sources
- Importing Brushes into Procreate
- Troubleshooting Common Issues
- Tips and Tricks for Using Brushes in Procreate
- Conclusion
- FAQs
Overview of Procreate
Procreate is a powerful digital illustration and painting app designed exclusively for iOS devices. Developed by Savage Interactive, this app has gained immense popularity among artists, designers, and hobbyists due to its extensive range of features and intuitive interface.
With Procreate, users can unleash their creativity and bring their ideas to life using a wide variety of brushes, colors, and textures. Whether you are a professional artist looking to create stunning digital artwork or a beginner wanting to explore the world of digital painting, Procreate provides all the tools you need to express yourself.
One of the key advantages of Procreate is its ability to simulate the look and feel of traditional art mediums. The app offers an array of realistic brushes that mimic the texture and behavior of real-life art supplies. From smooth, flowing watercolors to bold and vibrant oil paints, Procreate provides a vast library of brushes to suit every artistic style and preference.
Procreate also boasts an extensive range of advanced features that enhance the drawing and painting experience. It supports layers, allowing artists to work on different elements of their artwork separately and make non-destructive edits. The app also offers various blending modes, selection tools, and transform options that enable users to manipulate their artwork with precision and ease.
In addition to its impressive technical capabilities, Procreate offers a seamless and user-friendly interface. The app’s intuitive design allows artists to navigate through its features effortlessly, making it suitable for both beginners and experienced users. Procreate’s interface is customizable, allowing artists to arrange their workspace according to their preferences and optimize their workflow.
Procreate also supports multi-touch gestures, making it easy to zoom in and out, rotate the canvas, and make precise brush strokes. The app offers a comprehensive range of color palettes and blending options, enabling artists to create captivating and vibrant artwork. Procreate also includes various drawing guides and tools, such as symmetry and perspective assist, to help artists achieve accuracy and precision.
Whether you prefer creating digital illustrations, character designs, or concept art, Procreate is a versatile app that caters to a wide range of artistic needs. Its user-friendly interface, extensive brush library, and powerful features make it a top choice for artists around the world.
Now that you have an overview of Procreate, you’re ready to dive into the world of digital art and explore its incredible potential. In the following sections, we will delve deeper into the topic of brushes in Procreate and guide you through the process of downloading and using them.
Understanding Brushes in Procreate
Procreate is a powerful and popular digital art app designed specifically for professional artists and designers. One of the key features that sets Procreate apart from other art applications is its extensive range of brushes. Brushes in Procreate play a vital role in creating stunning digital artwork by allowing artists to simulate different textures and techniques.
At its core, a brush in Procreate is a digital tool that mimics the movements and characteristics of traditional art tools, such as paintbrushes, pencils, markers, and more. These digital brushes offer a wide variety of options, including different shapes, sizes, opacities, and textures, providing artists with an immense creative range.
Each brush in Procreate consists of various settings and attributes that can be customized to suit an artist’s specific style and project requirements. These settings include parameters like brush size, opacity, flow, blend mode, and more. By adjusting these settings, artists can achieve different brush strokes and effects, from fine lines and smooth gradients to bold textures and expressive marks.
Procreate offers a vast library of pre-installed brushes that cater to different artistic needs. These default brushes cover a wide range of mediums and techniques, from digital painting and sketching to calligraphy and inking. Artists can simply select a brush from the library and start creating artwork right away, but the real beauty of Procreate lies in its ability to import and install custom brushes.
Custom brushes are created by artists, designers, and creators who want to share their unique brushes and styles with the Procreate community. These brushes can be downloaded and installed into Procreate, expanding the creative possibilities even further. The Procreate community is incredibly active and supportive, with numerous websites, forums, and marketplaces dedicated to sharing and trading brushes.
By understanding the intricacies of brushes in Procreate, artists can elevate their digital art to new heights. Experimenting with different brushes and their settings can unlock endless possibilities, enabling artists to achieve a level of detail and realism not easily achievable with traditional art tools. Whether you’re a digital artist or a traditional artist venturing into the digital realm, mastering brushes in Procreate is essential for creating breathtaking masterpieces.
Step-by-Step Guide to Downloading Brushes in Procreate
Procreate is a popular digital art app that offers a wide range of brushes for users to create stunning artworks. If you’re new to Procreate and looking to download brushes for your projects, follow this step-by-step guide to get started.
Step 1: Open Procreate and access the Brush Library
To begin, open Procreate on your device. Once you’re in the app, tap on the brush icon located at the top right corner of the screen to open the Brush Library.
Step 2: Browse the Brush Library
Within the Brush Library, you’ll find a vast collection of pre-installed brushes. Take some time to explore and experiment with the various categories and brush sets available. This will give you a better understanding of the different brushes Procreate offers.
Step 3: Tap on the “+” icon to access the Brush Library
When you’re ready to download new brushes, tap on the “+” icon that is located in the top right corner of the Brush Library screen. This will take you to the Procreate Brush Library where you can find even more brushes to download.
Step 4: Choose a source for new brushes
In the Procreate Brush Library, you’ll have multiple options to choose from when it comes to downloading new brushes. You can explore the Procreate brush sets, browse through popular brush creators, or even import brushes from external sources.
Step 5: Preview and select the brushes you want to download
Once you’ve chosen a source for new brushes, you’ll be presented with a selection of brushes to preview. Take your time to browse through the brushes and find the ones that best suit your artistic style and preferences. When you’ve found a brush you like, tap on it for a closer look.
Step 6: Tap on “Download” to add the brush to your library
If you’re satisfied with a particular brush, tap on the “Download” button to add it to your Procreate brush library. You’ll notice that the brush will now appear in the Brush Library, ready to be used for your artworks.
Step 7: Repeat the process for more brushes
You can repeat the above steps to download and add more brushes to your Procreate library. Don’t hesitate to explore different sources and categories to find the brushes that best suit your creative needs.
Step 8: Organize your brushes for easy access
As you accumulate more brushes in your Procreate library, it’s a good idea to organize them for easy access. You can create custom brush sets or arrange them into folders based on themes or styles. This will help you stay organized and find the brushes you need quickly.
Step 9: Enjoy using your downloaded brushes
Now that you’ve successfully downloaded and added new brushes to your Procreate library, it’s time to unleash your creativity. Experiment with different brush settings, combine brushes, and explore the endless possibilities of Procreate to create stunning digital artworks.
By following this step-by-step guide, you’ll be able to easily download and use brushes in Procreate, expanding your artistic toolkit and taking your digital art to new heights!
Finding Brushes on Procreate’s Brush Library
Procreate offers a vast library of brushes that allows users to explore a wide range of artistic styles and techniques. Finding the perfect brush for your project is a breeze with Procreate’s intuitive interface. Here’s how you can navigate the brush library and discover the ideal brush for your artistic needs.
To access the brush library, open the Procreate app on your device. Once you are in the app, you’ll notice a toolbar at the top of the screen. Tap on the brush icon, which is represented by a brushstroke symbol, to open the brush library.
Upon opening the brush library, you’ll be presented with a selection of categories to choose from. These categories are designed to help you narrow down your search and find brushes that match your artistic vision. Some common categories include “Pencils,” “Inking,” “Watercolor,” “Textures,” and “Special Effects.”
Simply tap on the category that best suits your needs to browse the available brushes within that category. Each category contains a variety of brushes with unique characteristics and textures. Take your time to explore the different options and experiment with different brushes to see which ones resonate with your artistic style.
If you already have a specific brush in mind, you can use the search bar located at the top of the brush library to quickly find it. Simply type in the name or a keyword associated with the brush, and Procreate will display the relevant matches.
As you scroll through the brush library, you’ll notice that each brush is showcased with a preview image and a name. This allows you to get a visual representation of what the brush looks like and helps you determine if it aligns with your artistic intentions.
Once you have found a brush that catches your eye, simply tap on it to select it. You can then start using the brush immediately in your current artwork or create a new layer to experiment with its capabilities. Don’t be afraid to test out different brushes and see how they interact with your digital canvas.
It’s important to mention that Procreate regularly updates its brush library, offering new brushes and improvements. To stay up to date with the latest additions, make sure to periodically check for updates within the app or keep an eye on Procreate’s official website and social media channels for announcements.
The brush library in Procreate is a treasure trove of artistic possibilities. By exploring the different categories and experimenting with various brushes, you’ll be able to elevate your digital artwork and bring your creative vision to life.
Please find the content below with the required HTML tags:
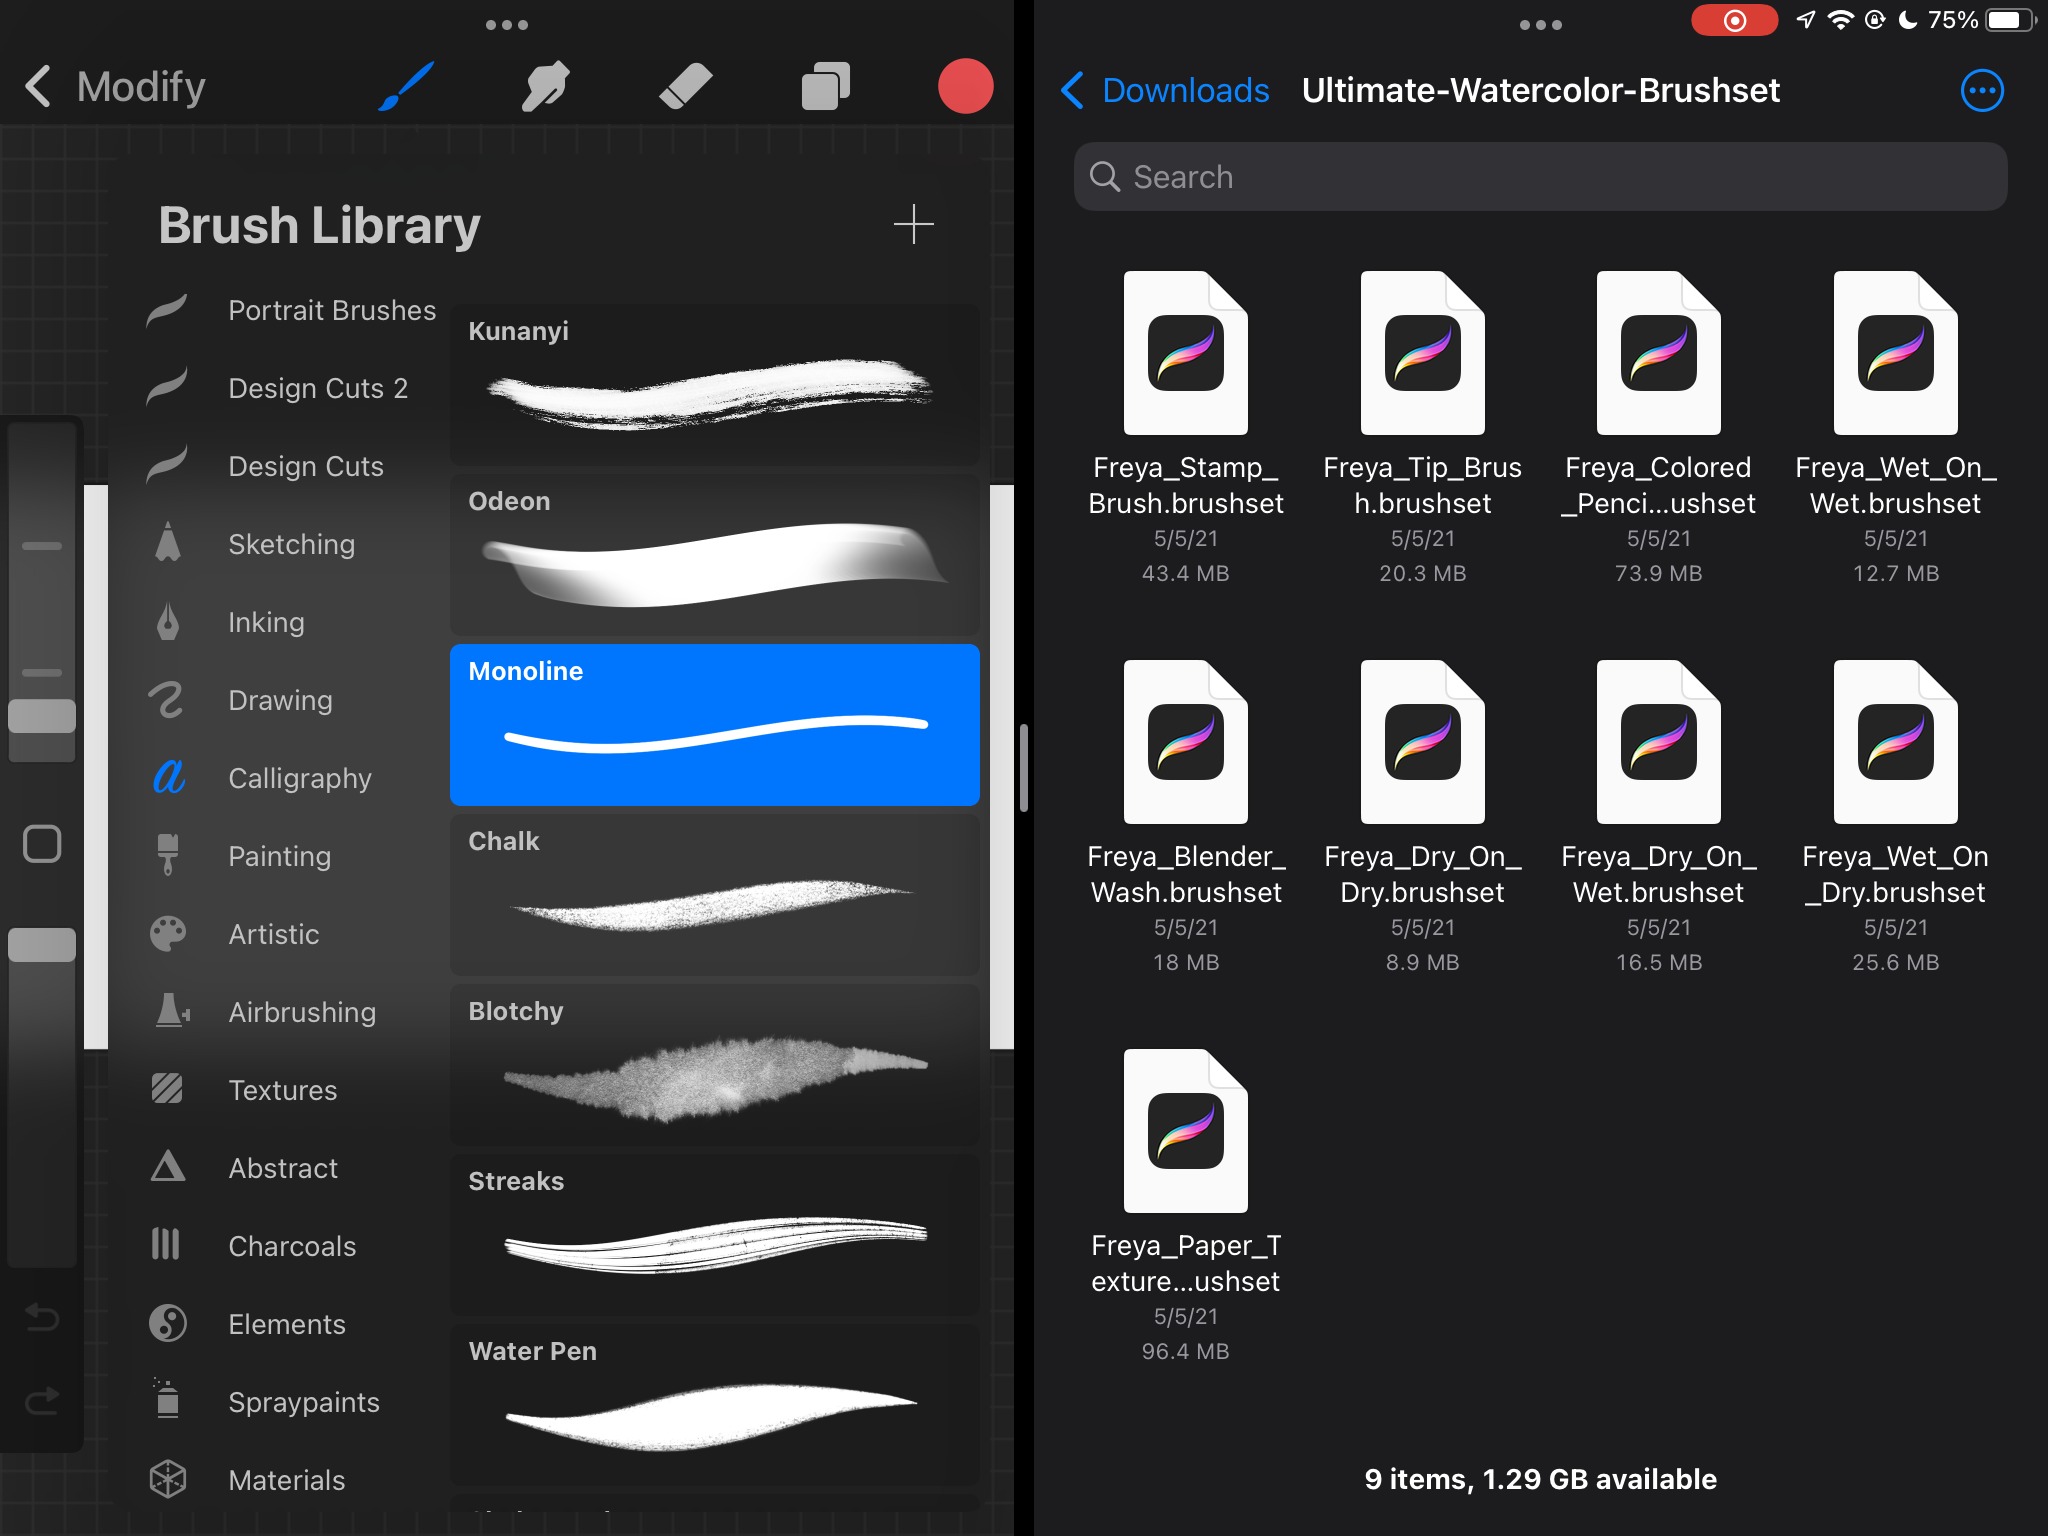
Downloading Brushes from External Sources
If you want to expand your collection of brushes in Procreate, you have the option to download brushes from external sources. This opens up a whole new world of possibilities by providing you with a wide range of unique and specialized brushes. Here’s how you can download brushes from external sources and bring them into Procreate:
1. Start by searching for brush sets online. Many artists and creators offer their custom brushes for free or for purchase on various platforms and websites. Look for reputable sources that provide high-quality brushes compatible with Procreate.
2. Once you have found a brush set you like, download it to your device. Typically, brushes come in a .brush or .brushset file format. You can usually download them by clicking on a download link or following the given instructions on the website.
3. After downloading the brush set, locate the file in your device’s storage. This can be in your Downloads folder or the folder you specified when saving the file. Remember the location, as you will need to access it in the next steps.
4. Open Procreate on your device. Tap on the “+” icon located at the top right corner of the screen to create a new canvas.
5. Once you’re in the canvas creation screen, swipe left to access the Import tab. This tab allows you to import various resources into Procreate, including brushes.
6. Tap on the “Import” option. This will open up your device’s file browser within Procreate.
7. Navigate to the location where you saved the downloaded brush file. Tap on the file to select it, and then tap on “Import” in the top right corner of the screen.
8. Procreate will import the brush set, and you will see a preview of the brushes on the screen. You can tap on each brush to see a larger preview and read the brush details.
9. To finalize the import of the brushes, tap on “Done” at the top right corner of the screen. The brushes will now be added to your brush library in Procreate.
10. You can access the newly imported brushes by tapping on the brush icon on the top right corner of the screen. Swipe through the brush library until you find the imported brushes.
Notes: It is important to ensure that the brushes you download are compatible with the version of Procreate you are using. Some brushes may require specific versions or updates of the app to work correctly.
By downloading brushes from external sources, you can access a wide range of brushes created by talented artists and designers. This allows you to experiment with different styles, textures, and effects in your Procreate artworks, giving them a unique touch.
Remember to respect the terms and conditions set by the creators of the brushes. If the brushes are for personal use only, avoid sharing or distributing them without proper permission.
Now that you know how to download brushes from external sources, you can explore and enhance your Procreate experience by adding new and exciting brushes to your collection.
Importing Brushes into Procreate
Procreate is a popular digital art app that offers a vast variety of brushes to enhance your artistic creations. While the app comes with a decent selection of built-in brushes, you may want to explore additional brushes to diversify your artistic toolkit. Thankfully, Procreate allows you to import custom brushes created by other artists or download brushes from external sources. In this section, we will guide you through the process of importing brushes into Procreate.
Before diving into the process, it’s important to note that Procreate supports brushes in the .brush format. So, when you are searching for brushes to import, make sure they are compatible with Procreate and are in the appropriate format.
Now, let’s proceed with the step-by-step guide to importing brushes into Procreate:
- First, find the brush you want to import into Procreate. There are several platforms where you can browse and download brushes created by artists, such as Gumroad, Creative Market, or even Procreate’s own Brush Library.
- Once you have found a brush you like, download the brush file to your device. Typically, brushes are downloaded in a .zip format.
- Next, locate the downloaded .zip file and extract its contents. You can use a file manager app or the built-in file manager on your device. Extracting the file will give you the actual .brush file.
- Now open Procreate on your device and create a new canvas or open an existing artwork.
- In the top-right corner of the toolbar, you will find the brush icon. Tap on it to access the Brush Library.
- Within the Brush Library, tap on the “+” icon located in the upper-right corner. This will open the Import dialog box.
- Navigate to the location where you saved the extracted .brush file and select it. Procreate will import the brush file and add it to your library.
- Once imported, you can find the newly added brush in the Brush Library. Simply tap on it to select and start using it in your artwork.
That’s it! You have successfully imported a custom brush into Procreate. Now, let your creativity flourish by experimenting with different brushes and techniques in your digital artwork.
It’s worth mentioning that Procreate also allows you to organize your brushes into custom sets for easier access. You can create different sets based on your preferences or art styles.
Furthermore, if you want to remove a brush from Procreate, simply swipe left on the brush name in the Brush Library and tap on the “Delete” option that appears. This will remove the brush from Procreate, but keep in mind that it won’t delete the actual brush file from your device.
Now that you know how to import brushes into Procreate, the possibilities are endless. Explore different brushes, experiment with textures and strokes, and take your digital art to the next level. Happy creating!
Troubleshooting Common Issues
While downloading brushes in Procreate is usually a seamless process, you may encounter a few common issues along the way. Here are some troubleshooting tips to help you overcome these challenges:
- Brush Not Showing: If you’ve downloaded a brush but can’t find it in Procreate, make sure you’ve properly imported it. Go to the “Brush Library” in Procreate and tap on the “+” symbol to import the brush. If you’ve already imported it and it still doesn’t show up, try restarting the app.
- Incompatibility with Procreate Version: Brushes are occasionally designed for specific versions of Procreate. If you’re using an older version of Procreate, some brushes may not work properly or may not show up at all. Check the brush’s compatibility with your Procreate version before downloading.
- Corrupted Brush File: In rare cases, a brush file may get corrupted during the download process. If you’re experiencing issues with a specific brush, try deleting it from Procreate and then re-downloading it from the original source.
- Storage Space: Procreate brushes can take up a significant amount of storage space, especially if you download a large number of them. If you’re running low on storage, consider deleting some unused brushes or transferring them to an external storage device to free up space.
- Brush Settings not Working: Sometimes, brushes may behave differently than expected due to customized settings. If you’re experiencing issues with a particular brush, make sure to check its settings and adjust them as needed. Additionally, ensure that you’re using the brush on an appropriate layer and that the layer’s blend mode is compatible with the brush.
If you’ve tried these troubleshooting tips and are still encountering issues, it’s always helpful to reach out to the Procreate community for assistance. Whether through forums, social media groups, or Procreate’s official support channels, there are knowledgeable users and professionals who can provide guidance and solutions to your specific problem.
Remember, troubleshooting common issues is a normal part of the process, and with a little patience and persistence, you’ll be downloading and using brushes in Procreate without any problems.
Tips and Tricks for Using Brushes in Procreate
Procreate is a powerful digital art and design application that offers a wide range of brushes to enhance your artistic creations. To help you get the most out of Procreate’s brushes, here are some tips and tricks to elevate your digital art:
1. Experiment with Different Brush Types: Procreate offers a diverse range of brush types, including organic, textured, and specialty brushes. Don’t be afraid to experiment and try out different brushes to find the perfect one for your artwork. Each brush has unique settings and characteristics, so take the time to explore and discover the ones that suit your style best.
2. Customize and Fine-Tune Brushes: Procreate allows you to customize and adjust the settings of each brush to your preference. Play around with brush opacity, size, flow, and shape dynamics to create the desired effect. You can also adjust the brush blend mode and add texture or noise to achieve more interesting and realistic results.
3. Use Brush Shortcuts: Procreate offers a variety of shortcuts to streamline your workflow and save time. Familiarize yourself with brush shortcuts such as adjusting brush size and opacity with gestures, double-tapping to reset a brush, or using the two-finger swipe to undo or redo actions. These shortcuts can greatly improve your efficiency and productivity while working on your projects.
4. Utilize Layer Blending Modes: Layer blending modes in Procreate can enhance the appearance and texture of your artwork. Experiment with different blending modes such as Multiply, Overlay, and Screen to achieve unique effects and create depth in your paintings. Don’t be afraid to experiment and combine different blending modes to create stunning and complex visuals.
5. Take Advantage of Brush Smoothing: Brush smoothing is a handy feature in Procreate that helps you create smooth and precise strokes. Enable brush smoothing and adjust the strength to control the stability of your brush strokes. This feature is especially useful for creating clean linework or intricate details in your artwork.
6. Layer your Brushes: Procreate’s layer system allows you to stack multiple brushes on top of each other, creating interesting effects and textures. Layer different brush strokes, blend colors, and experiment with different opacities to add depth and dimension to your artwork. This technique can bring your creations to life and make them visually captivating.
7. Save and Organize Your Favorite Brushes: As you explore and discover brushes that you love, make sure to save and organize them for easy access. Procreate allows you to create custom brush sets and organize your brushes into different categories. This way, you can quickly find and use your favorite brushes without searching through the extensive brush library.
8. Practice and Experiment: The key to mastering brushes in Procreate is practice and experimentation. Don’t be afraid to push the boundaries, try new techniques, and explore the capabilities of different brushes. The more you practice, the more you will understand the nuances of each brush and develop your unique artistic style.
9. Take Advantage of Tutorials and Online Communities: Procreate has a vibrant online community where artists share their knowledge, tips, and tutorials. Take advantage of these resources to expand your skills and learn from others. Participate in challenges, join forums, and follow artists who inspire you. The Procreate community is a valuable source of inspiration and learning.
By applying these tips and tricks, you can unlock the full potential of Procreate’s brushes and elevate your digital art to new heights. Embrace the versatility and creativity that Procreate offers, and let your imagination soar.
In conclusion, downloading brushes for Procreate opens up a whole new world of creative possibilities. Whether you are an artist looking to enhance your digital artwork or a hobbyist wanting to explore the endless options, having a diverse collection of brushes can truly elevate your artwork. With the wide range of brush sets available online, there is something for everyone, from realistic pencil sketches to vibrant watercolors and everything in between.
By following the steps outlined in this article, you can easily find and download brushes to Procreate and start experimenting with different styles and effects. Remember to consider the brush size, opacity, and blending modes to achieve the desired results. Don’t shy away from trying out new brushes and techniques, as that is where true creativity thrives.
So, unleash your creativity, download those brushes, and let your imagination run wild with Procreate!
FAQs
1. Can I download brushes for Procreate?
Yes, you can download brushes for Procreate. Procreate has a wide selection of brushes available, both free and paid, that can be downloaded from various sources including the Procreate app itself, online marketplaces, and individual artists. These brushes can enhance your artwork and provide a unique creative experience.
2. How can I download brushes for Procreate?
To download brushes for Procreate, you can follow these steps:
– Open the Procreate app on your device.
– Go to the “Brush Library” tab, which is represented by a paintbrush icon.
– Tap on the “+” icon at the top right corner of the screen.
– This will take you to the “Brush Library” panel where you can browse and download brushes.
– Choose a brush category, then select a brush pack you want to download.
– Tap on the “Download” button next to the brush pack to add it to your collection.
– Once the brush pack is downloaded, you can access and use the brushes in your artwork.
3. Are all brushes for Procreate free?
No, not all brushes for Procreate are free. While there are many free brushes available, some artists and designers create premium brushes that come with a price tag. These premium brushes often offer advanced features, unique textures, and specialized effects. Whether to use free brushes or invest in premium ones depends on your personal preference and creative needs.
4. Where can I find brushes for Procreate?
You can find brushes for Procreate from various sources including:
– Procreate app: The Procreate app itself offers a wide range of brushes that you can download directly from its built-in library.
– Online marketplaces: Websites like Gumroad, Creative Market, and Etsy have a large collection of Procreate brushes created by individual artists and designers for sale.
– Social media platforms: Artists often share their Procreate brushes on platforms like Instagram and YouTube, so following artists and checking out their profiles can lead you to new brushes.
– Procreate forums and communities: Joining Procreate forums, groups, and communities can connect you with fellow artists who may share or recommend brushes.
5. Can I create my own brushes for Procreate?
Yes, Procreate allows you to create your own custom brushes. The app provides powerful brush creation tools that allow you to control various aspects such as shape, size, opacity, and texture. You can experiment with different settings and create brushes that suit your artistic style and needs. This feature gives you the freedom to personalize your creative workflow and unlock endless possibilities in Procreate.