
Backing up your iPhone 10 is crucial for safeguarding your valuable data and ensuring a seamless transition to a new device if needed. Whether you're upgrading to a new iPhone or simply want to secure your photos, contacts, and settings, having a reliable backup is essential. In this article, we'll explore the various methods to backup an iPhone 10, ranging from iCloud and iTunes to third-party solutions. By understanding the importance of regular backups and mastering the process, you can enjoy peace of mind knowing that your cherished data is protected. Let's delve into the world of iPhone backups and discover the best practices for securing your digital life.
Inside This Article
- Step 1: Update Your iPhone
- Step 2: Connect to Wi-Fi
- Step 3: Backup Using iCloud
- Step 4: Backup Using iTunes
- Conclusion
- FAQs
**
Step 1: Update Your iPhone
**
Before backing up your iPhone, it’s essential to ensure that your device is running the latest version of iOS. Updating your iPhone not only provides access to the newest features and security enhancements but also helps in creating a smooth and successful backup process.
Updating your iPhone is a straightforward process. Simply navigate to “Settings,” tap on “General,” and then select “Software Update.” If an update is available, tap “Download and Install.” Your device will then begin the update process, which may take a few minutes depending on the size of the update and your internet connection speed.
It’s important to have your iPhone connected to a reliable Wi-Fi network during the update to ensure a stable and uninterrupted download. Additionally, it’s advisable to have your device connected to a power source to prevent any interruptions due to low battery levels during the update.
By keeping your iPhone updated, you not only ensure that it is equipped with the latest features and security patches but also set the stage for a seamless backup process, safeguarding your valuable data and settings.
**
Step 2: Connect to Wi-Fi
**
Before proceeding with the backup process, ensure that your iPhone is connected to a Wi-Fi network. This is crucial as backing up your device requires a stable and high-speed internet connection to ensure that all your data is securely and efficiently saved.
Connecting to Wi-Fi is a simple process. First, access the “Settings” app on your iPhone by tapping on the gear-shaped icon. Then, select “Wi-Fi” from the list of options. Here, you will see a list of available Wi-Fi networks. Tap on the network you wish to connect to and enter the password if prompted. Once entered, tap “Join” to establish the connection.
It’s important to ensure that the Wi-Fi network you connect to has a strong and reliable signal. This will prevent any interruptions during the backup process, ensuring that all your valuable data is securely transferred to the backup location.
**
Step 3: Backup Using iCloud
**
Backing up your iPhone using iCloud is a convenient and secure way to ensure that your data is safe and accessible. iCloud provides a seamless backup process that automatically saves your photos, videos, app data, settings, and more to the cloud. Here’s how you can easily backup your iPhone using iCloud:
1. Connect to Wi-Fi: Before initiating the backup process, ensure that your iPhone is connected to a stable Wi-Fi network. This is crucial as the backup file can be large, and a Wi-Fi connection ensures a smooth and uninterrupted transfer of data to iCloud.
2. Access iCloud Settings: On your iPhone, navigate to “Settings” and tap on your name at the top of the screen. Next, select “iCloud” and then “iCloud Backup.”
3. Enable iCloud Backup: Toggle the “iCloud Backup” option to enable it. Once activated, your iPhone will automatically back up to iCloud when it is connected to Wi-Fi, locked, and plugged into power. You can also manually initiate a backup by tapping “Back Up Now” in the “iCloud Backup” menu.
4. Monitor Backup Progress: After initiating the backup, you can monitor its progress by navigating to “Settings,” selecting your name, tapping “iCloud,” and then “iCloud Backup.” This screen displays the time of the last successful backup and the size of the backup file.
5. Ensure Sufficient iCloud Storage: It’s essential to ensure that you have enough iCloud storage to accommodate the backup. If your iCloud storage is insufficient, you can purchase more storage or manage your existing storage by deleting unnecessary data or upgrading your iCloud storage plan.
By following these simple steps, you can effortlessly backup your iPhone using iCloud, providing you with peace of mind knowing that your valuable data is securely stored in the cloud.
**
Step 4: Backup Using iTunes
**
Backing up your iPhone using iTunes is another reliable method to safeguard your data. iTunes allows you to create a complete backup of your device, including settings, app data, and more. Follow these steps to back up your iPhone using iTunes:
1. Connect Your iPhone to Your Computer: Use a USB cable to connect your iPhone to your computer. Launch iTunes if it doesn’t open automatically.
2. Trust This Computer: If prompted on your iPhone, tap “Trust” to establish a connection between your device and the computer.
3. Select Your iPhone in iTunes: Once connected, your iPhone icon will appear in the upper-left corner of the iTunes window. Click on it to access your device’s summary.
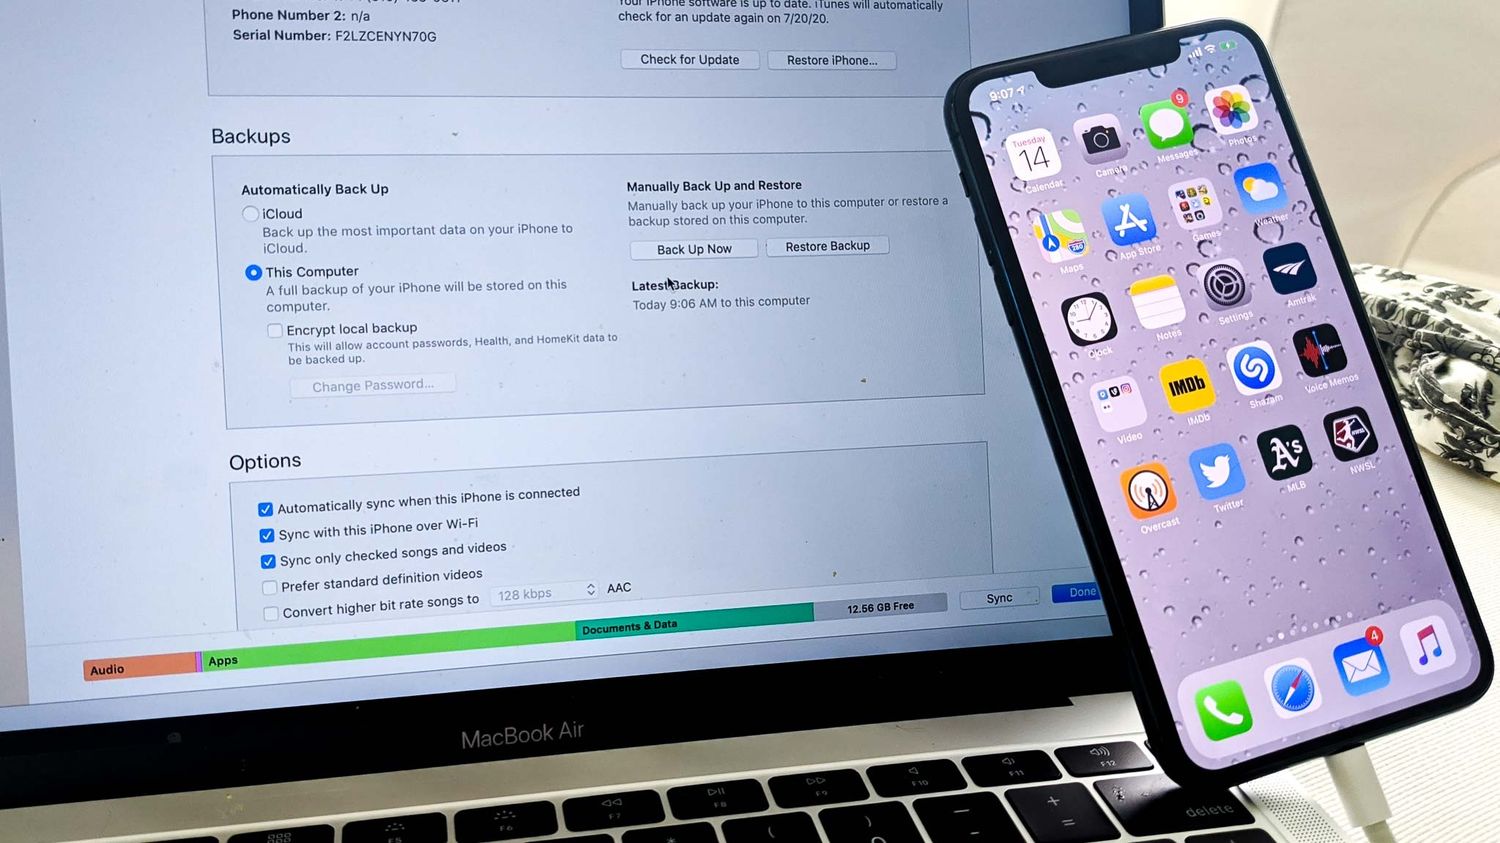
4. Back Up Your iPhone: Under the “Backups” section, select “This computer” and click “Back Up Now.” iTunes will start creating a backup of your iPhone’s data.
5. Monitor the Backup Process: Keep your iPhone connected until the backup process is complete. You can monitor the progress in the iTunes status bar.
6. Verify the Backup: After the backup is finished, ensure that it was successful by checking the backup details in iTunes preferences.
By following these steps, you can confidently back up your iPhone using iTunes, providing an additional layer of security for your valuable data.
**
Conclusion
**
Backing up your iPhone 10 is essential for safeguarding your valuable data and ensuring a seamless experience with your device. By regularly creating backups, you can protect your photos, videos, contacts, messages, and app data from unforeseen mishaps. Whether you opt for iCloud or iTunes, the process is straightforward and can be customized to suit your preferences. With the convenience of automatic backups and the flexibility to manually initiate the process, you have full control over securing your digital assets. Embracing a proactive approach to iPhone backup empowers you to enjoy peace of mind, knowing that your cherished content is securely preserved and easily recoverable whenever the need arises.
FAQs
Q: How do I know if my iPhone 10 is backed up?
A: To check if your iPhone 10 is backed up, go to Settings > [your name] > iCloud > iCloud Backup. If the iCloud Backup option is toggled on and the last backup date is recent, your iPhone 10 is backed up.
Q: Can I backup my iPhone 10 without using iCloud?
A: Yes, you can backup your iPhone 10 using your computer and iTunes. Simply connect your iPhone 10 to your computer, open iTunes, and select your device. From there, you can choose to back up your iPhone 10 to your computer.
Q: What should I do if my iPhone 10 backup is taking a long time?
A: If your iPhone 10 backup is taking longer than expected, ensure that you have a stable and fast internet connection. You can also try restarting your iPhone 10 and the Wi-Fi router to see if it speeds up the backup process.
Q: Can I access my iPhone 10 backup from multiple devices?
A: Yes, if you use iCloud to backup your iPhone 10, you can access the backup from multiple devices signed in with the same Apple ID. This allows for seamless access to your data across your Apple devices.
Q: Will my iPhone 10 backup include all my data and settings?
A: Yes, when you backup your iPhone 10, it includes your device settings, app data, home screen and app organization, iMessage, text (SMS), and MMS messages, photos and videos on your iPhone, and more.