
Do Not Disturb is a handy feature on the iPhone 13 that allows you to temporarily silence calls, messages, and notifications, ensuring you can enjoy uninterrupted peace and focus. Whether you’re in a meeting, getting some much-needed rest, or simply want to minimize distractions, Do Not Disturb is your go-to solution. Activating this feature on your iPhone 13 is a breeze, and in this article, we will guide you through the process step-by-step. So, if you’re wondering how to turn on Do Not Disturb on your new iPhone 13, keep reading to discover the simple and effective methods that will help you achieve a truly distraction-free experience.
Inside This Article
- How to Access the Control Center on iPhone 13
- Enabling Do Not Disturb Mode on iPhone 13
- Customizing Do Not Disturb Settings on iPhone 13
- Managing Exceptions in Do Not Disturb Mode on iPhone 13
- Conclusion
- FAQs
How to Access the Control Center on iPhone 13
Accessing the Control Center on your iPhone 13 is a breeze and allows you to quickly access various settings and functions. Follow these simple steps to access the Control Center:
1. Start by unlocking your iPhone 13 by either using Face ID or entering your passcode.
2. Once you are on the home screen, swipe down from the top-right corner of the screen. This action will reveal the Control Center.
3. Alternatively, if you prefer, you can also access the Control Center by swiping up from the bottom of the screen. Again, start your swipe from the bottom-right corner of the display.
4. Upon accessing the Control Center, you’ll find an array of useful shortcuts and settings that you can easily toggle on or off by tapping the icons. These include Wi-Fi, Bluetooth, Airplane Mode, Brightness, Volume, Do Not Disturb, and more.
5. To customize the Control Center, go to Settings on your iPhone 13, then tap on Control Center. From here, you can add or remove shortcuts and rearrange their order based on your preferences.
That’s it! You are now equipped with the knowledge of how to access the Control Center on your iPhone 13. With just a simple swipe, you can easily control various features and settings right at your fingertips.
Enabling Do Not Disturb Mode on iPhone 13
Do Not Disturb mode on your iPhone 13 can be a lifesaver when you need some uninterrupted time or when you want to avoid distractions during important events or meetings. It allows you to silence calls, notifications, and alerts, ensuring that you can focus on the task at hand without any interruptions. In this article, we will walk you through the step-by-step process of enabling Do Not Disturb mode on your iPhone 13.
1. Enable Do Not Disturb from the Control Center
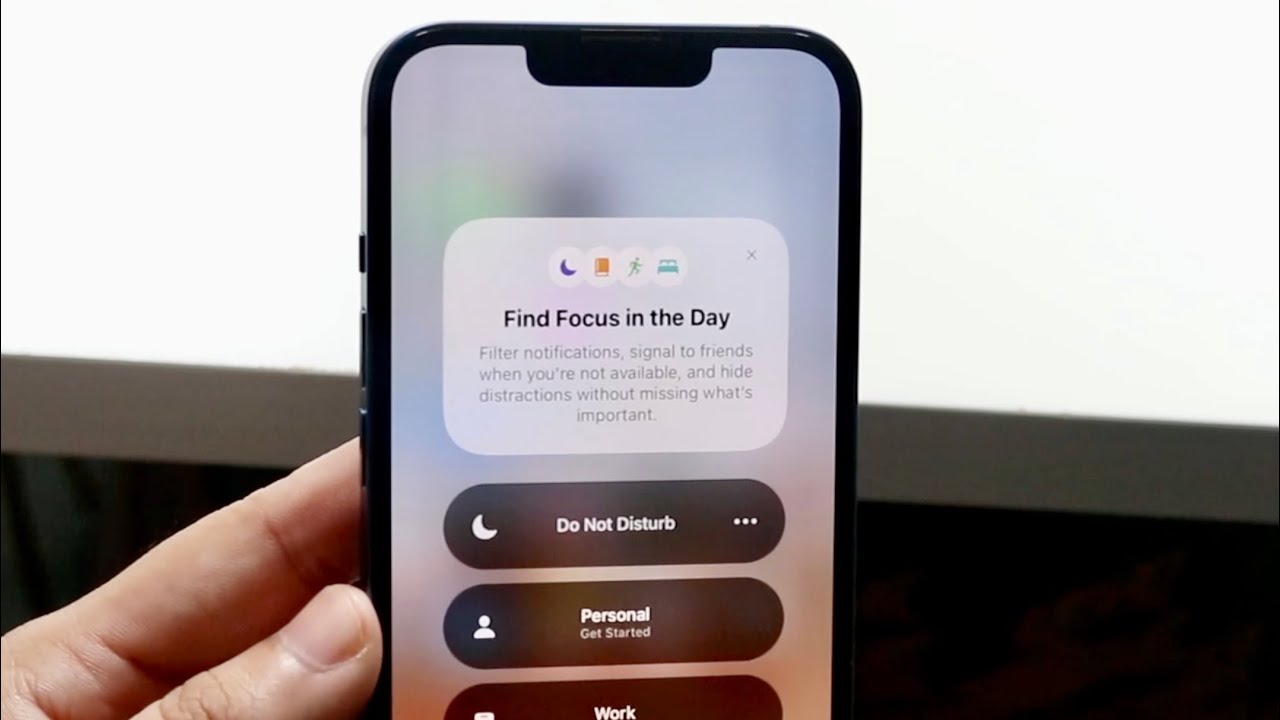
The easiest way to enable Do Not Disturb mode on your iPhone 13 is by using the Control Center. To access the Control Center, simply swipe down from the top right corner of your iPhone 13’s screen. You will see a range of options, including the “Do Not Disturb” button with a crescent moon icon. Tap on the button to activate Do Not Disturb mode. The crescent moon icon will appear on the top right corner of your screen, indicating that the mode is now enabled.
2. Activate Do Not Disturb Mode using the Settings app
If you prefer to enable Do Not Disturb mode through the Settings app, follow these steps:
- Open the “Settings” app on your iPhone 13.
- Scroll down and tap on the “Do Not Disturb” option.
- Toggle on the “Do Not Disturb” switch to activate the mode.
In the Do Not Disturb settings, you can customize the behavior of the mode by allowing calls from specific contacts, enabling repeated calls to come through, or setting a schedule for when Do Not Disturb should automatically turn on and off.
3. Schedule Do Not Disturb to automatically turn on
If you want Do Not Disturb mode to activate automatically at certain times, you can schedule it using the “Scheduled” option in the Do Not Disturb settings. Here’s how:
- Go to the “Do Not Disturb” settings in the “Settings” app.
- Tap on the “Scheduled” option.
- Toggle on the “Scheduled” switch.
- Select the “From” and “To” times for when you want Do Not Disturb mode to be enabled.
By setting a schedule, you can ensure that your iPhone 13 will automatically enter Do Not Disturb mode during specific times, such as when you’re sleeping or attending a meeting.
4. Enable Do Not Disturb during specific events or while driving
In addition to scheduling Do Not Disturb mode, you can also enable it during specific events or while driving. Here’s how:
- Go to the “Do Not Disturb” settings in the “Settings” app.
- Tap on the “Do Not Disturb While Driving” option.
- Select the desired option: “Automatically,” “When Connected to Car Bluetooth,” or “Manually.”
Enabling Do Not Disturb While Driving can help minimize distractions on the road and ensure your focus remains on driving safely.
That’s it! You now know how to enable Do Not Disturb mode on your iPhone 13. Whether you need some uninterrupted time or simply want to avoid distractions, Do Not Disturb mode can be a valuable feature to have on your device.
Customizing Do Not Disturb Settings on iPhone 13
Do Not Disturb is a valuable feature on the iPhone 13 that allows you to silence all incoming calls, alerts, and notifications whenever you need some uninterrupted time. But did you know that you can customize the Do Not Disturb settings on your iPhone 13 to suit your specific needs? Whether you want to schedule Do Not Disturb to activate automatically at specific times, enable it during important events, or while driving, these customization options can greatly enhance your iPhone experience.
Let’s explore how you can customize the Do Not Disturb settings on your iPhone 13:
1. Activate Do Not Disturb from the Control Center
The easiest way to turn on Do Not Disturb on your iPhone 13 is through the Control Center. Simply swipe down from the top-right corner of the screen to access the Control Center. Look for the crescent moon icon, and tap on it to enable Do Not Disturb mode. This will instantly silence all incoming calls and notifications until you decide to turn it off.
2. Customize Do Not Disturb in the Settings app
If you prefer to have more control over your Do Not Disturb settings, you can customize them in the Settings app. Go to the Settings app on your iPhone 13 and scroll down until you find the “Do Not Disturb” option. Here, you can toggle on “Scheduled” to set specific times for Do Not Disturb to automatically activate. You can also allow calls from specific contacts in your Favorites or enable repeated calls to come through if someone calls you multiple times within a short period.
3. Schedule Do Not Disturb for specific events
Another useful feature of customization is the ability to schedule Do Not Disturb for specific events. For example, if you have a weekly meeting that you don’t want to be disturbed during, you can set up an event in your Calendar app and enable Do Not Disturb only for that event. This way, your iPhone 13 will automatically silence calls and notifications during the specified event, ensuring you can focus on what matters most.
4. Enable Do Not Disturb while driving
Safety is paramount, especially while driving. That’s why Apple has included a feature that allows you to enable Do Not Disturb while driving. When this feature is activated, your iPhone 13 will automatically detect when you’re driving and silence all calls and notifications. This not only helps to minimize distractions but also promotes responsible driving habits.
Customizing the Do Not Disturb settings on your iPhone 13 gives you the flexibility to tailor this important feature according to your preferences. Whether you want to set specific schedules, enable it for important events, or activate it while driving, your iPhone 13 can provide a more personalized and distraction-free experience.
So go ahead, take advantage of the customization options available and enjoy uninterrupted peace of mind with Do Not Disturb on your iPhone 13.
Managing Exceptions in Do Not Disturb Mode on iPhone 13
Do Not Disturb mode on iPhone 13 is a handy feature that allows you to silence notifications and calls, providing you with uninterrupted moments. However, there may be certain contacts or apps that you don’t want to miss out on, even when in Do Not Disturb mode. To manage exceptions in Do Not Disturb mode on your iPhone 13, follow these simple steps:
1. Open the Settings app on your iPhone 13.
2. Scroll down and tap on “Do Not Disturb”.
3. Tap on “Allow Calls From” to specify which calls you want to allow when Do Not Disturb is enabled. You have the option to choose from “Everyone”, “No One”, “Favorites”, or “Contacts”. Select the option that suits your preference.
4. To allow repeated calls to come through in case of emergencies, toggle on the “Repeated Calls” option. When this option is enabled, if the same person calls you within three minutes, their call will not be silenced.
5. To manage exceptions for specific contacts, go back to the main “Do Not Disturb” screen and tap on “Allow Calls From”. Scroll down and tap on “Custom”. Here, you can choose specific individuals or groups of contacts that you want to allow calls from while in Do Not Disturb mode.
6. Apart from calls, you can also manage exceptions for messages and other notifications. To do this, go back to the main “Do Not Disturb” screen and navigate to the “Silence” section. Tap on “Always” if you want to silence all notifications, or select “Only while iPhone is locked” to allow notifications when your device is unlocked.
7. If you want to allow certain apps to break through the Do Not Disturb barrier, scroll down to the “Do Not Disturb While Driving” section and tap on “Activate” under “Allow These Apps”. From here, you can choose which apps are allowed to send you notifications even when in Do Not Disturb mode.
By managing exceptions in Do Not Disturb mode on your iPhone 13, you can ensure that important calls, messages, and notifications can still reach you when you need them, while enjoying the benefits of a peaceful, interruption-free experience.
Conclusion
In conclusion, the Do Not Disturb feature on the iPhone 13 is a valuable tool for managing interruptions and ensuring a more focused and uninterrupted experience. Whether you’re in a meeting, enjoying quality time with friends and family, or simply needing some peace and quiet, Do Not Disturb offers a convenient way to temporarily silence incoming calls, messages, and notifications.
By enabling Do Not Disturb, you can have peace of mind knowing that your iPhone 13 won’t disrupt you with unnecessary alerts. Utilize the customization options to set specific times, allow important calls, or activate the feature when connected to your car’s Bluetooth system. The flexibility of this feature allows you to tailor it to your individual preferences and needs.
With Do Not Disturb, you can reclaim control over your iPhone 13 and optimize your productivity, concentration, and overall iPhone experience. So go ahead and activate Do Not Disturb mode on your iPhone 13 today, and enjoy a peaceful and interruption-free user experience.
FAQs
Here are some frequently asked questions about turning on Do Not Disturb on iPhone 13:
-
1. How do I turn on Do Not Disturb on my iPhone 13?
To turn on Do Not Disturb on your iPhone 13, simply swipe down from the top right corner of the screen to access the Control Center. Then, tap on the crescent moon icon to activate Do Not Disturb mode. You can also schedule Do Not Disturb to automatically turn on during specific times by going to Settings > Do Not Disturb and adjusting the settings.
-
2. Can I allow certain contacts to bypass Do Not Disturb on my iPhone 13?
Yes, you can allow certain contacts to bypass Do Not Disturb on your iPhone 13. To do this, go to Settings > Do Not Disturb > Allow Calls From and choose either “Favorites” to allow calls from people in your Favorites list, “All Contacts” to allow calls from anyone in your contacts, or “No One” to block all calls during Do Not Disturb mode.
-
3. Will enabling Do Not Disturb on my iPhone 13 block all incoming notifications?
Enabling Do Not Disturb on your iPhone 13 will silence incoming calls and notifications, but it does not block them completely. The notifications will still be received, but they will not generate any sound or vibration, and the screen will remain dark when they arrive.
-
4. Can I customize the settings for Do Not Disturb on my iPhone 13?
Yes, you can customize the settings for Do Not Disturb on your iPhone 13. In addition to scheduling specific times for Do Not Disturb to activate, you can also choose to allow repeated calls to come through, set up an automatic reply to let people know you are currently unavailable, and even specify certain apps or services whose notifications you still want to receive during Do Not Disturb mode.
-
5. Is there a way to quickly turn on Do Not Disturb on my iPhone 13 without going to the Control Center?
Yes, there is a quick way to turn on Do Not Disturb on your iPhone 13 without going to the Control Center. You can create a shortcut on your Home Screen by using the Shortcuts app. Simply open the app, create a new shortcut, add the “Set Do Not Disturb” action, and then add the shortcut to your Home Screen. This way, you can activate Do Not Disturb with just a tap on the shortcut icon.