Instagram has turned the tables of photography ever since it entered the internet craze over the past years. From the tedious and time-consuming photo editing to the one-click preset, photo manipulation gradually shifted from difficult to easy using several helpful photo editing applications like Lightroom Mobile.
Whether you’re a newbie at photo editing or an expert, Lightroom Mobile is the application that satisfies all of your desired tricks and effects in just a few clicks. However, searching for these tricks on the web can be arduous and might even sap the motivation right out of you. Fortunately, here at Cellular News, we got you covered.
Here are the 8 simple ways on how to use Lightroom Mobile like a pro. But before we go straight into it, let us first understand the nook and cranny of Lightroom Mobile.
In A Nutshell: What is Lightroom Mobile?

Lightroom Mobile or also known as Lightroom CC Mobile is a powerful photo editing application developed by Adobe. The first edition existed as a desktop version and the mobile version (for iOS and Android) was later on released in 2014.
The Lightroom Mobile app (iOS and Android) is designed to serve as an extension of the primary Lightroom program installed on your PC. It extends your current work in progress beyond the desktop, allowing you super-smooth access to your Lightroom catalog with basic editing options to keep track of your progress even when you’re on the go.
The application is free to download on the Apple Appstore and Google Play Store. However, a few advanced features and the ability to sync to the Lightroom Cloud requires you to avail of a Creative Cloud subscription which costs $9.99USD a month.
The price is well worth it because once availing, you can now have access to more than 30 professional presets and functions with an additional 2 GB of Creative Cloud storage space.
Without further ado, here is the comprehensive Lightroom Mobile tutorial for your photo editing needs.
8 Simple Ways on How To Use Lightroom Mobile Like A Pro:
1. HDR Support
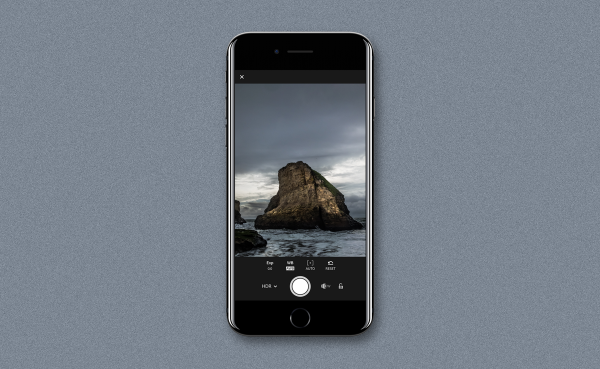
Lightroom Mobile offers endless possibilities to its users, and one of them is capturing HDR photos. You can take amazing photos using Lightroom’s built-in mobile camera and it’s even better than your device’s normal phone camera. You will not only get a RAW image but also an HDR.
HDR, or High Dynamic Range, is a feature in which multiple photos with different exposures blend together into a single image. The main goal of HDR is to capture the brightest highlights and the darkest shadows to use in the photo.
The feature works automatically by scanning the scene and determining the correct exposure range. Then, three DNG files are captured and are immediately aligned, merged, deghosted, and tone-mapped in the app to eliminate unnecessary noise in the images.
However, the HDR feature of Lightroom Mobile is not widely available on all devices. For iOS users, devices that can capture in DNG such as iPhone 6s, 6s Plus, 7, 7 Plus, iPhone SE, or iPad Pro 9.7″ are only supported. On the other hand, Android users using Samsung S7, S7 Edge, Google Pixel, and Pixel XL can only access the said function.
2. Import Photos Using Siri
Whether you’re using Lightroom for iPad or iPhone, the application has a sweet treat for you. Importing your RAW files from your camera roll to your Lightroom Mobile is now easy using only your voice and your most trusted companion, Siri. Lightroom’s latest update allows you to automate this task with Siri shortcut. Siri shortcut is available for both iPhone and iPad with iOS 12 or higher.
Here’s how to do that:
- Go to settings
- Tap Siri & Search
- Tap All Shortcuts to see the expanded list of commands
- At the upper right corner of the screen, tap the “+” sign.
- Search for ‘Get Photos’
- Drag the ‘Get Last Import’ command on the shortcut builder.
- Go back to the list of commands and look for ‘Import to Lightroom.’ If you don’t see the said command, just type it in the search box.
- Drag the ‘Import to Lightroom’ command on the shortcut builder. This should be below the ‘Get Last Import’ command.
- Apply preset is also available under the ‘Import to Lightroom’ command. If you have to add preset to the photos you wish to import, you can choose from B&W, Color, Vignetting, and more. However, if you opt not to, you can just deselect the option.
3. Sync Your Photos To Your Mobile or Desktop
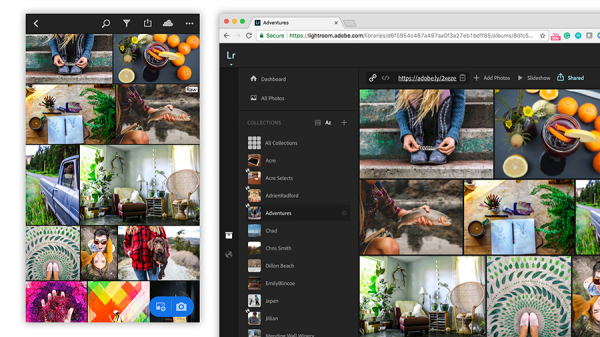
Syncing your files across your devices is now a language and necessity in the modern world. Not only does it saves you from losing your precious files but also keeps you from the heavy burden of carrying excess and bulky baggage.
To sync, here are the instructions:
- Open your Lightroom software on the desktop and click on your name on the top left.
- Click the ‘Sync with Lightroom Mobile.”
Do note that you have to be signed in to your Adobe account for this feature to work. Once you have successfully set up the sync feature of LIghtroom, any edits you make will automatically be registered and transferred across all your devices. How seamless is that?
4. Healing Tool
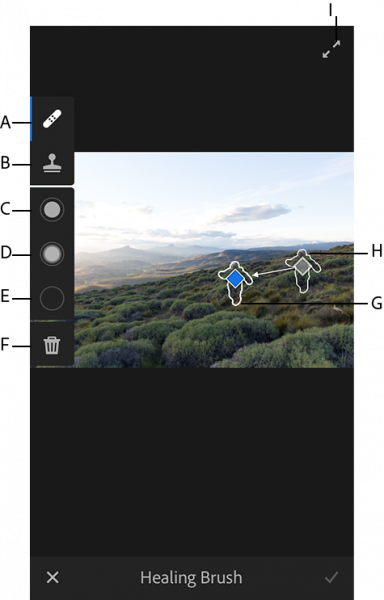
Many photographers have complained about a black dot appearing on their photos and ruining their masterpieces. Luckily, Lightroom Mobile released the healing tool in 2018 to its mobile version to address the issue.
Healing Tool, or also known as a healing brush, allows you to remove any unnecessary part of the image. Once highlighted, Lightroom will automatically pick up another spot to put over that point to replace the unwanted noise or image clutter like it never existed before.
This is a good tool used by photographers and editors since it mostly saves their ruined creations and prevents them from being discarded and thrashed. If you happen to experience this, all you have to do is to try out Lightroom Mobile’s Healing Tool.
5. Selective Edits
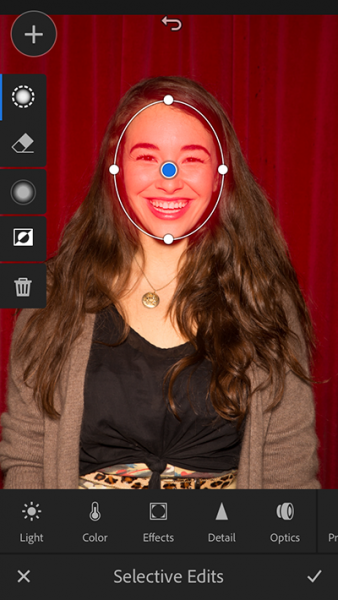
Selective Edits, as its name suggests, allows you to edit only certain parts of the picture. Nothing more, nothing less. It basically makes any of your selected spots stand out. You can select a region and apply your desired corrections using the Brush Selection, Radial Selection, and Linear Selection.
The Brush selection tool allows you to select specific parts of the region by brushing over them. The Radial selection, on the other hand, lets you select a region of editing and you are able to control the size and dimension of that region. Finally, Linear Selection does the same but only in linear mode. You can make the region as wide and narrow as you like.
6. Tone Curve
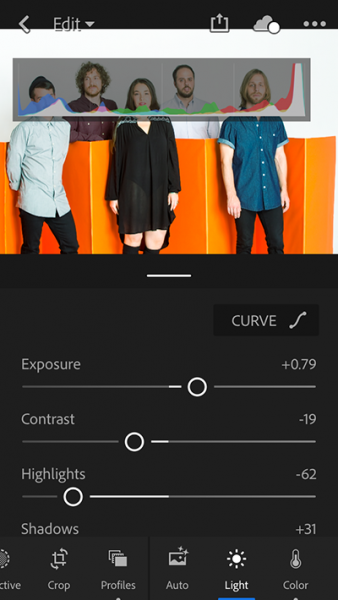
Tone Curve is one of the Lightroom Mobile tricks photographers frequently used to adjust the settings of their images. It is a graphical representation of the tonal range of your image. Moreover, it is represented as a straight diagonal line that you can manipulate to change the tone of your image. The bottom range represents the shadows, the middle range represents mid-tones, and the top range represents the highlights. You can manipulate the tone curve to achieve your desired setting and outcome.
7. Customized Presets
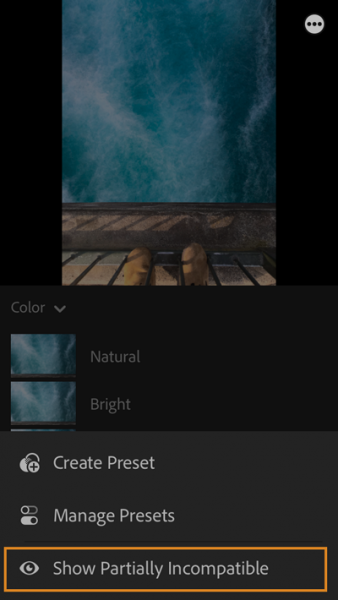
When it comes to mobile photo editing, the convenience and usability of an editing application come to mind. Applying the desired photo adjustment can be tough since one has to manipulate a photo using his thumb and not a desktop mouse. With this, people resort to a one-click edit involving the use of presets.
A preset is a configured setting applied to photos to adjust its brightness, clarity, color, tone, and a lot more. With just a single click, you can already achieve a certain look for your photo. What makes presets stood out the most is its consistency, accuracy, time management, and capability to conduct bulk editing.
To create your own presets, you have to do the following:
- Open the app and load a new photo to edit.
- Edit the image according to your preferred adjustments: exposure, highlights, shadows, white balance, and healing tool.
- Tap the 3 dots on the top-right corner of the screen.
- Tap ‘Create Preset.’
- Name your preset and click on the checkmark at the upper right hand to save your effect.
On the other hand, if you prefer buying and installing presets by famous photographers, there are several ways on how to download Lightroom presets on iPhone and Android. It sometimes involved using the desktop software of Lightroom and syncing it to your mobile version. Or, you can directly buy presets from Lightroom.
8. Capture Photos Using Pro Mode
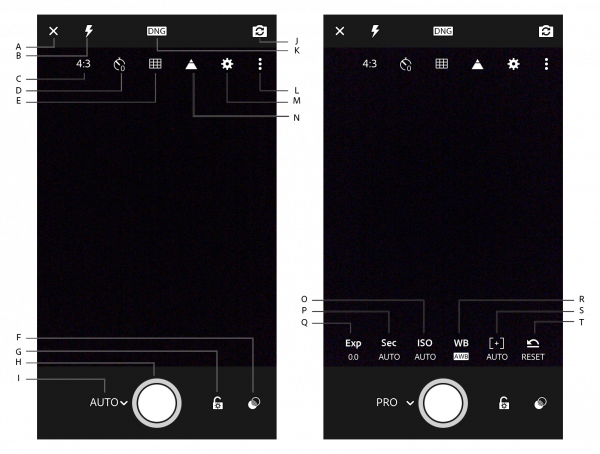
The Pro Mode allows you to capture photos using the same settings as you use with your DSLR cameras. Through Pro mode, you can adjust the ISO, shutter speed, exposure compensation, and white balance. You have to enable your skills in photography to successfully pull off a wonderful photo using Lightroom Mobile’s Professional mode.
Now that you know these incredibly easy ways how to use Lightroom Mobile like a pro, it’s time to download the app if you haven’t and start editing your photos like an expert.
