
Creating presets on Lightroom Mobile can significantly streamline your photo editing process, allowing you to achieve consistent and professional-looking results with just a few taps. Whether you're an amateur photographer or a seasoned pro, mastering the art of presets can revolutionize your workflow and elevate the visual impact of your images. In this comprehensive guide, we'll delve into the intricacies of creating presets on Lightroom Mobile, empowering you to unlock the full potential of this powerful tool. From understanding the fundamentals of presets to mastering the art of customization, we'll equip you with the knowledge and skills needed to curate your own collection of personalized presets. Get ready to embark on a journey of creativity and efficiency as we explore the fascinating world of Lightroom Mobile presets.
Inside This Article
- Setting Up Your Lightroom Mobile
- Editing Your Photo and Creating Your Desired Look
- Saving Your Edits as a Preset
- Applying Your Preset to Other Photos
- Conclusion
- FAQs
Setting Up Your Lightroom Mobile
If you're an avid photographer or simply someone who loves capturing life's precious moments, having a powerful yet user-friendly photo editing tool on your mobile device is a game-changer. Adobe Lightroom Mobile is a fantastic option, offering a wide array of editing features and the convenience of being accessible on the go. Let's dive into the process of setting up your Lightroom Mobile and getting ready to unleash your creativity.
1. Download and Install the App
The first step in embarking on your Lightroom Mobile journey is to download the app from the App Store (for iOS devices) or the Google Play Store (for Android devices). Once the installation is complete, launch the app to begin the setup process.
2. Sign In or Create an Adobe Account
Upon opening the app, you will be prompted to sign in with your Adobe account. If you don't have one, fear not! You can easily create a new account within the app. Having an Adobe account allows you to sync your edits and presets across multiple devices, ensuring a seamless editing experience.
3. Explore the Interface
As you enter the Lightroom Mobile interface, take a moment to familiarize yourself with the layout. The intuitive design makes it easy to navigate through the various editing tools, presets, and settings. Spend some time tapping around to discover the different features and options available to you.
4. Customize Your Preferences
Before you start editing your photos, it's a good idea to customize the app's preferences to suit your workflow. This includes setting up default import settings, choosing your preferred file format, and adjusting other options to align with your editing style.
5. Enable Syncing Across Devices
One of the most advantageous features of Lightroom Mobile is its ability to sync your edits and presets across multiple devices. To enable this functionality, head to the settings and ensure that syncing is turned on. This ensures that your work is seamlessly accessible whether you're using your smartphone, tablet, or computer.
By following these steps, you'll have your Lightroom Mobile app set up and ready to unleash your creativity. With the app at your fingertips, you're well-equipped to capture, edit, and share stunning photos with ease. Now that your setup is complete, it's time to dive into the exciting world of photo editing and create captivating visuals that truly stand out.
Editing Your Photo and Creating Your Desired Look
Once you have your Lightroom Mobile app set up, it's time to delve into the exhilarating process of editing your photos and bringing your creative vision to life. Whether you're aiming for vibrant landscapes, captivating portraits, or artistic compositions, Lightroom Mobile provides a plethora of editing tools to help you achieve your desired look. Let's explore the steps to enhance your photos and craft a compelling visual narrative.
1. Selecting the Perfect Photo
Before diving into the editing process, it's essential to choose the photo that you want to work on. Whether it's a breathtaking sunset, a candid portrait, or a bustling cityscape, select an image that resonates with you and holds the potential to shine even brighter with your creative touch.
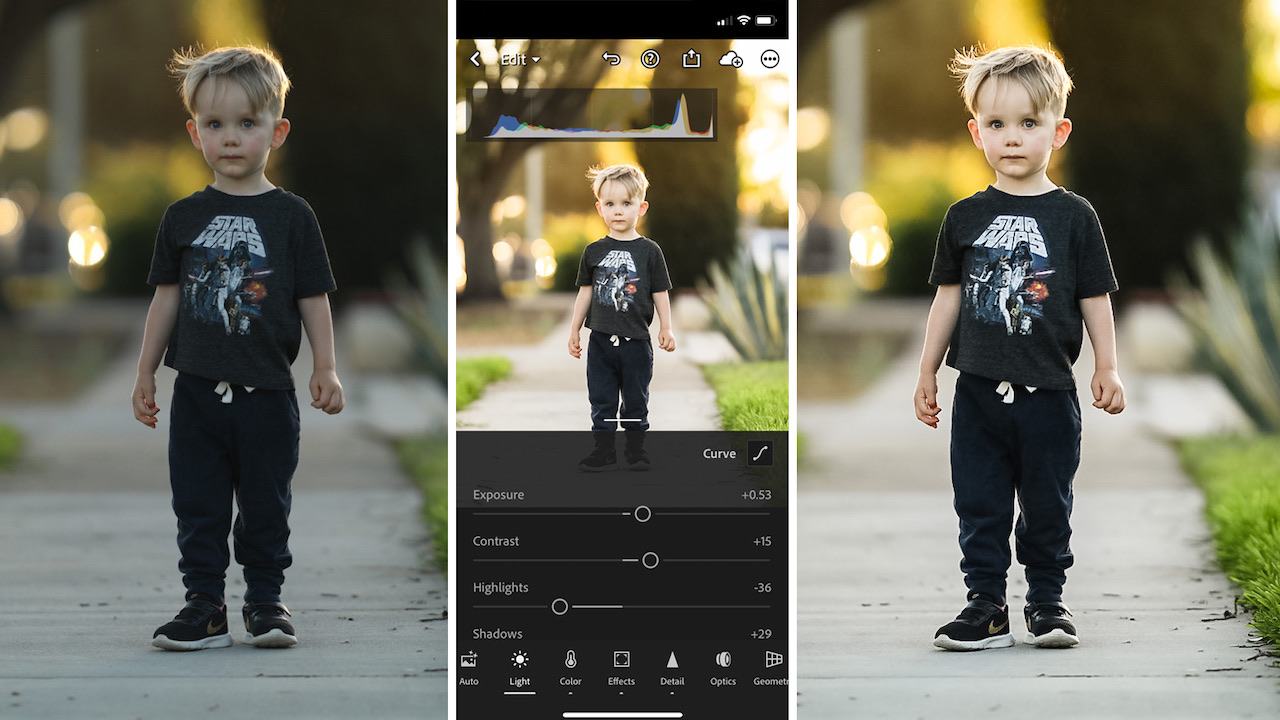
2. Enhancing Exposure and Color
Lightroom Mobile offers a range of powerful editing tools to refine the exposure and color balance of your photo. Adjust the exposure to achieve the ideal brightness and contrast, ensuring that the details in both the highlights and shadows are well-defined. Next, fine-tune the colors using the intuitive sliders to bring out the vibrancy of the scene or evoke a specific mood through color grading.
3. Fine-Tuning Composition and Cropping
Composition plays a pivotal role in the visual impact of a photo. With Lightroom Mobile, you can refine the composition by straightening horizons, correcting perspective distortions, and cropping the image to emphasize the focal point. This step allows you to guide the viewer's gaze and enhance the overall storytelling within the frame.
4. Applying Creative Presets
To expedite the editing process and maintain a consistent aesthetic across your photos, consider utilizing creative presets. These pre-defined sets of editing adjustments can instantly transform the mood and style of your photo, whether you're aiming for a vintage film look, a modern minimalist vibe, or a dramatic black and white aesthetic.
5. Fine-Tuning Details and Sharpness
Detail is key to creating a compelling and immersive visual experience. Use the sharpening and noise reduction tools in Lightroom Mobile to enhance the clarity and crispness of intricate details within your photo, ensuring that every element is rendered with precision and finesse.
6. Adding Artistic Effects and Finishing Touches
To infuse your photo with a touch of artistry, explore the artistic effects and finishing touches available in Lightroom Mobile. Whether it's adding a subtle vignette, applying selective adjustments to specific areas of the photo, or experimenting with creative filters, these final touches can elevate your photo and imbue it with your unique style.
By following these steps, you can harness the full potential of Lightroom Mobile to edit your photos and bring your desired look to fruition. Embrace the creative process, experiment with different editing techniques, and let your artistic intuition guide you as you transform your photos into captivating visual masterpieces. With each edit, you're not just enhancing a photo – you're crafting a compelling story that resonates with your audience and leaves a lasting impression.
Saving Your Edits as a Preset
As you immerse yourself in the captivating process of editing your photos using Lightroom Mobile, you may find yourself consistently applying a set of adjustments that align with your preferred style or aesthetic. Instead of recreating these edits from scratch for each photo, Lightroom Mobile offers a remarkable feature that streamlines your workflow and empowers you to preserve your meticulously crafted edits as presets. These presets serve as a blueprint for your desired look, allowing you to effortlessly apply a consistent style to your photos with a single tap. Let's explore the seamless process of saving your edits as a preset and unlocking a world of editing efficiency and creative consistency.
1. Crafting Your Signature Look
Before delving into the preset creation process, it's essential to fine-tune your edits to reflect your signature style. Whether it's a vibrant and punchy aesthetic, a moody and atmospheric vibe, or a clean and minimalist approach, ensure that your edits encapsulate the visual narrative you aim to convey. By refining the exposure, color grading, sharpening, and other adjustments to align with your creative vision, you set the stage for encapsulating your unique style within a preset.
2. Accessing the Preset Creation Interface
Once you've perfected your edits and achieved the desired look for your photo, navigate to the preset creation interface within Lightroom Mobile. This intuitive feature allows you to encapsulate your editing adjustments into a reusable preset, ensuring that your carefully crafted style is readily available for future use.
3. Naming Your Preset
As you embark on the preset creation journey, take a moment to give your preset a meaningful and descriptive name. Whether it's "Golden Hour Glow," "Urban Noir," or "Vintage Elegance," a well-chosen name not only reflects the essence of your preset but also facilitates easy identification and selection when applying it to your photos.
4. Saving Your Edits
With your edits finalized and your preset named, it's time to immortalize your creative vision as a preset. By saving your edits as a preset, you encapsulate the precise adjustments, tonal curves, color settings, and artistic nuances that define your desired look. This process ensures that your editing expertise is distilled into a convenient and reusable format, ready to be applied to future photos with a single tap.
5. Organizing and Categorizing Presets
To maintain a well-organized collection of presets, consider categorizing them based on themes, moods, or editing styles. This approach allows you to effortlessly locate and apply the perfect preset that complements the visual narrative of each photo, enhancing your editing efficiency and creative versatility.
By following these steps, you can seamlessly save your edits as a preset in Lightroom Mobile, empowering you to preserve your unique style and apply it to your photos with unparalleled ease. This feature not only elevates your editing efficiency but also ensures a consistent and cohesive visual identity across your photography portfolio. With your presets at your disposal, you're poised to infuse your photos with your distinct artistic flair and captivate your audience with visually stunning imagery.
Applying Your Preset to Other Photos
Once you've meticulously crafted and saved your custom preset in Lightroom Mobile, you're equipped with a powerful tool that streamlines your editing workflow and infuses your photos with a consistent and distinctive style. The ability to apply your preset to other photos with ease not only enhances your editing efficiency but also ensures a cohesive visual identity across your photography portfolio. Let's delve into the seamless process of applying your preset to other photos and unlocking a world of creative versatility and editing precision.
1. Selecting Your Target Photo
The first step in applying your preset to another photo is to choose the image that you wish to enhance with your signature style. Whether it's a recent capture, a timeless landscape, or a captivating portrait, select a photo that aligns with the aesthetic and mood encapsulated by your preset. By carefully choosing your target photo, you set the stage for a harmonious fusion between your preset's style and the visual narrative of the image.
2. Accessing the Presets Library
Navigate to the presets library within Lightroom Mobile, where your meticulously crafted preset resides alongside a collection of pre-defined and user-created presets. This intuitive interface serves as a treasure trove of editing styles, allowing you to effortlessly browse, select, and apply the perfect preset to your target photo.
3. Applying Your Custom Preset
Locate your custom preset within the presets library and apply it to your target photo with a simple tap. As you witness the transformative impact of your preset on the image, revel in the seamless fusion of your signature style with the visual elements within the photo. Whether it's a vibrant boost in colors, a captivating shift in mood, or a refined tonal balance, your preset breathes new life into the photo, elevating it to new artistic heights.
4. Fine-Tuning and Refining
After applying your preset, take a moment to fine-tune and refine the adjustments to suit the specific characteristics of the target photo. Lightroom Mobile empowers you to further customize the editing parameters, allowing you to strike the perfect balance and ensure that your preset harmonizes flawlessly with the nuances of the image. This step enables you to tailor the preset's impact, ensuring that it accentuates the unique attributes of the photo.
5. Embracing Creative Exploration
With your preset applied and the adjustments refined, embrace the creative exploration that unfolds within Lightroom Mobile. Experiment with additional editing tools, selective adjustments, and artistic effects to further enhance the visual narrative of the photo. This iterative process allows you to infuse your creative vision into the image, resulting in a captivating visual masterpiece that resonates with your unique style.
By following these steps, you can seamlessly apply your custom preset to other photos in Lightroom Mobile, unlocking a world of creative versatility and editing precision. This feature not only streamlines your editing workflow but also empowers you to infuse your photos with a consistent and distinctive aesthetic, ensuring that each image reflects your artistic flair and captivates your audience with visually stunning imagery. With your preset at your fingertips, you're poised to embark on a captivating journey of visual storytelling, where each photo becomes a canvas for your creative expression.
In conclusion, creating presets on Lightroom Mobile can significantly streamline your photo editing process, allowing you to achieve consistent and professional-looking results with just a few taps. By following the steps outlined in this article, you can customize and save your preferred editing settings as presets, enabling you to apply them to your photos effortlessly. Whether you're a photography enthusiast or a professional, leveraging presets can save you time and effort, while ensuring a cohesive and polished aesthetic across your images. With the ability to fine-tune and organize your presets, Lightroom Mobile empowers you to elevate your mobile editing workflow and produce stunning visuals that resonate with your unique style and vision. Embrace the power of presets and unlock the full potential of your mobile photography journey.
FAQs
-
What are presets in Lightroom Mobile, and how do they work?
Presets in Lightroom Mobile are pre-defined settings that can be applied to photos to achieve a specific look or style. They work by adjusting various aspects of the photo, such as color, exposure, and contrast, with just one click. -
Can I create my own presets in Lightroom Mobile?
Yes, you can create your own presets in Lightroom Mobile by adjusting the settings of a photo to achieve the desired look, then saving those settings as a preset for future use. -
Are presets compatible across different devices using Lightroom Mobile?
Yes, presets created in Lightroom Mobile are compatible across different devices, allowing you to apply the same look to your photos regardless of the device you are using. -
How can I organize and manage my presets in Lightroom Mobile?
You can organize and manage your presets in Lightroom Mobile by creating preset groups, renaming presets, and deleting or exporting presets as needed to keep your collection organized. -
Can I share my presets with others using Lightroom Mobile?
Yes, you can share your presets with others using Lightroom Mobile by exporting them and sending the preset files to other users, who can then import and use them in their own Lightroom Mobile app.