
In today’s fast-paced digital world, staying connected to our work is essential. One of the most convenient ways to do so is by adding our work email to our phones. By doing this, we can easily access and manage our work messages, appointments, and tasks on the go. However, for those who are not well-versed in mobile phone technology, the process of adding a work email to a phone may seem daunting. But fear not – in this article, we will guide you through the step-by-step process of adding your work email to your phone. Whether you have an Android or an iPhone, we have got you covered. So let’s get started and ensure that you never miss an important work email again!
Inside This Article
- Step 1: Go to Email Settings
- Step 2: Select Add Account
- Step 3: Enter Your Work Email Address
- Step 4: Configure Account Settings
- Step 5: Complete Email Setup
- Conclusion
- FAQs
Step 1: Go to Email Settings
Adding a work email to your phone allows you to stay connected and productive wherever you go. To get started, you’ll need to access the email settings on your mobile device. Here’s how:
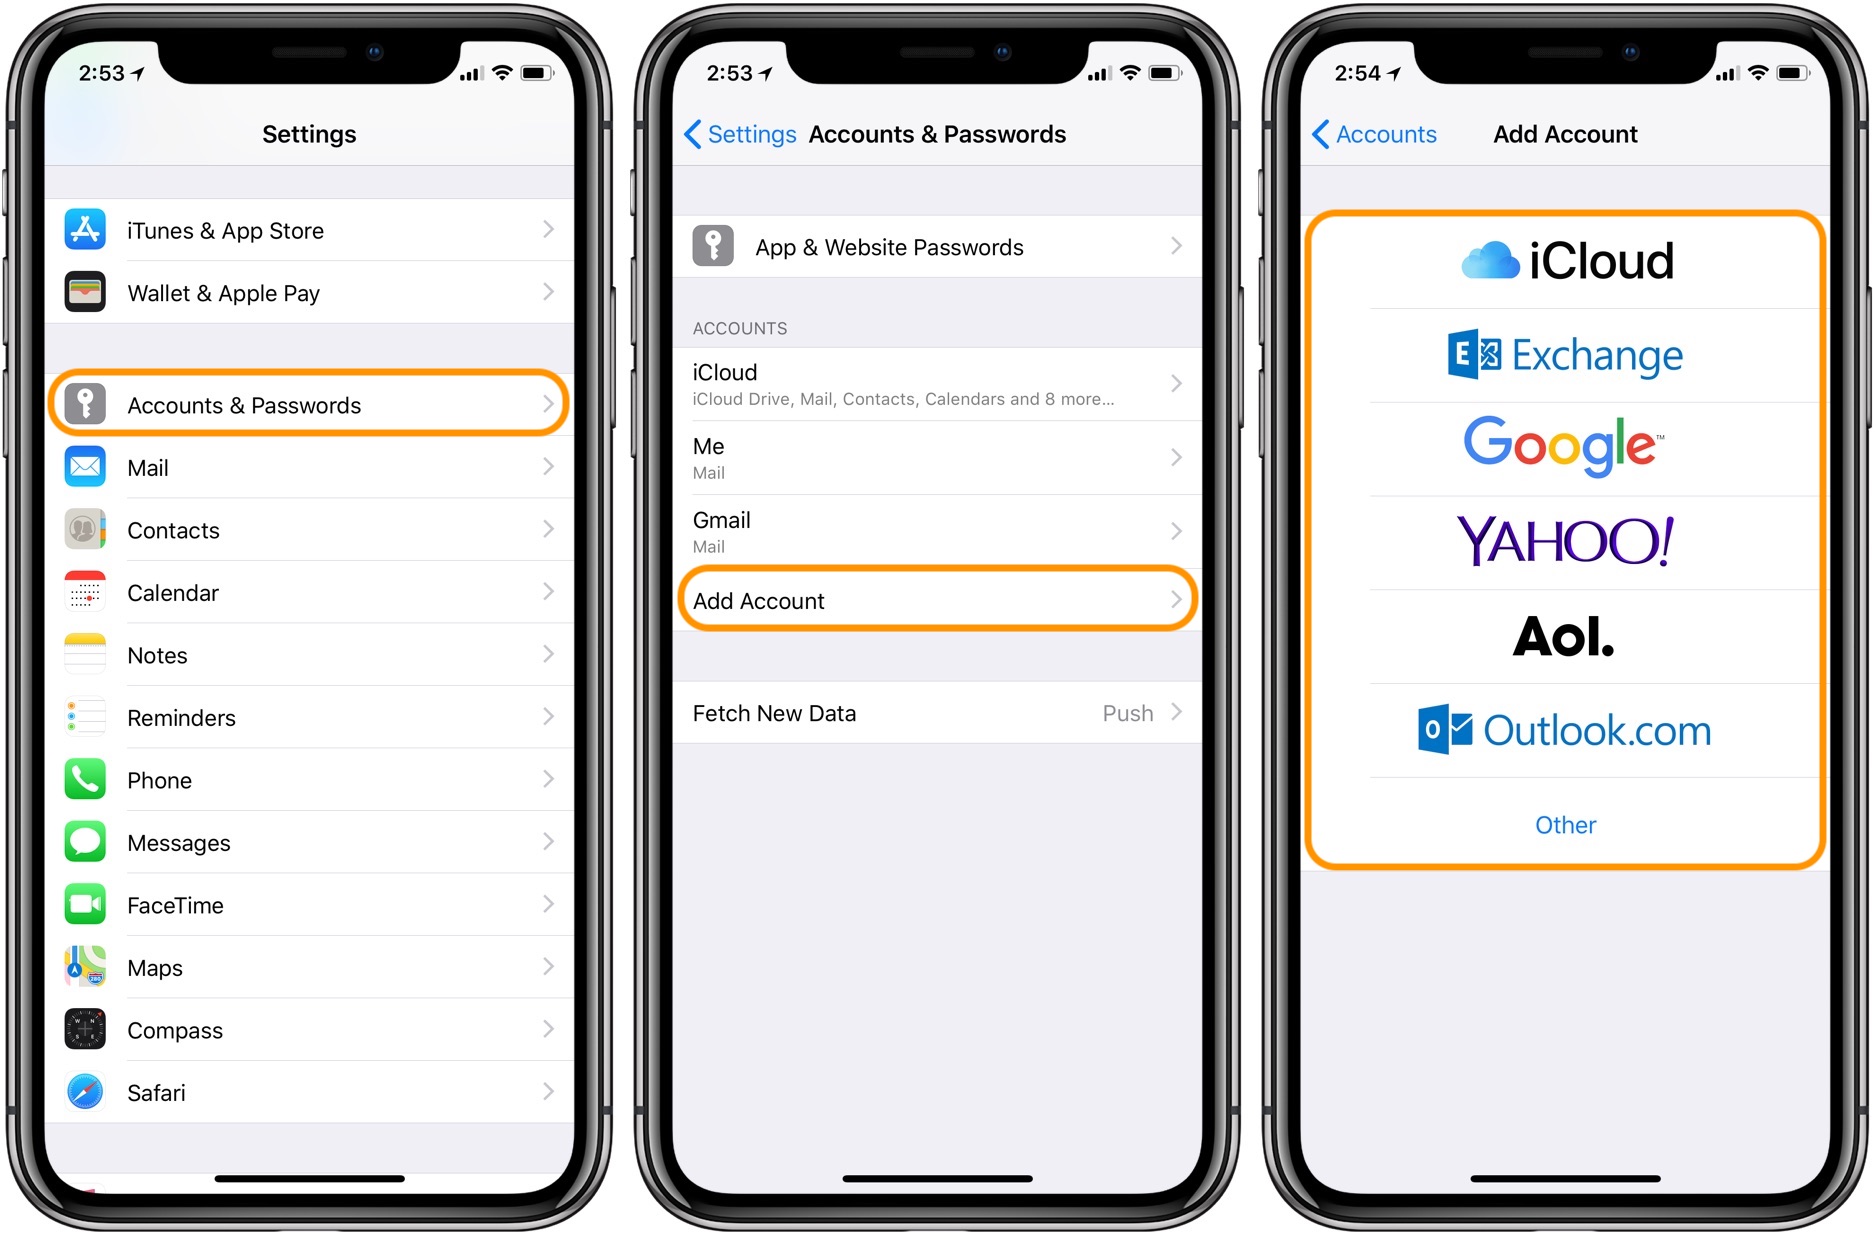
1. Locate the “Settings” app on your phone’s home screen. It’s usually represented by a gear icon or can be found in the app drawer.
2. Tap on “Settings” to open the main settings menu. Depending on your phone’s brand and model, the layout may vary slightly.
3. Scroll down the settings menu until you find the “Mail” or “Mail, Contacts, Calendars” option. Tap on it to access your email settings.
4. If you use an Android device, you may see the “Accounts” or “Users & Accounts” option instead. Tap on it to proceed to the next step.
5. On some Android devices, you might need to select your email provider from a list of available options, such as Gmail, Outlook, or Yahoo. Choose the appropriate option for your work email.
6. In the email settings menu, you may find options to manage your email accounts, including adding new accounts and configuring existing ones. Look for the option to “Add Account” or a similar label.
7. Tap on “Add Account” to begin the process of adding your work email to your phone. This will take you to the account setup screen.
That’s it for Step 1! You have successfully accessed the email settings on your phone. Now, let’s move on to Step 2, where we will guide you through the process of adding your work email account.
Step 2: Select Add Account
After accessing your email settings, the next step in adding a work email to your phone is to select the “Add Account” option. This option is typically found either at the bottom of the settings menu or under the “Accounts” section.
When you select “Add Account,” your phone will display a list of different email providers to choose from. These options can include popular providers such as Gmail, Yahoo, Outlook, or Exchange. However, if your work email is not listed, don’t worry, as you can still manually add your account.
If your work email provider is listed, you can simply tap on the corresponding option and proceed to the next step. However, if it is not listed, look for an option that says “Other” or “Manual Setup.” This will allow you to manually input the settings for your work email account.
Once you have selected the appropriate option, your phone will prompt you to enter your work email address. Make sure to double-check the spelling to avoid any errors. After entering your email address, tap “Next” or a similar button to proceed.
At this point, depending on your email provider, you may be prompted to select the type of email account you are adding, such as IMAP or POP. If you’re unsure, it’s usually best to choose IMAP for greater synchronization capabilities.
After selecting the account type, you may also need to provide additional information such as the server settings and the port number. This information can usually be obtained from your IT department or the email provider’s support documentation.
Once you have entered all the necessary information, tap “Next” or a similar button to continue. Your phone will then attempt to verify the account settings and establish a connection with the email server.
If the verification is successful, you will be taken to the next step in the email setup process. However, if there are any errors or issues, you may need to go back and double-check the settings you entered, or contact your IT department or email provider for assistance.
Remember, the steps outlined here may vary slightly depending on the make and model of your phone, as well as the specific email provider. However, the general process of selecting “Add Account” and entering your work email address remains the same.
Keep in mind that adding a work email to your phone can be a valuable tool for staying connected and productive on the go. By following these steps, you can easily set up your work email account and start enjoying the convenience of accessing your emails anytime, anywhere.
Step 3: Enter Your Work Email Address
Entering your work email address is a crucial step in adding your work email to your phone. It allows your device to establish a connection with your work email server and fetch your emails seamlessly. Follow the steps below to enter your work email address:
1. Open the email settings on your phone. Depending on the type of phone you have, this may be located in different places. Typically, you can find it in the “Settings” or “Mail” app.
2. Look for the option to “Add Account” and tap on it. This will prompt your phone to display a list of email account types you can add.
3. Select the option for “Exchange” or “Microsoft Exchange” if you are using a Microsoft work email account. If you are using a different email provider, such as Google or Yahoo, choose the appropriate option (e.g., “Gmail” or “Yahoo”).
4. Enter your work email address in the designated field. Make sure you type it correctly to avoid any errors in setting up your email account.
5. If prompted, provide your work email password. This is the password you use to access your work email on a computer or webmail. If you are unsure of your password, consult your IT department or check your email provider’s website for assistance.
6. Tap “Next” or “Continue” to proceed. Your phone will attempt to verify your email account by connecting to the server. It may ask for additional information, such as your account domain or server address. Again, if you are unsure of these details, consult your IT department or refer to your email provider’s support documentation.
7. Once your phone successfully verifies your work email account, you will have the option to customize additional settings, such as syncing frequency and email notifications. Adjust these settings according to your preferences and needs.
8. Finally, tap “Done” or “Finish” to complete the process. Your work email account is now successfully added to your phone, and you can start receiving and sending work emails directly from your device.
Remember, these steps may vary slightly depending on the make and model of your phone and the email provider you use for your work email. If you encounter any difficulties, it’s best to consult your IT department or seek help from your email service provider’s support team.
Step 4: Configure Account Settings
Once you have entered your work email address in Step 3, the next step is to configure the account settings. This is an important part of the setup process as it allows you to customize how your work email is managed and displayed on your phone.
Here are some key settings you may need to configure:
- Incoming Mail Server: This setting determines the server that your phone will connect to retrieve incoming emails. You will need to enter the correct server address for your work email provider. This information is usually provided by your IT department or can be found in your work email account settings.
- Outgoing Mail Server: Similar to the incoming mail server, the outgoing mail server setting specifies the server that your phone will use to send emails. Make sure to enter the correct server address, which is often different from the incoming mail server.
- Authentication: Most work email accounts require authentication to ensure the security of your account. You will need to select the appropriate authentication method, such as username and password or secure certificate, and enter the necessary credentials.
- Encryption: Encrypting your work email can provide an added layer of security. Depending on your work email provider, you may have the option to enable SSL or TLS encryption. It is recommended to enable encryption to protect your email communications.
- Sync Frequency: The sync frequency setting determines how often your phone checks for new emails. You can usually choose from options like manual, every 15 minutes, every hour, etc. Select a sync frequency that suits your needs and ensures you receive work emails in a timely manner.
It is important to double-check all the settings before proceeding to the next step. Make sure you have entered the correct server addresses, authentication credentials, and encryption settings to avoid any issues with your work email account.
Once you have configured the account settings, you are ready to proceed to the final step of the email setup process. This step will vary depending on your phone’s operating system and email client, but typically involves verifying the account settings and completing the setup process.
By taking the time to properly configure your work email account settings, you can ensure a seamless and secure email experience on your phone. Now, let’s move on to the next step and complete the email setup process.
Step 5: Complete Email Setup
Once you have entered your work email address and configured the necessary settings, you are now ready to complete the email setup process on your phone. Follow the remaining steps below:
1. Verify Email Account:
After entering all the required information, your phone will attempt to verify your work email account. This process may take a few moments as your device communicates with the email server to ensure the provided details are accurate. Once the account is successfully verified, you will be able to proceed to the next step.
2. Customize Additional Settings:
At this stage, you will have the option to customize additional settings for your work email account. These settings may include notification preferences, signature configurations, sync frequency, and more. Take some time to review and adjust these options according to your preferences and requirements.
3. Test Email Sending and Receiving:
Now is the time to test whether your phone can send and receive emails from your work account. You can do this by sending a test email to yourself or a colleague and checking if it successfully reaches the recipient’s inbox. Likewise, ensure you are able to receive and access emails in your work inbox on your phone. If any issues arise during this test, double-check your email settings and contact your IT department if necessary.
4. Set Up Email Syncing:
If you want to receive real-time updates and notifications for new emails on your phone, it is recommended to set up email syncing. This ensures that your work emails are automatically updated and synced with your phone, providing you with the latest information without delay. Depending on your device and email service provider, you may be able to adjust the sync frequency or choose manual syncing if preferred.
5. Organize Email Folders:
If you have multiple email folders in your work account, you may want to organize them on your phone as well. This can help you quickly access specific emails or categorize them based on different projects or priorities. Most email apps allow you to create folders and arrange them in a hierarchical structure for easier navigation.
6. Enable Security Measures:
Work email accounts often contain sensitive and confidential information, so it is crucial to enable appropriate security measures to protect your data. This may include setting a strong password, enabling two-factor authentication, or configuring remote wipe options in case your phone gets lost or stolen. Take the necessary steps to ensure the security of your work email account on your device.
Once you have completed these steps, you have successfully set up your work email on your phone. Now you can efficiently manage and stay connected to your work inbox wherever you go.
Conclusion
Adding your work email to your phone can greatly enhance your productivity and efficiency. It allows you to stay connected and access important emails even when you’re on the go. By following the step-by-step instructions outlined in this article, you can easily set up your work email account on your mobile device.
Remember to always ensure the security of your work email by implementing strong passwords and enabling encryption if available. Regularly updating your email settings and keeping your phone software up to date can also help protect your sensitive work-related information.
With your work email set up on your phone, you’ll be able to effectively manage your work communications, respond promptly to important messages, and stay connected with your colleagues and clients wherever you are. Take advantage of this convenient feature to streamline your work processes and stay productive on the go.
FAQs
Q: How do I add my work email to my phone?
A: Adding your work email to your phone is a simple process. You can usually do it by going to the settings menu on your phone, selecting the “Accounts” or “Email” section, and then choosing “Add Account”. From there, you will be prompted to enter your work email address and password. Follow the on-screen instructions to complete the setup.
Q: Can I add multiple work emails to my phone?
A: Yes, most smartphones allow you to add multiple work email accounts to your device. Follow the same steps as mentioned earlier to add additional work email accounts. Keep in mind that some email apps may have a limit on the number of accounts you can add, so check the app’s settings or documentation for any limitations.
Q: Why should I add my work email to my phone?
A: Adding your work email to your phone allows you to stay connected and access important work-related information on the go. It enables you to check and respond to emails, receive real-time notifications, and have access to your work calendar and contacts from your mobile device, enhancing your productivity and flexibility.
Q: Are there any security concerns when adding a work email to my phone?
A: Security should always be a top priority when adding a work email to your phone. Ensure that your device is protected with a strong, unique passcode, and consider enabling additional security features such as fingerprint or facial recognition. Additionally, make sure your work email account’s security settings are configured correctly, and if your workplace offers any additional security measures such as VPN access, make use of them to safeguard your data.
Q: Is it possible to remove a work email account from my phone?
A: Yes, you can remove a work email account from your phone at any time. Simply go to the settings menu, select the “Accounts” or “Email” section, find the account you want to remove, and choose the option to remove or delete it. Keep in mind that removing a work email account from your phone will delete all associated emails, contacts, and calendar data from your device, so make sure to back up any important information before removing the account.