
Are you a proud owner of an iPhone and looking to set up your email account on it? Don’t worry, we’ve got you covered! Adding your email account to your iPhone is a straightforward process that will allow you to efficiently manage your emails on the go. Whether you have a Gmail, Yahoo, Outlook, or any other email account, integrating it with your iPhone will ensure that you stay connected and never miss an important message. In this article, we will guide you through the step-by-step process of adding your email account to an iPhone, providing you with all the necessary information and tips to make the setup seamless. So, grab your iPhone, follow along, and let’s get your email up and running in no time!
Inside This Article
- Setting Up Email on Your iPhone
- Method 1: Adding Email Account Automatically
- Method 2: Adding Email Account Manually
- Method 3: Troubleshooting Email Setup Issues on iPhone
- Conclusion
- FAQs
Setting Up Email on Your iPhone
Setting up your email account on your iPhone is a simple process that allows you to stay connected and access your emails while on the go. Whether you use a popular email client like Gmail or have a custom domain email address, you can easily add your email account to your iPhone and start sending and receiving emails in no time. In this article, we will guide you through the process of setting up email on your iPhone, including both automatic and manual methods.
Method 1: Adding Email Account Automatically
The easiest and fastest way to add your email account to your iPhone is by using the automatic setup feature. This method works for most popular email providers, including Gmail, Yahoo, and Outlook. Here’s how you can do it:
- Open the “Settings” app on your iPhone.
- Scroll down and tap on “Mail” (or “Mail, Contacts, Calendars” depending on your iOS version).
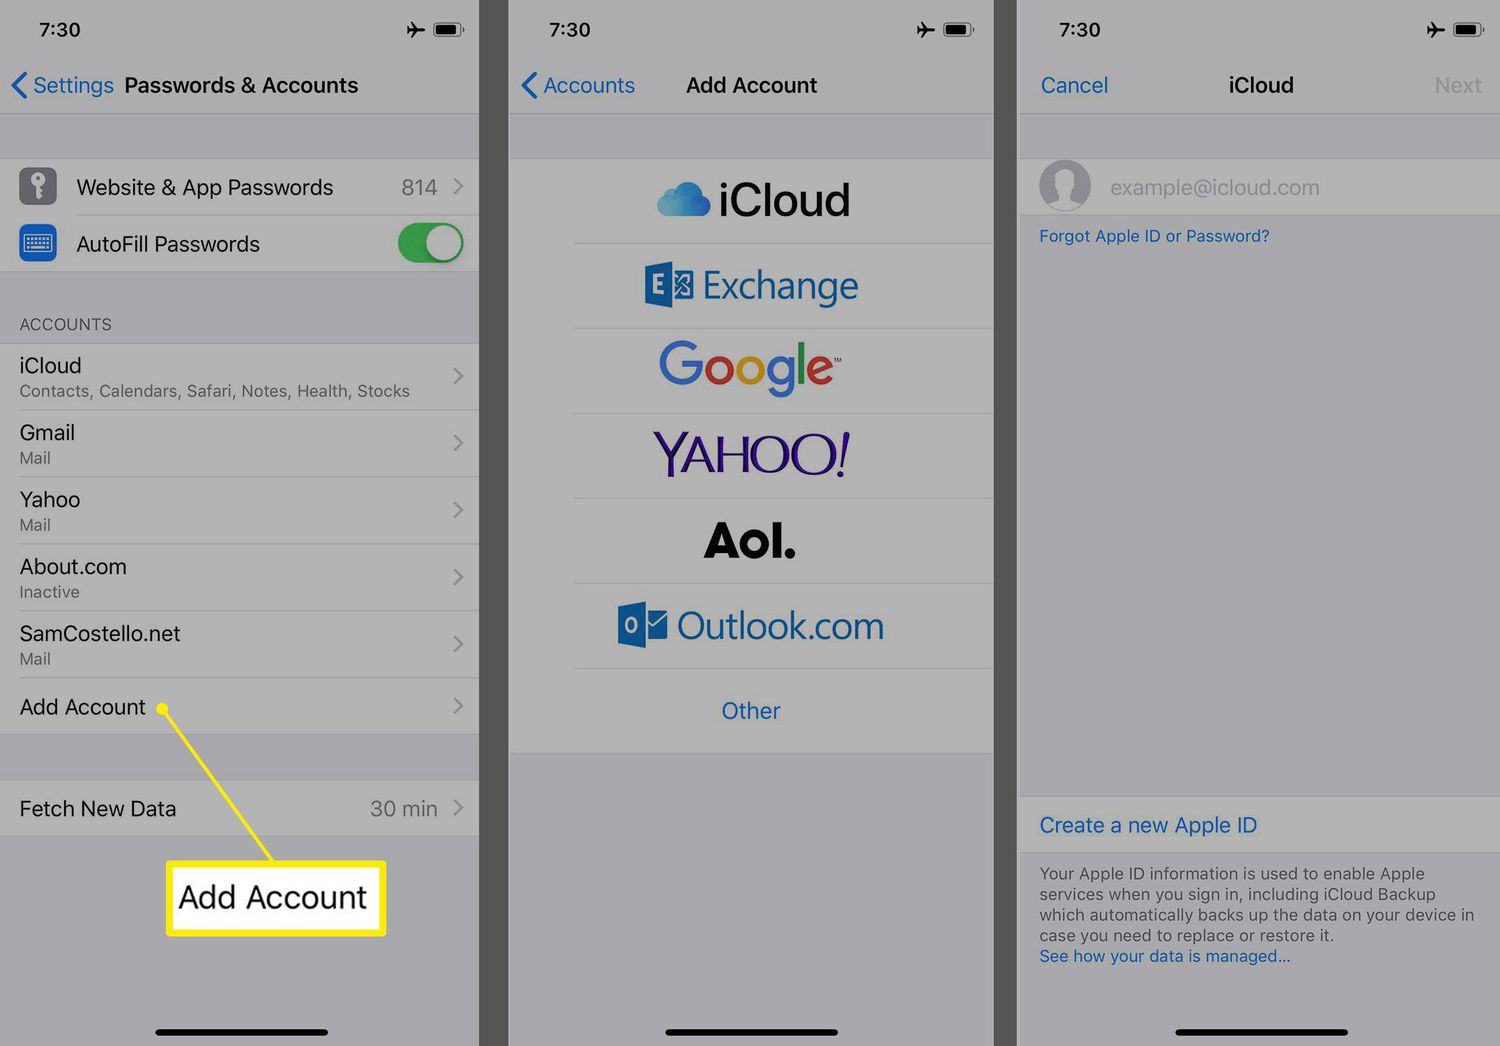
- Tap on “Add Account”. You will see a list of popular email providers, such as Google, Yahoo, Outlook, and iCloud. Select your email provider from the list.
- Enter your email address and password.
- Tap “Next” and wait for your iPhone to verify your account.
- Choose the data you want to sync with your iPhone, such as Mail, Contacts, Calendars, and Notes.
- Tap “Save” to complete the setup process.
Method 2: Adding Email Account Manually
If your email provider is not listed in the automatic setup feature, or if you have a custom domain email address, you can add your email account manually. Here’s how:
- Go to the “Settings” app on your iPhone.
- Scroll down and tap on “Mail” (or “Mail, Contacts, Calendars”).
- Tap on “Add Account” and select “Other”.
- Choose “Add Mail Account” and enter your name, email address, password, and a description for the account.
- Tap “Next” and select the type of email account you have, such as IMAP or POP. If you’re not sure, check with your email provider.
- Enter the incoming and outgoing mail server information. You can get this information from your email provider or IT department.
- Tap “Next” and wait for your iPhone to verify the account.
- Choose the data you want to sync with your iPhone and tap “Save”.
Method 3: Troubleshooting Email Setup Issues on iPhone
If you encounter any issues while setting up your email account on your iPhone, here are some troubleshooting tips:
- Double-check your email address and password to ensure they are entered correctly.
- Ensure you have a stable internet connection.
- If you have two-factor authentication enabled, make sure to enter the verification code when prompted.
- Verify the incoming and outgoing server settings with your email provider.
- Restart your iPhone and try the setup process again.
- If the problem persists, contact your email provider or IT department for further assistance.
Setting up your email account on your iPhone allows you to stay connected and access your emails on the go. By following the steps outlined in this article, you can quickly and easily add your email account to your iPhone and start managing your emails effortlessly.
Method 1: Adding Email Account Automatically
Adding your email account to your iPhone can be done quickly and effortlessly using the automatic setup method. This method allows your iPhone to automatically detect the settings for your email account and configure it accordingly. Follow the steps below to add your email account automatically:
1. Open the Settings app on your iPhone.
2. Scroll down and tap on “Mail” or “Accounts & Passwords” (the option may vary depending on your iOS version).
3. Tap on “Add Account”.
4. On the next screen, you will see a list of email service providers. You can choose your email provider from the list, such as Gmail, Outlook, Yahoo, etc. If your email provider is not listed, tap on “Other”.
5. If you selected your email provider from the list, enter your email address and password, and then tap “Next”. Your iPhone will attempt to automatically detect the email settings and configure your account.
6. If you chose “Other”, you will need to enter your name, email address, password, and any other required information. Tap “Next” and your iPhone will try to verify and set up your email account.
7. Once the verification process is complete, you will be taken to the “Mail” screen. Your email account should now be added and ready to use on your iPhone.
Adding your email account automatically can save you time and ensure that the correct settings are applied. However, if the automatic method fails or if you prefer to set up your account manually, you can follow the steps outlined in the next section.
Method 2: Adding Email Account Manually
Adding an email account manually to your iPhone gives you full control over the settings, allowing you to tailor your email experience to your preferences. Follow the steps below to manually add your email account:
- Open the Settings app: Locate and tap the “Settings” app on your iPhone’s home screen.
- Scroll down and tap “Mail”: In the Settings menu, scroll down and tap “Mail.”
- Tap “Accounts”: Within the Mail menu, tap “Accounts” to access the account settings.
- Tap “Add Account”: Under the Accounts menu, tap “Add Account” to begin the manual setup process.
- Select your email provider: On the Add Account screen, you will see a list of popular email providers. If your provider is listed, tap on it. If not, select “Other” and tap “Add Mail Account.”
- Enter your email account details: Fill in the required fields with your name, email address, password, and a description for the account. Tap “Next” when you’re finished.
- Configure server settings: In the next screen, you will need to enter the incoming and outgoing mail server information for your email provider. If you’re unsure about these settings, contact your email provider or refer to their documentation. Tap “Next” when you’re done.
- Choose which features to synchronize: On the following screen, you can choose which features you want to synchronize with your iPhone, such as Mail, Contacts, Calendars, and Notes. Toggle the switches according to your preferences, and tap “Save” to complete the setup process.
Once you have followed these steps, your email account will be added to your iPhone, and you’ll be able to access and manage your emails directly from the Mail app.
Method 3: Troubleshooting Email Setup Issues on iPhone
If you’re experiencing email setup issues on your iPhone, don’t worry! This method will guide you through troubleshooting steps to resolve any problems you may encounter.
1. Check your internet connection: Make sure your iPhone is connected to a stable internet connection, whether it’s through Wi-Fi or cellular data. A weak or unstable connection can prevent email setup from completing successfully.
2. Verify your email settings: Double-check that you have entered the correct email server settings. This includes the incoming and outgoing mail server settings, port numbers, and authentication requirements. You can usually find these settings on your email provider’s website or by contacting their support team.
3. Restart your iPhone: Sometimes, a simple restart can fix various software glitches. Press and hold the power button until the “slide to power off” option appears. Slide it to turn off your device, then press and hold the power button again to turn it back on. After the restart, try setting up your email account again.
4. Update your iPhone’s software: Outdated software can cause compatibility issues with email setup. Go to the Settings app, select “General,” and then “Software Update.” If an update is available, download and install it. Once your iPhone is running the latest software version, try setting up your email account again.
5. Remove and re-add the email account: If the previous steps didn’t work, you can try removing the email account and adding it again. Go to the Settings app, scroll down and tap on “Mail,” and then select “Accounts.” Choose the email account you’re having trouble with and tap “Delete Account.” Confirm the removal and then re-add the account by tapping on “Add Account” and following the prompts.
6. Contact your email provider: If you’ve exhausted all troubleshooting steps and are still unable to set up your email account on your iPhone, reach out to your email provider for further assistance. They may be able to provide specific guidance based on their server settings and any known issues.
By following these troubleshooting steps, you should be able to resolve most email setup issues on your iPhone. Remember to double-check your settings, ensure a stable internet connection, and keep your iPhone’s software up to date. If you still encounter difficulties, don’t hesitate to seek support from your email provider or Apple’s support team.
Conclusion
In conclusion, adding your email account to your iPhone is a straightforward process that can greatly enhance your productivity and keep you connected on the go. With just a few simple steps, you can have all your important emails at your fingertips, allowing you to read, send, and manage them effortlessly.
By following the steps outlined in this article, you can configure your email account with ease, whether it’s a popular provider like Gmail or Outlook, or a custom email domain. With the convenience of having your emails right on your iPhone, you can stay on top of important messages, respond promptly, and manage your inbox effectively.
Now that you know how to add your email account to an iPhone, go ahead and give it a try. Enjoy the seamless integration of your email with your device and enjoy the convenience of keeping your digital life organized and accessible at all times.
FAQs
1. How do I add my email account to an iPhone?
To add your email account to an iPhone, follow these steps:
1. Go to the “Settings” app on your iPhone.
2. Scroll down and tap on “Mail”.
3. Choose “Accounts” or “Passwords”.
4. Tap on “Add Account”.
5. Select the type of email account you want to add (e.g., iCloud, Gmail, Yahoo, etc.).
6. Enter your email address and password, then follow the prompts to complete the setup.
7. Once the account is added, you can access your email from the “Mail” app on your iPhone.
2. Can I add multiple email accounts to my iPhone?
Yes, you can add multiple email accounts to your iPhone. Simply follow the steps mentioned in the previous FAQ for each email account you want to add. Your iPhone allows you to manage and access all your email accounts conveniently from one place.
3. Will adding an email account to my iPhone sync my emails across devices?
Yes, when you add an email account to your iPhone, it will sync your emails across all devices that are connected to the same email account. This means that any changes made (such as marking an email as read or deleting an email) on one device will be reflected on all other devices accessing the same email account.
4. What if I don’t know the server settings for my email account?
If you don’t know the server settings for your email account, you can usually find them on your email provider’s website or by contacting their support. Common server settings include the incoming and outgoing mail server addresses, port numbers, and authentication methods. Make sure to have this information handy when setting up your email account on your iPhone.
5. How do I remove an email account from my iPhone?
To remove an email account from your iPhone, follow these steps:
1. Go to the “Settings” app on your iPhone.
2. Scroll down and tap on “Mail”.
3. Choose “Accounts” or “Passwords”.
4. Tap on the email account you want to remove.
5. Tap on “Delete Account” and confirm.
The email account will be removed from your iPhone, and all associated emails and settings will be deleted.