
Are you an avid photographer who loves editing your pictures on the go? If so, then Lightroom Mobile is the perfect tool for you. This powerful app allows you to edit your photos right from your mobile device, giving you the flexibility and convenience you need. And if you find yourself applying the same edits over and over again, you’ll be thrilled to learn that Lightroom Mobile allows you to save presets. Presets are pre-determined sets of edits that you can apply to your photos with just a few taps, saving you time and ensuring consistency in your editing workflow. In this article, we’ll guide you through the process of saving a preset in Lightroom Mobile, so you can enhance your photos with ease and efficiency. Let’s dive in!
Inside This Article
- To Save a Preset in Lightroom Mobile:
- Accessing the Preset Menu
- Creating a New Preset
- Adjusting Preset Settings
- Saving and Applying the Preset
- Conclusion
- FAQs
To Save a Preset in Lightroom Mobile:
Lightroom Mobile is a powerful tool for editing photos on the go. One of its most useful features is the ability to save presets, which are essentially pre-defined sets of editing adjustments that can be applied to your photos with just a few clicks. Saving presets can save you a lot of time and effort, especially if you commonly use the same editing settings.
To save a preset in Lightroom Mobile, follow these simple steps:
- Accessing the Preset Menu
- Creating a New Preset
- Adjusting Preset Settings
- Saving and Applying the Preset
To begin, open Lightroom Mobile on your device and load the photo you want to edit. Once you have your photo open, tap the “Presets” icon located at the bottom of the screen. This will bring up the preset menu, which displays the collection of available presets.
To create a new preset, tap the 3-dot menu icon in the top-right corner of the preset menu. From the drop-down menu, select “Create Preset.” A dialog box will appear, allowing you to name your preset and choose the settings you want to include.
Once you have named your preset, you can start adjusting the settings. Lightroom Mobile provides a wide range of editing tools, such as exposure, contrast, saturation, and more. Use the sliders and controls to customize the specific changes you want to include in your preset.
After making the desired adjustments, tap the checkmark icon to save your preset. The preset will now appear in the preset menu, ready to be applied to other photos. To apply the preset, simply open a new photo, tap the “Presets” icon, and select the desired preset from the list. The preset settings will be instantly applied to your photo.
Saving a preset in Lightroom Mobile is a quick and convenient way to apply consistent edits to your photos. Whether you have a specific editing style or just want to save time, presets can be a game-changer in your mobile editing workflow.
Accessing the Preset Menu
If you’re an avid user of Lightroom Mobile and want to save valuable time while editing your photos, using presets is the way to go. Presets are pre-determined settings that you can apply to your images with just a few clicks. To access the preset menu in Lightroom Mobile, follow these simple steps:
- Open the Lightroom Mobile app on your smartphone or tablet.
- Select the photo you want to edit from your library or camera roll.
- Tap on the “Edit” button located at the bottom of the screen. This will bring up the editing options.
- Look for the “Presets” button, often represented by an icon with three overlapping circles or squares. It’s usually located at the bottom of the editing interface.
- Tap on the “Presets” button to open the preset menu.
Once you’ve successfully accessed the preset menu, you’re now ready to explore the wide variety of preset options available. From here, you can choose from the built-in presets provided by Lightroom Mobile or import your own custom presets.
Creating a New Preset
Creating a new preset in Lightroom Mobile allows you to save a set of customized editing settings that you can apply to other photos with just a few clicks. This feature is perfect for photographers who want to apply consistent edits to their images or for those who want to quickly achieve a certain aesthetic across multiple photos. Follow the steps below to create a new preset in Lightroom Mobile.
1. Launch the Lightroom Mobile app and open the photo you wish to create a preset from.
2. Tap the Edit icon located at the bottom of the screen to access the editing tools.
3. Make the desired adjustments to the photo, such as adjusting exposure, contrast, saturation, or applying filters.
4. Once you are satisfied with the edits, tap the Presets icon located at the bottom of the screen. It looks like four overlapping circles.
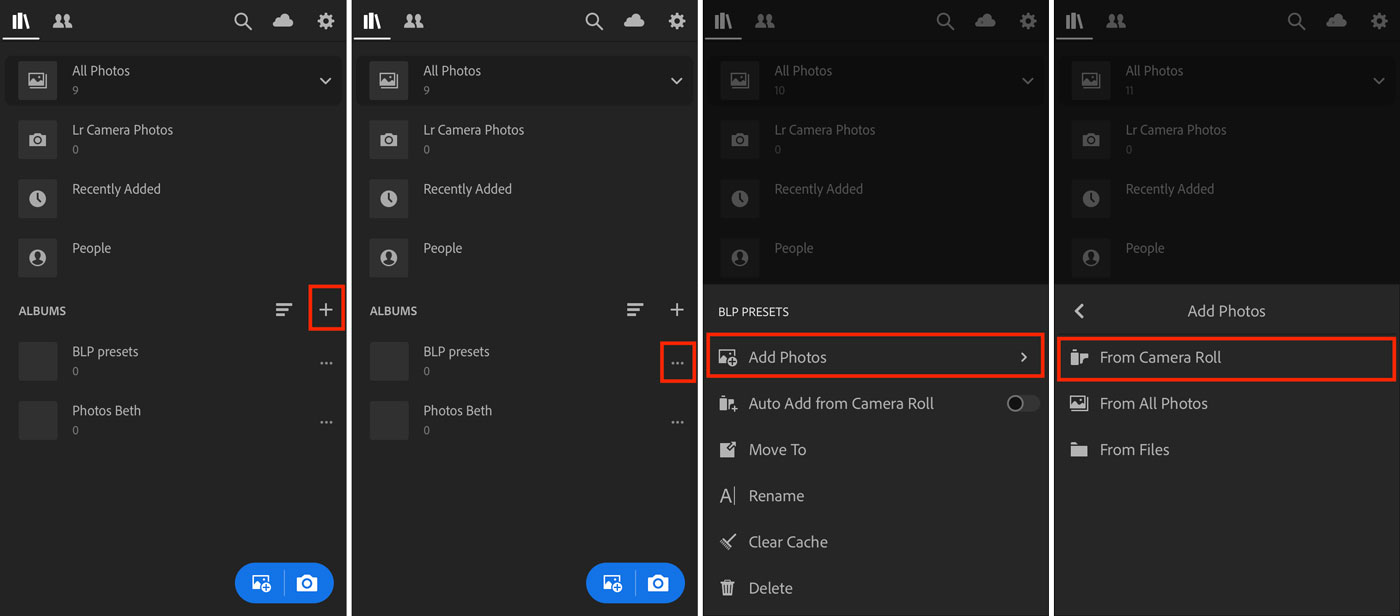
5. The Presets menu will appear, displaying a list of available presets. Scroll to the bottom of the list and tap the “+” icon to create a new preset.
6. A dialog box will appear, allowing you to name your preset. Choose a descriptive name that reflects the adjustments you have made. For example, if you have increased the vibrance and added a vintage filter, you could name your preset “Vibrant Vintage.”
7. After naming your preset, you can choose the group where you want to save it. Lightroom Mobile provides default groups like “Color,” “Black and White,” and “General,” or you can create custom groups to organize your presets.
8. Once you have named your preset and selected the group, tap the checkmark or “Save” button to save the preset.
9. Your new preset will now appear in the Presets menu, ready to be applied to other photos. Simply tap on the preset to instantly apply the saved edits to your selected image.
By creating and saving presets in Lightroom Mobile, you can streamline your editing process and maintain consistent styles across your photographs. Remember to experiment with different adjustments and settings to create presets that suit your unique style and vision.
Adjusting Preset Settings
When you want to create a preset in Lightroom Mobile, it’s not only about selecting the desired adjustments, but also fine-tuning those settings to achieve the perfect look. Here are the steps to adjust the preset settings:
-
Start by selecting the preset you want to adjust from the preset menu.
-
Once the preset is applied to your photo, you can see all the adjustments that have been made in the Edit panel.
-
Explore the Edit panel and make any necessary changes to the various settings such as exposure, contrast, highlights, shadows, temperature, and more.
-
Play around with the sliders and toggles to achieve the desired effect on your photo.
-
Remember, the goal is to customize the preset settings to suit your specific needs and preferences.
-
You can also experiment with different adjustments to see how they affect the overall look of your photo.
-
Take your time to fine-tune each setting and make sure to achieve the desired result before saving the preset.
-
Keep in mind that the adjustments you make in the Edit panel will be applied to all future photos when you use the preset.
-
Once you are satisfied with the adjustments, you can save the preset with the updated settings.
By adjusting the preset settings, you have the flexibility to create a personalized look that perfectly matches your editing style. It allows you to enhance the preset’s effect or tone it down to fit the specific requirements of your photos. So, don’t be afraid to get creative and experiment with different adjustments to achieve the desired outcome.
Saving and Applying the Preset
Once you have created and adjusted your desired preset settings in Lightroom Mobile, it’s time to save and apply the preset to your photos. Here’s how you can do it:
1. Save the Preset: To save the preset, tap on the three-dot menu at the top right corner of the preset editor screen. From the dropdown menu, select “Save as Preset”.
2. Name the Preset: Give your preset a descriptive and memorable name. This will help you easily identify and apply it in the future. You can also choose to organize your presets into different groups by selecting a group from the “Group” dropdown menu.
3. Apply the Preset: To apply the preset to a photo, go back to the editing screen and select the photo you want to edit. Open the preset menu by tapping on the preset icon at the bottom of the screen. Browse through your saved presets and select the one you want to apply. The preset will be instantly applied to the photo.
4. Adjusting the Preset: If you want to make further adjustments to the preset settings after applying it, you can do so by going to the editing screen. You can tweak the different editing parameters like exposure, contrast, saturation, etc., to fine-tune the photo according to your preferences.
5. Saving the Edited Photo: Once you are satisfied with the adjustments, you can save the edited photo by tapping on the saving icon at the top right corner of the screen. You can choose to save the photo to your device’s gallery or share it directly to social media platforms.
6. Applying the Preset to Multiple Photos: To save time and maintain consistency across multiple photos, you can apply the same preset to a batch of photos. Simply select multiple photos in the library grid view, then open the preset menu and choose the preset you want to apply. The selected preset will be applied to all the selected photos.
By saving and applying presets in Lightroom Mobile, you can easily achieve a consistent editing style for your photos with just a few taps. It allows you to streamline your editing process and create visually stunning images effortlessly.
Conclusion
Saving a preset in Lightroom Mobile is a valuable tool that can greatly enhance your editing workflow. With just a few simple steps, you can create customized presets that can be applied to multiple photos with one click. This not only saves you time, but also helps maintain a consistent editing style across your images.
By following the steps mentioned in this article, you can now confidently create, save, and apply presets in Lightroom Mobile. Whether you’re an amateur photographer looking to streamline your editing process or a professional seeking to maintain a cohesive visual identity, presets are a powerful and convenient feature to utilize.
Ready to take your photo editing to the next level? Start exploring the possibilities of creating your own presets in Lightroom Mobile today!
FAQs
1. What is Lightroom Mobile?
Lightroom Mobile is a powerful mobile application developed by Adobe, designed for editing and organizing photos on the go. It offers a wide range of editing tools and features, allowing users to enhance their images with ease.
2. How do I save a preset in Lightroom Mobile?
To save a preset in Lightroom Mobile, follow these steps:
- Open the Lightroom Mobile app on your device.
- Select or import the photo you want to edit.
- Apply the desired adjustments, such as adjusting exposure, contrast, and color settings.
- Once you are satisfied with the edits, tap the Presets button at the bottom of the editing screen.
- Select “Create Preset” and give your preset a name.
- Customize the settings you want to include in the preset, such as exposure, color, tone curve, and more.
- Finally, tap “Save” to save your custom preset.
3. Can I use the presets I create in Lightroom Mobile on a computer?
Yes, you can use the presets you create in Lightroom Mobile on a computer. Simply sync your mobile presets to the Adobe Creative Cloud, and they will be available for use in the desktop version of Lightroom. This allows you to seamlessly transfer your editing preferences and styles between mobile and desktop platforms.
4. Are there any pre-made presets available in Lightroom Mobile?
Yes, Lightroom Mobile provides users with a variety of pre-made presets that can be applied to photos with a single tap. These presets come in various styles and effects, such as classic, black and white, vintage, and more. Additionally, you can download and install additional presets created by other users or professional photographers to further expand your editing options.
5. Can I share presets with other Lightroom Mobile users?
Yes, you can share presets with other Lightroom Mobile users. You can export your presets as DNG files and then share them through email, messaging apps, or cloud storage platforms. The recipient can then import the DNG file into their Lightroom Mobile app and apply the preset to their photos. This feature allows photographers to exchange editing styles and presets, fostering a collaborative community of creative individuals.