
Are you tired of dealing with the hassle of scanning documents with a bulky scanner? Well, fret no more! Nowadays, you can conveniently scan documents using just your iPhone. With the advancements in technology, your trusty mobile phone is more than just a communication device. It has the power to quickly and effortlessly digitize your important paperwork. In this article, we will guide you through the process of scanning documents with your iPhone, offering you a convenient and portable alternative to traditional scanners. Whether you need to scan a receipt, a contract, or any other important document, your iPhone has got you covered. Say goodbye to the clutter of physical papers and embrace the simplicity of digital scanning on the go!
Inside This Article
- Prerequisites- iOS device with a camera- Notes app installed on your iPhone
- Steps to Scan Documents with Your iPhone
- Additional Features and Tips
- Troubleshooting: Issues with document clarity or alignment – Problems with saving or sharing scans
- Conclusion
- FAQs
Prerequisites- iOS device with a camera- Notes app installed on your iPhone
To scan documents with your iPhone, there are a few prerequisites you need to have in place. Firstly, you will need an iOS device with a camera. This can include the iPhone 6s or later models, as well as the iPad Pro, iPad (5th generation or later), and iPad mini (5th generation or later). Having a device with a camera is essential as it allows you to capture images of the documents you want to scan.
Secondly, you need to have the Notes app installed on your iPhone. The Notes app is a pre-installed application that comes with iOS devices and serves as a versatile note-taking tool. Apart from typing notes, the Notes app also offers the option to scan documents directly within the app.
Installing the Notes app on your iPhone is straightforward. If you have not deleted it, you should find the app on your home screen. Simply tap on the icon, and it will launch the app, ready for you to create and access your notes. In case you have removed the app, you can easily restore it from the App Store by searching for “Notes” and tapping the “Get” or “Install” button.
Steps to Scan Documents with Your iPhone
Scanning documents using your iPhone has never been easier! With the built-in capabilities of the Notes app, you can quickly digitize paper documents and have them saved on your device. Follow these simple steps to scan documents with your iPhone:
- Launch the Notes app: Locate and tap on the Notes app icon on your iPhone to open it.
- Create a new note: Tap the “+” button at the bottom of the screen to create a new note.
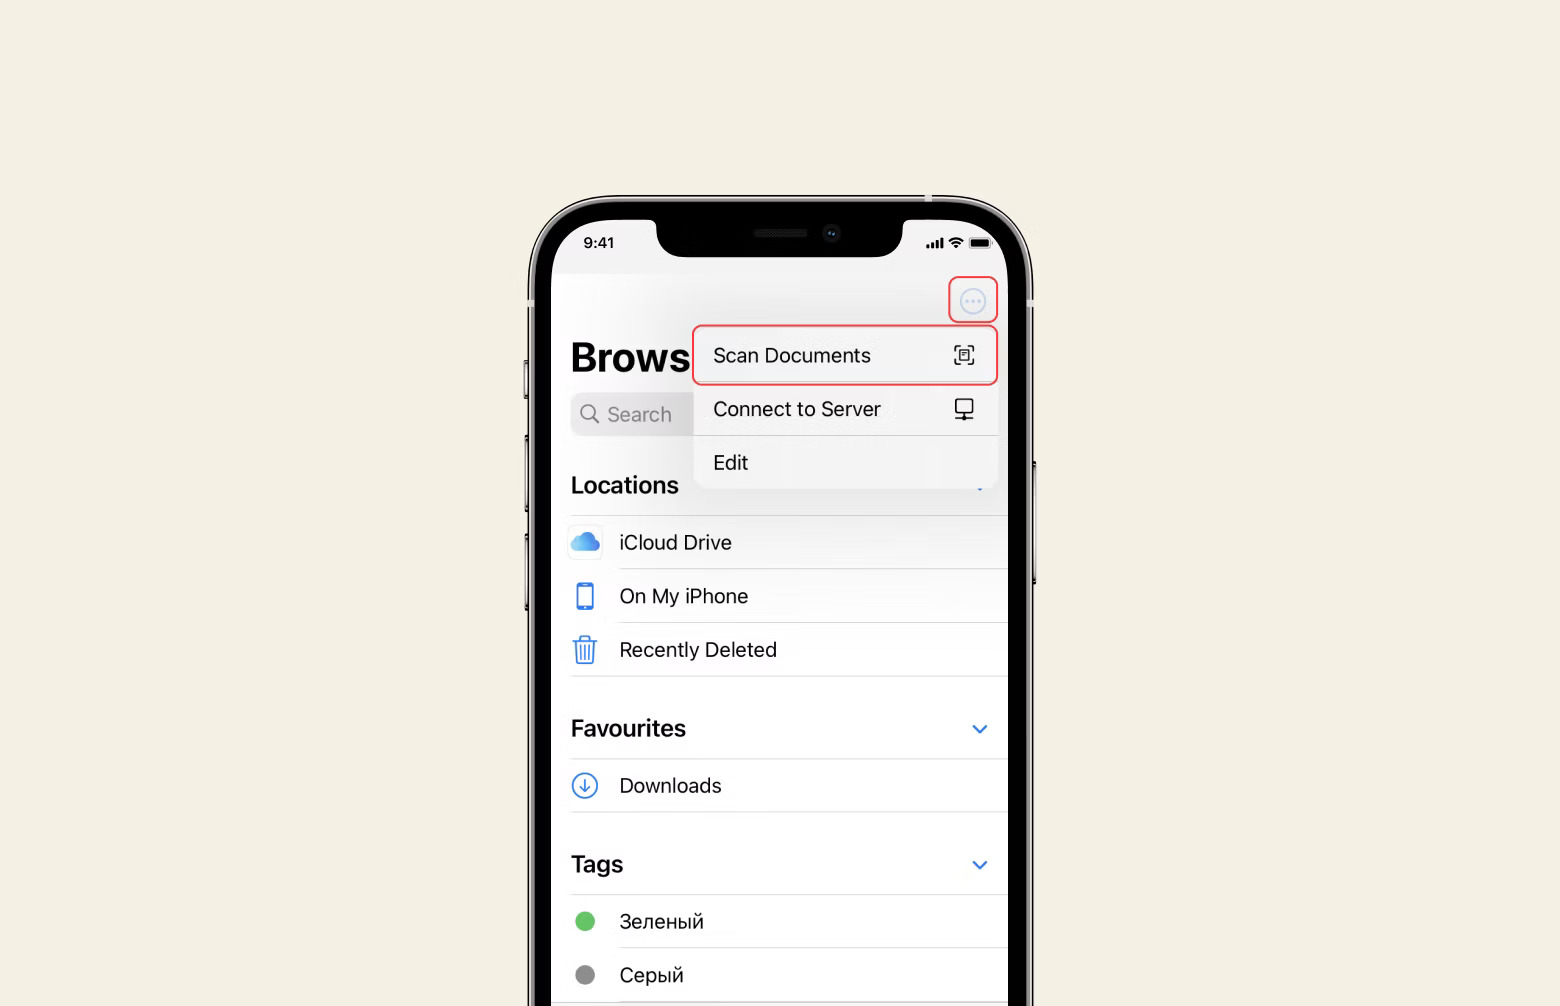
- Tap the camera icon: Within the new note, tap on the camera icon at the bottom center of the screen.
- Select “Scan Documents” option: A menu will appear, where you’ll need to select the “Scan Documents” option. This will activate the iPhone’s camera for scanning.
- Position the document within the frame: Hold your iPhone steady and align the document you wish to scan within the viewfinder. Ensure that the edges of the document are visible and properly aligned.
- Adjust the corners if necessary: If the document’s corners are not detected accurately, use the on-screen grid to manually adjust them. Simply drag the corners to match the edges of the document.
- Tap “Keep Scan” to save the scan: Once you’re satisfied with the document’s alignment, tap the “Keep Scan” button to save the scanned document to the note.
Now you have successfully scanned a document using your iPhone! You can repeat the process to scan additional pages or documents within the same note. The scanned documents are stored within the note, ensuring easy access whenever you need them.
Remember to save your scanned documents periodically to prevent any accidental loss. You can also edit, annotate, or share the scanned documents as needed, directly from the Notes app.
Additional Features and Tips
When it comes to scanning documents with your iPhone, there are several additional features and tips that can enhance your scanning experience. In this section, we will explore how to adjust scan settings, add multiple pages to a single scan, use filters and editing tools, and share or save the scanned documents.
Adjusting Scan Settings
Before capturing a scan, you have the option to adjust various settings to optimize the quality and appearance of the scanned document. By tapping on the three dots icon at the top right corner of the screen during the scanning process, you can access settings such as color mode (color, grayscale, or black and white), document size, and auto-crop. Experiment with these settings to achieve the best results for your scanned documents.
Adding Multiple Pages to a Single Scan
If you have a set of documents that you want to scan as a single file, you can easily add multiple pages to a single scan using your iPhone. After capturing the first page of the document, instead of saving it, tap the “+” icon at the bottom right corner of the screen to add another page. Repeat this process for each page you want to include in the scan. Once you have captured all the required pages, tap “Save” to create a single scan with multiple pages.
Using Filters and Editing Tools
The Notes app on your iPhone offers a range of filters and editing tools that allow you to enhance the appearance of your scanned documents. After capturing a scan, tap on the scanned image to bring up the editing menu. From here, you can apply filters to adjust the color and contrast, crop and resize the document, rotate or straighten it, and even add annotations or signatures. Take advantage of these tools to make your scanned documents look more professional and polished.
Sharing or Saving Scanned Documents
Once you have completed the scanning process and are satisfied with the quality of your scanned documents, you can easily share or save them using your iPhone. To share a scanned document, tap the arrow icon at the top right corner of the screen and choose the desired sharing method such as email, messaging apps, or cloud storage platforms. If you prefer to save the document locally on your device or in the iCloud, tap the “Save to Files” option and select the desired location. This way, you can easily access and retrieve your scanned documents whenever you need them.
With these additional features and tips, you can make the most out of your iPhone’s scanning capabilities and efficiently digitize your documents on the go. Experiment with different settings, explore the editing tools, and effortlessly save and share your scanned documents with ease. Enjoy the convenience and productivity that your iPhone brings to document scanning!
Troubleshooting: Issues with document clarity or alignment – Problems with saving or sharing scans
If you’re encountering issues with the clarity or alignment of your scanned documents, or if you’re facing problems when saving or sharing your scans, fret not! These common problems can be easily resolved with a few simple troubleshooting steps. Let’s dive into some possible solutions:
1. Document Clarity:
If your scanned documents appear blurry or unclear, follow these steps:
- Ensure that you have adequate lighting: Insufficient lighting can result in poor clarity. Make sure you’re in a well-lit area or use the built-in flash feature on your iPhone.
- Adjust the distance: Maintain an appropriate distance between your iPhone and the document. Being too close or too far can impact the quality of the scan.
- Hold steady: Keep your hand steady while scanning to avoid any shaking or blurriness caused by movement.
- Clean the camera lens: Check for any smudges or dirt on your iPhone’s camera lens. Wipe it gently with a soft cloth to ensure clear scans.
2. Document Alignment:
If your documents appear misaligned or off-center in the scan, try these solutions:
- Position the document properly: Make sure the edges of the document align with the frame on your iPhone’s screen. This will ensure that the scan captures the entire document accurately.
- Use the guides: The scanning feature in the notes app provides alignment guides to help you position the document correctly. Use these guides to align your document within the frame.
- Retake the scan if necessary: If you’re not satisfied with the alignment of a scan, simply tap “Retake” and try again until you achieve the desired result.
3. Saving or Sharing Scans:
If you’re experiencing difficulties when saving or sharing your scanned documents, consider the following solutions:
- Check your storage space: Ensure that you have sufficient storage space available on your iPhone. If your device is running low on storage, it may affect your ability to save or share scans. Delete unnecessary files or apps to free up space.
- Confirm permissions: Make sure the Notes app has the necessary permissions to access your camera, photos, and files. You can check this in your iPhone’s settings under “Privacy”.
- Choose the appropriate format: When saving or sharing your scans, ensure that you’re selecting the desired file format (such as PDF or JPEG) and choosing the appropriate app or method for sharing, such as email or cloud storage.
By following these troubleshooting steps, you should be able to overcome any issues you may encounter with document clarity, alignment, and saving or sharing scans using your iPhone. Now you can efficiently scan and manage your important documents, making your mobile device even more versatile and productive.
Conclusion
Scanning documents with your iPhone has never been easier or more convenient. With the advancements in technology and the wide range of document scanning apps available, you can now digitize your paperwork with just a few taps on your smartphone. Whether you need to scan receipts, contracts, or important papers, your iPhone can serve as a powerful scanning tool.
By following the steps outlined in this article, you can ensure that your scanned documents are clear, legible, and of high quality. Remember to choose a reliable scanning app, position the document properly, and make use of helpful features like auto-crop and filters.
So, say goodbye to bulky scanners and streamline your document management with the convenience of your iPhone. Start scanning and organizing your paperwork efficiently today!
FAQs
1. Can I scan documents with my iPhone?
Yes, you can! iPhones have a built-in document scanning feature that allows you to easily digitize physical documents using the device’s camera.
2. How do I access the document scanning feature on my iPhone?
To access the document scanning feature on your iPhone, simply open the Notes app and create a new note. Tap on the “+” icon at the bottom of the screen, then select “Scan Documents” from the menu that appears.
3. Are there any third-party apps I can use to scan documents on my iPhone?
Yes, there are many third-party apps available on the App Store that offer additional features and functionality for scanning documents on your iPhone. Some popular options include CamScanner, Evernote Scannable, and Adobe Scan.
4. Can I edit scanned documents on my iPhone?
Absolutely! Once you have scanned a document on your iPhone, you can easily edit it using various editing tools available within the Notes app or in third-party document editing apps. These tools allow you to crop, rotate, adjust brightness, and make other modifications to your scanned documents.
5. Are there any limitations to scanning documents with an iPhone?
While scanning documents with an iPhone is incredibly convenient, there are a few limitations to keep in mind. One limitation is the quality of the camera, which may not produce the same level of detail and clarity as a dedicated scanner. Additionally, scanning large documents or multiple pages can be time-consuming, as you will need to capture each page individually.