
Welcome to our comprehensive guide on how to scan from the iPhone 13! As smartphone technology continues to advance, our iPhones are increasingly becoming powerful tools for various tasks, including scanning documents. Whether you need to digitize important paperwork, make electronic copies of receipts, or simply want to reduce clutter by going paperless, scanning from your iPhone 13 is a convenient and efficient solution.
In this article, we will walk you through the step-by-step process of scanning documents using your iPhone 13, highlighting the built-in scanning features and suggesting some third-party apps that can enhance your scanning experience. Whether you’re a student, a professional, or simply someone who wants to make the most of their iPhone’s capabilities, this guide will equip you with all the necessary knowledge to effectively scan documents using your iPhone 13.
Inside This Article
- Point 1: Understanding the scanning capabilities of iPhone 13
- Point 2: Using the Apple Notes app for document scanning
- Point 3: Scanning documents using third-party scanning apps
- Point 4: Tips for maximizing scanning accuracy on iPhone 13
- Conclusion
- FAQs
Point 1: Understanding the scanning capabilities of iPhone 13
The iPhone 13 boasts impressive scanning capabilities that can transform your device into a powerful portable scanner. With its advanced camera system and user-friendly apps, scanning documents, receipts, and even handwritten notes has never been easier.
The camera on the iPhone 13 is equipped with high-resolution capabilities and advanced image processing algorithms, allowing you to capture sharp and detailed scans. Whether you need to digitize important documents for work or simply want to create a digital archive of your paperwork, the iPhone 13 is up to the task.
One of the standout features of the iPhone 13’s scanning capabilities is the ability to scan documents directly from the Apple Notes app. This built-in app allows you to scan, crop, and enhance your scans with just a few taps. The app automatically detects edges, corrects perspective, and adjusts lighting, ensuring that your scanned documents look professional and legible.
Not only can you scan documents using the Apple Notes app, but you also have the option to save your scans as PDF files or images. This makes it easy to share your scanned documents via email, text messages, or cloud storage services like iCloud or Dropbox.
In addition to the Apple Notes app, there are numerous third-party scanning apps available on the App Store that can further enhance your scanning experience. These apps often offer additional features such as OCR (optical character recognition), which allows you to extract text from scanned documents and convert them into editable text files.
When using scanning apps, it’s important to choose one that suits your specific needs and preferences. Some popular scanning apps include Adobe Scan, Scanbot, and CamScanner, each offering unique features and functionalities.
While the scanning capabilities of the iPhone 13 are impressive, there are a few tips you can follow to maximize scanning accuracy. Ensure that you have adequate lighting when scanning documents to capture clear and legible scans. Position your phone parallel to the document you’re scanning to avoid distortion. Also, make sure to clean your camera lens regularly to avoid any smudges or debris that may affect the quality of your scans.
Overall, the scanning capabilities of the iPhone 13 make it a versatile tool for digitizing and organizing your documents. Whether you’re a student, professional, or simply someone looking to minimize paper clutter, the iPhone 13’s scanning features are sure to make your life easier.
Point 2: Using the Apple Notes app for document scanning
One of the convenient features of the iPhone 13 is its built-in document scanning capability through the Apple Notes app. This powerful app allows you to quickly scan and digitize your documents, eliminating the need for a separate scanning device or app.
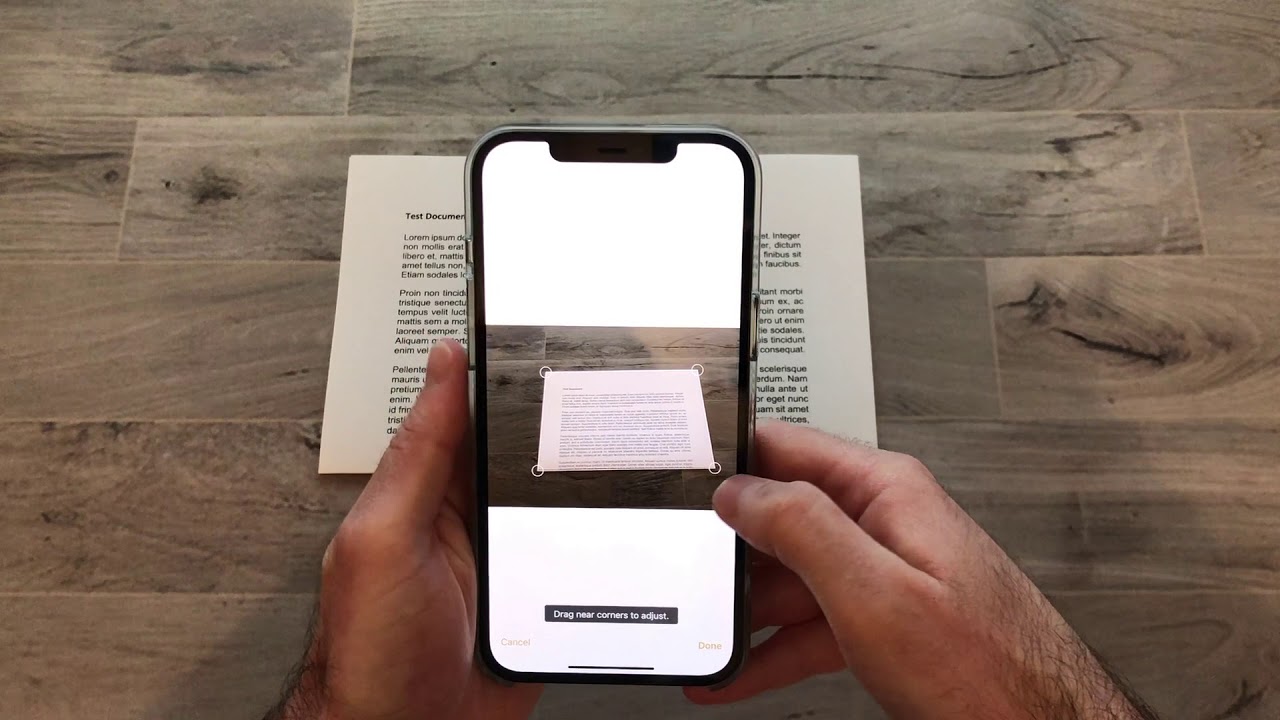
To start scanning with the Apple Notes app, simply open the app and create a new note. Next, tap on the “+” symbol in the toolbar at the bottom of the screen and select “Scan Documents” from the menu.
Once you are in the scanning mode, position your iPhone camera over the document you want to scan. The app will automatically detect the edges of the document and capture the image. You can manually adjust the frame if needed by dragging the blue dots.
After the document is captured, you have the option to scan more pages or adjust the scan settings. The Apple Notes app offers various options like adjusting the color, rotation, or even removing the document background to improve the legibility of the scan.
Once you are satisfied with the scan, tap on the “Keep Scan” button to save the document to the note. You can add additional scans or even include text, drawings, or annotations to the note if desired.
The Apple Notes app also allows you to easily share your scanned documents. Simply tap on the share icon and choose how you want to share the document, whether it’s through email, messaging apps, or cloud storage services.
With the Apple Notes app, scanning documents on your iPhone 13 becomes a seamless and efficient process. Whether you need to scan receipts, contracts, or important documents, this app provides a straightforward and reliable solution.
Point 3: Scanning documents using third-party scanning apps
While the built-in Apple Notes app offers basic document scanning features, there are also several third-party scanning apps available in the App Store that can take your scanning experience on the iPhone 13 to the next level. These apps provide advanced functionalities and tools to enhance the quality and usability of your scanned documents.
One popular option is the Adobe Scan app, which not only enables you to scan documents but also offers features like automatic text recognition (OCR). This means that you can easily convert your scanned documents into editable text that can be copied, pasted, or edited. Additionally, Adobe Scan provides options to organize and categorize your scanned documents effectively.
Another highly-rated scanning app is CamScanner. Besides offering high-quality document scanning capabilities, CamScanner allows you to collaborate with others by sharing scanned documents and adding comments or annotations. It also offers cloud storage integration, making it convenient to access your scanned documents from any device.
For those who prioritize privacy and security, Scanbot is an excellent choice. This app offers end-to-end encryption, ensuring that your scanned documents remain secure. Scanbot also provides intelligent cropping and image enhancement features, resulting in professional-looking scans.
If you require advanced editing features, Scanner Pro is worth considering. This app offers powerful editing tools, such as the ability to adjust the brightness, contrast, and color of your scanned documents. Additionally, Scanner Pro supports OCR, enabling you to extract text from your scanned documents and perform quick searches.
Before choosing a third-party scanning app, it’s essential to consider your specific needs and preferences. Some apps may have more features, while others may focus on simplicity and ease of use. Reading user reviews and comparing the features of different apps can help you make an informed decision.
Once you have selected and downloaded a third-party scanning app, using it to scan documents on your iPhone 13 is usually straightforward. Simply launch the app, position your document within the camera frame, and capture the image. Many apps also offer automatic edge detection and image enhancement to ensure optimal scan quality.
Remember to explore the settings and options of the scanning app you choose. You may find additional features like multi-page scanning, PDF conversion, or integration with cloud storage services that enhance your scanning experience even further.
Point 4: Tips for maximizing scanning accuracy on iPhone 13
Scanning documents on your iPhone 13 can be a convenient way to digitize and organize important paperwork. However, to ensure the best possible scanning accuracy, there are a few tips and tricks you can keep in mind. Let’s explore some key considerations:
1. Adequate lighting: Good lighting is crucial for clear and accurate scans. When scanning documents, make sure you are in a well-lit area or use the built-in flash on your iPhone 13 if necessary. Avoid shadows and reflections that can affect the readability of the scanned document.
2. Positioning the document: Properly positioning the document is essential for optimal scanning results. Align the document within the camera frame, ensuring that all edges are visible. Use the grid lines feature in the camera app to help you align the document correctly.
3. Maintain a steady hand: Hold your iPhone 13 steadily while scanning to prevent blurring or distortion. If necessary, prop your device against a stable surface or consider using a tripod or phone stand to maintain stability. This will help you capture crisp and legible scans.
4. Consider the angle: When scanning documents, try to position your iPhone 13 parallel to the document’s surface. This helps minimize perspective distortion and ensures that the text and images appear straight and undistorted in the scanned copy.
5. Clean camera lens: Make sure the camera lens on your iPhone 13 is clean before scanning. Dust or smudges on the lens can negatively impact image quality. Use a soft, lint-free cloth to gently clean the lens for optimal scanning accuracy.
6. Use the right scanning app: While the Apple Notes app can be handy for basic document scanning, if you require more advanced features, consider using third-party scanning apps available on the App Store. These apps often offer additional functions like OCR (optical character recognition) to extract text from scanned documents.
7. Review and edit: After scanning a document, take a moment to review it on your iPhone 13 screen. Check for any blurriness or cropping issues and make necessary adjustments using the editing tools within the scanning app. This ensures that you have a high-quality and accurate digital copy of your document.
8. Practice and experiment: Scanning accuracy can be improved with practice. Take the time to experiment with different lighting conditions, angles, and scanning apps to find the combination that works best for you. Over time, you will develop a knack for scanning documents quickly and accurately.
By following these tips, you can maximize the scanning accuracy on your iPhone 13 and efficiently convert physical documents into digital files. Enjoy the convenience and organization that document scanning on your iPhone 13 brings!
Conclusion
The iPhone 13 is not just an impressive smartphone, but it also offers an incredible scanning capability that allows you to digitize documents with ease. Whether you need to scan important paperwork, receipts, or even handwritten notes, the built-in scanner on the iPhone 13 provides a convenient solution right at your fingertips. With its advanced camera technology, powerful image processing, and user-friendly interface, scanning from your iPhone 13 has never been more seamless.
By following the simple steps outlined in this article, you can quickly and effortlessly scan documents using your iPhone 13. Whether you’re a student, professional, or anyone looking for a convenient way to digitize physical documents, the scanning feature on the iPhone 13 is a valuable tool. Say goodbye to bulky scanners and hello to the convenience of scanning directly from your iPhone 13 – the future of document scanning is here!
FAQs
Q: Can I scan documents directly from my iPhone 13?
Yes, the iPhone 13 comes equipped with a built-in scanner functionality that allows you to easily scan documents directly from your device.
Q: Is there a specific app I need to use for scanning documents on my iPhone 13?
No additional app is required as the scanning feature is integrated into the iPhone 13’s native Notes app. Simply launch the Notes app and tap on the document scanning icon.
Q: Can I scan multiple pages into a single document on my iPhone 13?
Absolutely! The scanning feature on the iPhone 13 allows you to scan multiple pages and merge them into a single document. Simply keep scanning each page and the app will automatically combine them for you.
Q: How can I customize the scanned documents on my iPhone 13?
After scanning a document on your iPhone 13, you have the ability to customize it. You can crop, rotate, adjust colors, and even add annotations using the editing tools within the Notes app.
Q: What file formats are supported for scanned documents on the iPhone 13?
The iPhone 13 scanning feature supports various file formats such as PDF, JPEG, and PNG. You can choose the preferred format before saving your scanned document.