
In today’s digital age, it’s become increasingly important to manage and restrict the content accessed on our iPhones and iPads, especially for parents who want to ensure their children have a safe and age-appropriate digital experience. That’s where screen time and content restrictions come into play. By utilizing these features, users can maintain control over what apps, websites, and content can be accessed on their devices. In this article, we will explore how to effectively use screen time to set content restrictions on your iPhone and iPad. Whether you’re a concerned parent or simply want to manage your own screen time, this guide will provide you with step-by-step instructions and valuable insights to help you enhance your digital well-being.
Inside This Article
- Enabling Screen Time on Your iPhone and iPad
- Setting up Content Restrictions on Screen Time
- Managing App Limits and Categories
- Restricting Specific Websites and Content
- Conclusion
- FAQs
Enabling Screen Time on Your iPhone and iPad
If you want to set content restrictions on your iPhone and iPad, using Screen Time is the way to go. Screen Time is a built-in feature that allows you to manage and monitor your device usage, including setting limits on app usage, managing screen time schedules, and restricting certain content. Follow the steps below to enable Screen Time on your iPhone and iPad:
- Step 1: Open Settings
- Step 2: Find and Tap on Screen Time
- Step 3: Enable Screen Time
- Step 4: Set Up Your Screen Time Passcode
To begin, unlock your device and open the Settings app. It’s represented by a grey gear icon and can usually be found on your home screen.
Within the Settings app, scroll down until you find “Screen Time”. It should be located near the top of the third set of options.
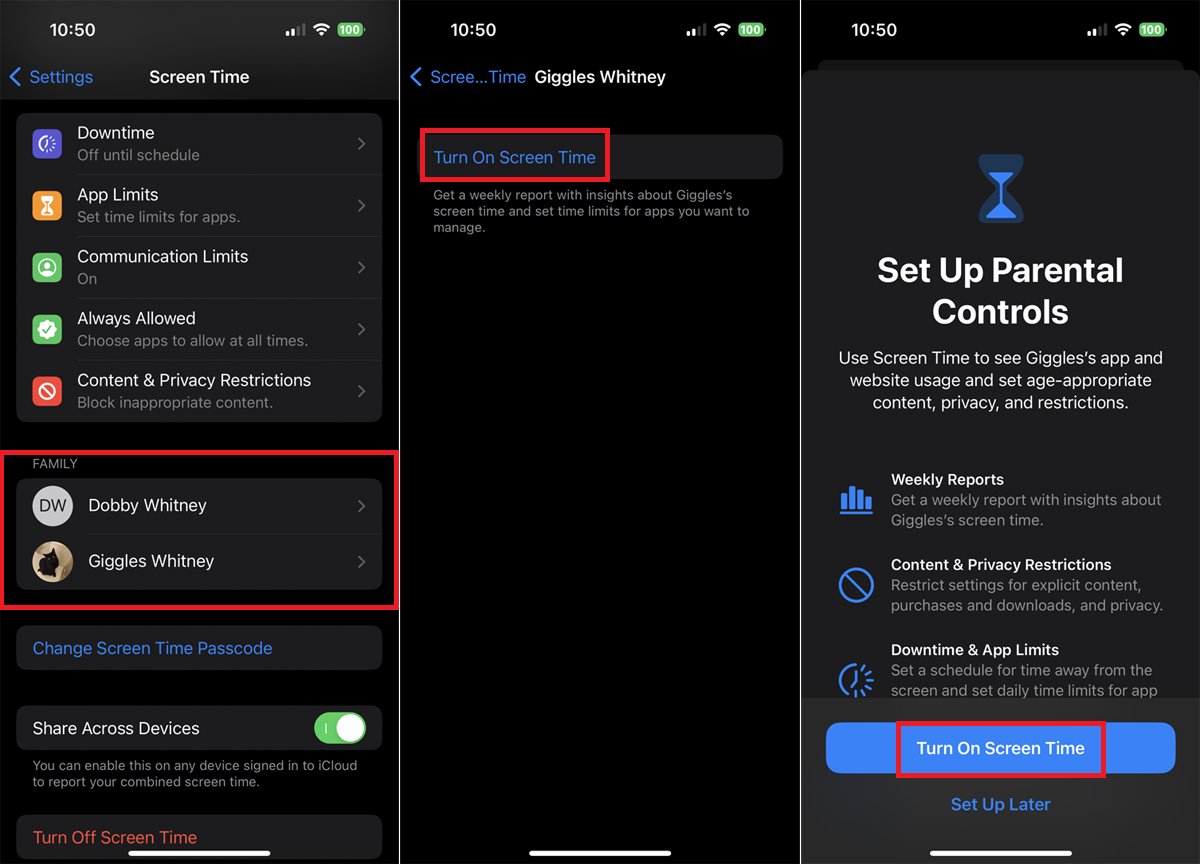
Once you’re in the Screen Time settings, tap on the toggle switch to enable Screen Time. You will be prompted to set up a Screen Time passcode which will be used to secure your settings.
Choose a 4-digit passcode that you can easily remember but that others won’t easily guess. This passcode will be required whenever you want to make changes to your Screen Time settings.
After completing these steps, Screen Time will be enabled on your iPhone and iPad. You can now proceed to set content restrictions and manage your device usage according to your preferences.
Setting up Content Restrictions on Screen Time
Screen Time is a feature on both iPhones and iPads that allows users to monitor and control their device usage. One of the key benefits of Screen Time is the ability to set content restrictions, ensuring that you or your loved ones have a safe and appropriate digital experience. Here’s how you can easily set up content restrictions on your iPhone and iPad.
To get started, navigate to the Settings app on your device and tap on “Screen Time.”
Next, tap on “Content & Privacy Restrictions.” You may be prompted to enter your device passcode or use Touch ID/Face ID to proceed.
Once you have entered the required authentication, you will see a range of content restriction options. These include restricting explicit language, explicit content, web content, and more. You can toggle these options on or off based on your preferences.
If you want to impose restrictions on specific apps, you can do so by scrolling down to the “Allowed Apps” section. Here, you can customize which apps are accessible during allowed screen time.
Furthermore, you can restrict certain features and services offered by Apple, such as Siri, dictation, and explicit music and podcast content. Simply scroll down to the “Allowed Store Content” section and toggle the desired options.
For additional control over web content, you can enable the “Web Content” option. It allows you to choose between allowing unrestricted access to websites or limiting access to specific age-appropriate categories, based on the device’s content ratings.
Remember to choose a passcode that is different from your device passcode when prompted. This passcode is used specifically for managing content restrictions, ensuring that only authorized users can modify the settings.
Once you have finished customizing your content restrictions, tap on the back arrow at the top left corner of the screen to save your changes.
Now, you have successfully set up content restrictions on your iPhone and iPad using Screen Time. These restrictions help create a safer and more controlled digital environment, making it easier for you to manage and monitor device usage.
It is important to note that while content restrictions in Screen Time provide a great level of control, no system is foolproof. Regularly communicate with your loved ones about responsible device usage and the importance of online safety.
Managing App Limits and Categories
One of the key features of Screen Time is the ability to set app limits and manage app categories. This functionality allows you to control the amount of time you spend on specific apps and even restrict access to certain app categories altogether.
To manage app limits, follow these steps:
- Open the Settings app on your iPhone or iPad.
- Scroll down and tap on “Screen Time”.
- Tap on “App Limits”.
- Tap on “Add Limit” to specify the app or app category you want to limit. You can choose from pre-defined categories like Social Networking, Games, or Entertainment, or select specific apps individually.
- Set the duration for the app limit by selecting the desired time limit from the options provided.
- Tap on “Add” to confirm the limit.
Once the app limit is set, Screen Time will notify you when you reach the allotted time for that particular app or category. You can choose to ignore the limit for the day or request additional time if needed.
Managing app categories works similarly:
- Open the Settings app on your iPhone or iPad.
- Scroll down and tap on “Screen Time”.
- Tap on “Content & Privacy Restrictions”.
- Enter your passcode or enable Face ID/Touch ID to access the restrictions menu.
- Tap on “Apps” under the Allowed Apps section.
- Toggle off the app categories you want to restrict access to. This will prevent any apps in the selected category from being used on your device.
By managing app limits and categories, you can have better control over your app usage and ensure a healthy balance between screen time and other activities.
Restricting Specific Websites and Content
If you want to take control over the websites and content that can be accessed on your iPhone or iPad, Screen Time provides a powerful feature to restrict specific websites and content.
To begin, open the Settings app on your device and tap on “Screen Time”. Next, select “Content & Privacy Restrictions” and enter your passcode when prompted.
Once you’re in the Content & Privacy Restrictions section, scroll down and tap on “Content Restrictions”. This will allow you to customize the type of content you want to restrict.
Under the “Web Content” section, you can choose to limit access to adult websites by selecting “Limit Adult Websites”. This will block any explicit or inappropriate content from being displayed on Safari or other web browsers.
If you want to take it a step further and restrict access to specific websites, you can do so by tapping on “Allowed Websites Only”. This will only allow access to the websites that you specifically whitelist.
To add websites to the allowed list, tap on “Add Website” under the “Never Allow” section. Enter the URL of the website you want to block and tap on “Done”. The website will now be added to the list of restricted websites.
If you want to remove a website from the allowed list, simply swipe left on the website name and tap on “Delete”. This will remove the website from the list, allowing access to it again.
In addition to website restrictions, you can also manage the types of content that can be accessed on your device. By tapping on “Apps”, you can choose to block specific apps or allow access only to certain apps.
For example, if you want to prevent access to social media apps, you can tap on “Social Networking” and select “Don’t Allow Apps” to block all social networking apps.
Furthermore, you can restrict access to explicit content by tapping on “Movies” or “Music” and selecting the appropriate rating limits.
By utilizing the options available in Screen Time’s Content Restrictions, you can create a safer and more controlled browsing experience for yourself or for your children.
Remember to regularly check and update the list of restricted websites and content to ensure that it aligns with your preferences and needs.
Conclusion
Setting content restrictions on your iPhone and iPad is crucial in today’s digital age. With the abundance of information and media available, it is important to protect yourself and your loved ones from inappropriate content. By utilizing the Screen Time feature on your device, you have the power to control what can be accessed, ensuring a safe and enjoyable browsing experience.
Whether you want to limit social media usage, restrict explicit content, or manage screen time for your children, Screen Time offers a variety of options to accommodate your needs. Take advantage of this powerful tool and establish healthy digital habits for yourself and your family.
Remember, technology should serve as a tool to enhance our lives, not hinder it. By setting content restrictions, you can strike a balance between staying connected and maintaining a healthy relationship with your device. Embrace the power of Screen Time and enjoy a safer and more meaningful digital experience.
FAQs
1. How do I set content restrictions using Screen Time on my iPhone?
To set content restrictions using Screen Time on your iPhone, go to Settings and tap on Screen Time. Then, tap on Content & Privacy Restrictions. From there, you can set restrictions for apps, websites, and other types of content based on age ratings and specific categories.
2. Can I set different content restrictions for different users on my iPad?
Yes, you can set different content restrictions for different users on your iPad. Each user can have their own Screen Time settings, allowing you to customize the content restrictions based on individual preferences and age groups.
3. What happens when I try to access restricted content on my device?
If you try to access restricted content on your device, depending on your settings, you may be prompted to enter a passcode or request permission from a parent or guardian. The exact process will vary based on your device and the restrictions you have set.
4. Can I override the content restrictions temporarily?
Yes, you can override the content restrictions temporarily if you have the passcode or if permission is granted. This can be useful in situations where you need access to specific content for a limited period of time.
5. Can I restrict access to specific apps on my device?
Yes, you can restrict access to specific apps on your device using Screen Time. Simply go to Settings, tap on Screen Time, and select App Limits. From there, you can set time limits or completely block access to individual apps.