
When it comes to digital art, Procreate is undoubtedly one of the leading software choices for artists and designers. This powerful app offers a wide range of features and tools that allow users to bring their ideas and creations to life on their devices. One such feature that can greatly enhance the creative process is the ability to add a reference photo in Procreate. Whether you’re looking to create a detailed portrait, replicate a still life, or simply draw inspiration from a real-life image, adding a reference photo can be a game-changer. In this article, we will guide you through the step-by-step process of adding a reference photo in Procreate, enabling you to elevate your digital art to new heights.
Inside This Article
- Methods of Adding a Reference Photo in Procreate
- Benefits of Using Reference Photos in Procreate
- Tips for Using Reference Photos in Procreate
- Conclusion
- FAQs
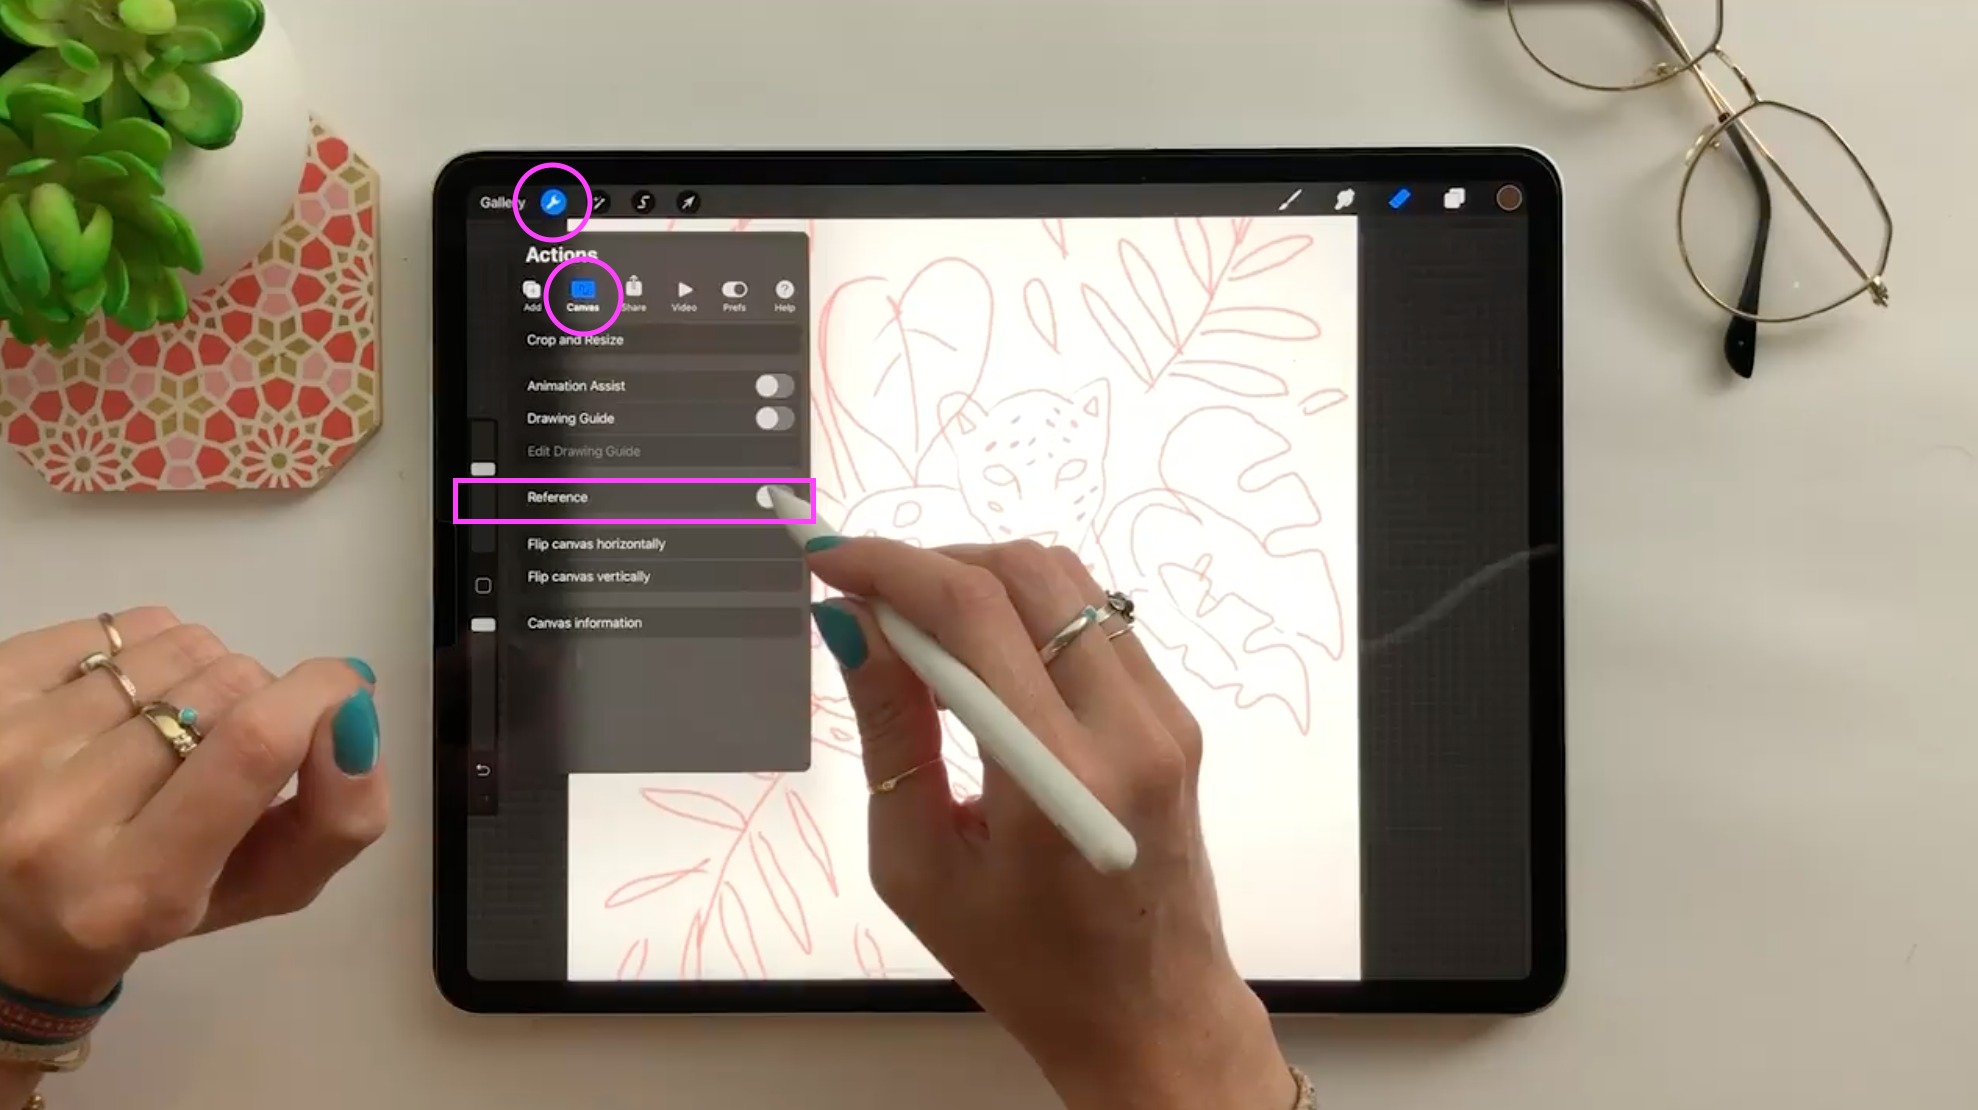
Methods of Adding a Reference Photo in Procreate
When using Procreate, an incredibly powerful digital art software, adding a reference photo can greatly enhance the accuracy and quality of your artwork. Fortunately, there are multiple methods to seamlessly integrate a reference photo into your workflow. Let’s take a closer look at the different ways you can add a reference photo in Procreate:
- Importing from the Photos App: This is perhaps the simplest method. Open Procreate and tap on the “+” button to create a new canvas. Then, tap on the “Photos” button and choose the photo you want to use as a reference. Procreate will import the photo directly into your canvas.
- Drag and Drop: For those using an iPad with Split View or Slide Over functionality, you can simply drag and drop a photo from the Files app into Procreate. Just open the Files app, find the photo you want to use, and drag it over to Procreate. It will automatically appear as a reference photo in your canvas.
- Copy and Paste: If you already have the reference photo saved in your clipboard, you can easily paste it into Procreate. Just open Procreate, create a new canvas, and then tap and hold on the canvas until the Paste option appears. Select Paste, and your reference photo will be added to the canvas.
- Using the Camera: If you prefer to take a photo or capture a reference image on the spot, you can use Procreate’s built-in camera feature. When creating a new canvas, tap on the “+” button, select “Photograph,” and then use the camera to capture the reference image. It will be instantly added to your canvas.
These methods provide flexibility and convenience, allowing you to incorporate reference photos seamlessly into your Procreate workflow. Experiment with different techniques to find the one that works best for you.
Benefits of Using Reference Photos in Procreate
Reference photos can be an invaluable tool for artists, providing a wealth of benefits when used in conjunction with Procreate. Whether you are a beginner or an experienced artist, here are some of the key advantages of using reference photos in Procreate:
1. Enhances Accuracy and Detail: Reference photos offer a level of precision and detail that can be challenging to achieve solely from imagination. By referring to a photo, you can capture the exact proportions, shapes, and colors of your subject, resulting in more accurate and realistic artwork.
2. Expands Creativity: While reference photos provide a solid foundation, they also stimulate your creativity. They can serve as a starting point or inspiration for your artwork and can be used to explore new styles, techniques, or compositions.
3. Improves Observational Skills: Working from reference photos helps you develop and refine your observational skills. You learn to analyze and study the details of your subject, such as light/shadow, texture, and form, allowing you to translate them onto your canvas more effectively.
4. Enables Experimentation: Reference photos offer a risk-free environment for experimentation and exploration. You can try different approaches, experiment with various brush techniques and effects, while still having the reference photo as a guide, building your skills and expanding your artistic capabilities.
5. Supports Learning and Growth: By studying and referencing from photos, you can learn to understand and interpret different subjects, objects, and environments. This knowledge transfers to other areas of your artwork, enabling you to tackle new challenges and expand your artistic repertoire.
6. Speeds Up Workflow: Having a reference photo in Procreate eliminates the need for constant internet searches or flipping through physical references. It streamlines your workflow, allowing you to focus on creating without interruptions, ultimately saving you time and increasing your productivity.
7. Offers Versatility: The use of reference photos in Procreate is incredibly versatile. You can import and manipulate multiple photos, create mash-ups, or incorporate elements from different references to create unique and original artwork.
8. Enhances Collaboration: If you are working on a collaborative project, reference photos can be shared and used by multiple artists, ensuring consistency and a unified vision. This enhances teamwork and facilitates communication between creators.
9. Enables Continuous Improvement: With reference photos, you can compare your artwork to the original photo, identifying areas for improvement and making necessary adjustments. This iterative process helps you grow as an artist and refine your skills.
10. Boosts Confidence: Utilizing reference photos can boost your confidence as an artist. The assurance that you are working with accurate references can give you a sense of security and encourage you to tackle more complex subjects or push the boundaries of your artistic abilities.
Overall, the benefits of using reference photos in Procreate are numerous and can greatly enhance your artistic journey. By incorporating reference photos into your workflow, you can leverage their advantages and take your artwork to new heights.
Tips for Using Reference Photos in Procreate
Adding reference photos to your Procreate artwork can be a game-changer, allowing you to accurately depict objects, scenes, and details. To make the most of this feature, here are some valuable tips to enhance your artistry:
1. Choose High-Quality Reference Photos:
When selecting reference photos, it’s essential to opt for high-resolution images. This ensures that you have access to clear and detailed visuals that accurately represent what you want to create.
2. Adjust Opacity and Placement:
Experiment with the opacity level of your reference photo to find the right balance. Lowering the opacity allows you to see both the reference photo and your artwork simultaneously, making it easier to replicate details and dimensions accurately. Move and resize the reference photo to suit your needs by using the Transform tool in Procreate.
3. Utilize the Split-screen Feature:
Procreate offers a convenient split-screen feature that allows you to view your reference photo alongside your artwork. This enables you to compare and reference details more efficiently, ensuring a more accurate depiction in your digital masterpiece.
4. Create a Reference Layer:
An effective way to incorporate reference photos is by creating a separate reference layer within your Procreate canvas. This layer can hold multiple reference images, which you can toggle on and off for easy access during the creation process.
5. Zoom In for Detailing:
Zoom in on specific areas of your reference photo to capture intricate details. This enables you to closely observe and replicate fine lines, textures, and shading that may be crucial to the overall realism of your artwork.
6. Use Distortion Tools:
Procreate offers various distortion tools that allow you to manipulate the shape of your reference photos. This can be useful when incorporating images into complex compositions or altering perspectives to fit the desired composition.
7. Organize and Label Reference Photos:
As you work on different projects, it’s important to organize your reference photos effectively. Use descriptive file names or create a dedicated folder to easily locate and access specific references when needed.
8. Experiment with Blending Modes:
Explore the wide range of blending modes available in Procreate. Applying different blending modes to your reference photo layer can create interesting visual effects or help you accurately capture specific lighting conditions.
9. Save Custom Color Palettes:
While referencing colors from your photos, consider creating a custom color palette in Procreate. This way, you can easily access and use those colors throughout your artwork, providing a cohesive and harmonious composition.
10. Practice and Experiment:
Using reference photos successfully in Procreate takes practice. Keep experimenting with different techniques, tools, and approaches to find what works best for you. Over time, you will develop your unique style and workflow that incorporates reference photos seamlessly into your art.
By implementing these tips, you can harness the full potential of reference photos in Procreate and take your digital artwork to new heights. So, grab your iPad, open Procreate, and let your creativity soar!
Conclusion
In conclusion, adding a reference photo in Procreate is a simple yet powerful tool that can greatly enhance your digital artwork. With the ability to import and manipulate images, you can easily refer to a photo while creating your masterpiece, ensuring accuracy and enhancing your creativity. Whether you’re a beginner or an experienced artist, having a reference photo can provide valuable guidance and inspiration.
By following the step-by-step process outlined in this article, you can easily add a reference photo in Procreate and take your digital artwork to the next level. So don’t hesitate to experiment, explore, and use reference photos to bring your artistic visions to life.
FAQs
1. Can I add a reference photo in Procreate?
Yes, you can certainly add a reference photo in Procreate. It is a powerful digital art app that allows artists to import photos into their canvas for reference while working on their artwork. Adding a reference photo can be very helpful in achieving accuracy and capturing the desired details in your artwork.
2. How do I add a reference photo in Procreate?
To add a reference photo in Procreate, follow these steps:
- Open Procreate and create a new canvas or open an existing one.
- Tap on the wrench icon located at the top left corner of the screen to open the Actions menu.
- Select “Add” or “Insert” from the Actions menu.
- Choose whether you want to import the photo from your Photos app, Files app, or take a photo using your device’s camera.
- Select the desired photo and it will be imported onto your canvas as a new layer.
- You can resize, rotate, or position the reference photo as needed.
3. Can I have multiple reference photos in Procreate?
Yes, you can have multiple reference photos in Procreate. After adding the initial reference photo, you can repeat the process mentioned in the previous question to add additional reference photos. Each photo will be imported as a separate layer, allowing you to work with multiple references simultaneously.
4. Can I adjust the opacity of the reference photo in Procreate?
Yes, you can adjust the opacity of the reference photo in Procreate. To do so, select the reference photo layer and tap on the “N” button located in the Layers panel. This will bring up the options for adjusting the opacity. Slide the opacity slider to your desired level, allowing you to see your artwork and the reference photo simultaneously.
5. Can I remove a reference photo from my canvas in Procreate?
Yes, you can remove a reference photo from your canvas in Procreate. To do this, go to the Layers panel and select the reference photo layer. Then, swipe left on the layer and tap on the “Delete” button to remove it from your canvas. Alternatively, you can also tap on the reference photo layer, select “Clear” from the pop-up menu, and confirm the deletion.