
In our increasingly visual world, the ability to resize images has become a crucial skill for many individuals and professionals. When it comes to digital art and graphic design, Procreate has emerged as a popular choice among artists as a powerful tool for creating stunning digital illustrations.
However, understanding how to manipulate and resize images within Procreate can be a valuable skill to possess. Whether you want to scale down an image to fit a specific canvas size or enlarge it for printing purposes, Procreate offers a comprehensive set of tools and features to help you achieve your desired outcome.
In this article, we will delve into the step-by-step process of resizing an image in Procreate, from opening the image to adjusting the dimensions and exporting the final result. So, grab your digital canvas and let’s explore the world of image resizing in Procreate!
Inside This Article
- The Basics of Procreate
- Resizing an Image in Procreate
- Additional Tips and Tricks for Image Resizing in Procreate
- Conclusion
- FAQs
The Basics of Procreate
If you are a digital artist or an aspiring creative, chances are you have heard of Procreate. Procreate is a powerful digital painting and illustration app that has gained immense popularity among artists of all skill levels. With its extensive range of features and intuitive interface, Procreate has revolutionized the way artists create digital artwork.
Whether you are a beginner or an experienced artist looking to enhance your digital art skills, understanding the basics of Procreate is crucial. In this article, we will explore the fundamental features and tools of Procreate that will help you get started on your artistic journey.
1. Brushes: One of the key features of Procreate is its extensive library of brushes. Procreate offers a wide variety of brushes, including realistic pencils, inking brushes, digital watercolors, and more. You can customize these brushes to create unique textures and effects, allowing you to bring your artistic vision to life.
2. Layers: Like most digital art software, Procreate allows you to work with layers. Layers enable you to separate different elements of your artwork and make adjustments without affecting the rest of your work. You can control the opacity, blending modes, and order of your layers, giving you complete control over your composition.
3. Selection Tools: Procreate offers a range of selection tools that allow you to isolate specific areas of your artwork for editing or manipulation. These selection tools include freehand selection, geometric shapes, and magic wand, making it easier to make precise edits and adjustments to your artwork.
4. Transform and Warp: Procreate provides powerful transformation and warp tools that enable you to resize, rotate, and reshape your artwork. You can easily distort, skew, or warp specific elements of your artwork to achieve the desired effect.
5. Blending Modes: Procreate offers a variety of blending modes that allow you to blend colors and textures seamlessly. This feature adds depth and richness to your artwork by creating realistic lighting and shading effects.
6. Exporting Options: Once you have completed your artwork, Procreate offers multiple options for exporting your work. You can save your artwork as a high-quality image, export it as a layered file for further editing, or even create timelapse videos of your creative process to share with others.
Procreate is a comprehensive digital art tool with a vast range of features. While these are just the basics, exploring and experimenting with the app will unlock even more creative possibilities. Now that you have a solid understanding of the fundamentals, it’s time to dive in and start creating amazing artwork with Procreate!
Resizing an Image in Procreate
Procreate is a powerful digital art software that allows artists to unleash their creativity on the iPad. One of the essential features of Procreate is the ability to resize images, whether you want to make them smaller or larger. Resizing an image in Procreate is a simple and straightforward process that can be done in a few different ways.
Let’s take a look at three methods you can use to resize an image in Procreate:
Method 1: Using the Transform Tool
The Transform tool in Procreate allows you to scale, rotate, and distort your artwork. To resize an image using the Transform tool, follow these steps:
- Select the image layer you want to resize.
- Tap on the Transform icon (represented by a square with arrows) in the top menu.
- Adjust the size of the image by dragging the handles on the corners or sides of the bounding box.
- Tap “Apply” to confirm the changes.
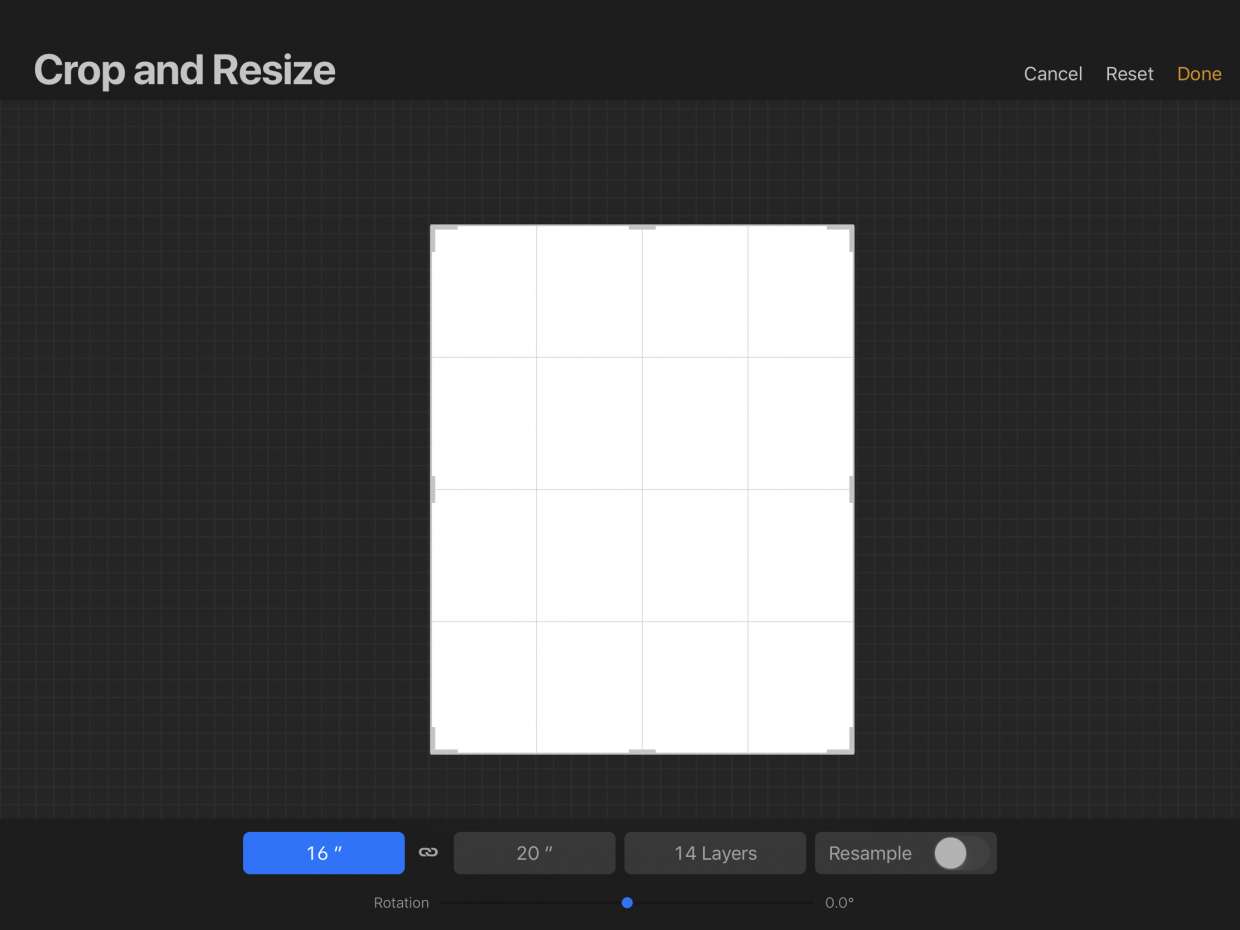
Method 2: Using the Crop Tool
The Crop tool in Procreate allows you to remove unwanted areas of your image and resize it simultaneously. Here’s how you can resize an image using the Crop tool:
- Select the image layer you want to resize.
- Tap on the Crop icon (represented by a square with lines) in the top menu.
- Adjust the size of the crop area by dragging the handles on the corners or sides of the bounding box.
- Tap “Crop” to resize the image according to the new crop area.
Method 3: Using the Canvas Size Tool
If you want to change the overall size of your canvas and resize the image proportionally, you can use the Canvas Size tool. Follow these steps:
- Select the image layer you want to resize.
- Tap on the Layers icon in the top menu, then select the image layer.
- Tap on “Image” and then “Canvas” in the menu that appears.
- Adjust the width and height values to resize the canvas. The image will be resized proportionally.
- Tap “Apply” to confirm the changes.
By using these methods, you can easily resize images in Procreate to suit your artistic needs. Whether you want to make your artwork smaller or larger, Procreate offers the flexibility and tools to achieve your desired results. Experiment with different resizing techniques and unleash your creativity in the digital realm!
Additional Tips and Tricks for Image Resizing in Procreate
Resizing images in Procreate is a powerful tool that allows you to manipulate and adjust your artwork with ease. While the basic methods of resizing have been covered in the previous sections, there are additional tips and tricks that can take your image resizing skills to the next level. Here are some handy techniques to consider:
1. Maintaining Proportions: When resizing an image, it’s important to maintain the original proportions to prevent distortion. In Procreate, you can easily do this by enabling the “Uniform” option in the Transform or Crop tools. This ensures that the image is scaled proportionally, preserving its aspect ratio.
2. Using Guide Lines: To achieve precise resizing, consider utilizing guide lines. Simply go to the Actions menu, select Add, and choose the “Guide” option. You can then drag the guide lines to the desired positions to align and resize your image accurately.
3. Undo and Redo: In case you make a mistake while resizing, Procreate allows you to undo and redo your actions. You can use the gestures or the buttons in the top toolbar to quickly revert or repeat your previous resizing steps.
4. Feathering Edges: If you want to create a smoother transition between the resized image and its surrounding area, consider applying feathering to the edges. This softens the edges and makes the resized image blend seamlessly with the background.
5. Experiment with Blending Modes: For more creative effects, try experimenting with blending modes after resizing your image. Procreate offers a variety of blending options that can enhance the overall look and feel of your resized artwork.
6. Utilize Alpha Lock: When resizing a specific element within your image, you can use the Alpha Lock feature to protect the rest of the artwork from being affected. This allows you to resize individual elements without altering the surrounding areas.
7. Grouping Layers: If your artwork consists of multiple layers, it’s a good practice to group them before resizing. Grouping allows you to resize multiple layers as a whole, maintaining their relative position and proportions.
8. Saving Presets: To save time and streamline your workflow, consider creating presets for frequently used resizing settings. This way, you can quickly apply the desired resizing parameters without manually adjusting them each time.
By implementing these additional tips and tricks, you can expand your capabilities in Procreate and achieve more precise and creative image resizing results. Don’t be afraid to experiment and explore different techniques to add your own personal touch to your resized artwork!
Conclusion
In conclusion, Procreate is an incredibly powerful tool for resizing images. Whether you are a professional designer or a hobbyist artist, Procreate offers a user-friendly interface and a wide range of features that make image resizing a breeze. With its intuitive controls and robust editing capabilities, Procreate allows you to effortlessly transform and resize your images to fit any specific requirements.
By following the steps outlined in this article, you can ensure that your resized images maintain their quality, clarity, and resolution. Remember to consider the aspect ratio, image dimensions, and file size to achieve the desired results. Additionally, Procreate offers a variety of exporting options, allowing you to save your resized images in various formats suitable for different platforms and purposes.
So, whether you need to resize images for print, social media, or your personal projects, Procreate is the ultimate solution. With its advanced tools and seamless workflow, you can resize images with precision and ease, unleashing your creativity and producing stunning visuals. So go ahead, give Procreate a try and take your image resizing game to the next level!
FAQs
1. Can I resize an image in Procreate?
Yes, you can resize an image in Procreate. Procreate is a powerful digital art and illustration app that allows you to make various edits to your artwork, including resizing. With Procreate, you can easily adjust the size of your image to fit your desired dimensions.
2. How do I resize an image in Procreate?
To resize an image in Procreate, follow these steps:
- Open your image in Procreate.
- Select the Transform tool, which looks like a square with arrows on the corners.
- Pinch your fingers together or apart on the canvas to resize the image. You can also drag the corners of the bounding box to resize the image.
- Once you’re satisfied with the new size, tap the arrow button in the top menu bar to confirm the changes.
3. Will resizing an image in Procreate affect its quality?
When you resize an image in Procreate, it can potentially impact its quality. Enlarging an image may result in pixelation and loss of detail, while reducing the size may cause some loss of sharpness. However, Procreate utilizes advanced algorithms to minimize these quality losses and maintain the integrity of your artwork as much as possible.
4. Can I resize multiple layers in Procreate?
Yes, you can resize multiple layers in Procreate. When you select the Transform tool, it automatically applies to all the selected layers. This allows you to resize multiple elements together, ensuring they stay in proportion to each other.
5. Is there a limit to how much I can resize an image in Procreate?
Procreate allows you to resize images to a certain extent, but there may be limitations depending on the original size and resolution of the image. Enlarging an image too much beyond its original dimensions can result in significant loss of quality. It is generally recommended to work with high-resolution images to maintain optimal quality when resizing in Procreate.