
Are you looking to enhance your image editing skills in Procreate? One of the most essential techniques to master is cutting out an image. Whether you want to isolate a subject, remove the background, or create a composite from different elements, knowing how to cut out an image in Procreate will give you the freedom and creativity to transform your digital artwork. In this article, we will guide you step-by-step on how to cut out an image in Procreate, using various tools and techniques. From selecting the subject to refining the edges, you’ll learn everything you need to know to achieve clean and professional-looking results. So, let’s dive in and unlock the potential of Procreate’s image editing capabilities!
Inside This Article
- Steps to Cut Out an Image in Procreate
- Fine-tuning the Cut Out Image
- Exporting the Cut Out Image
- Conclusion
- FAQs
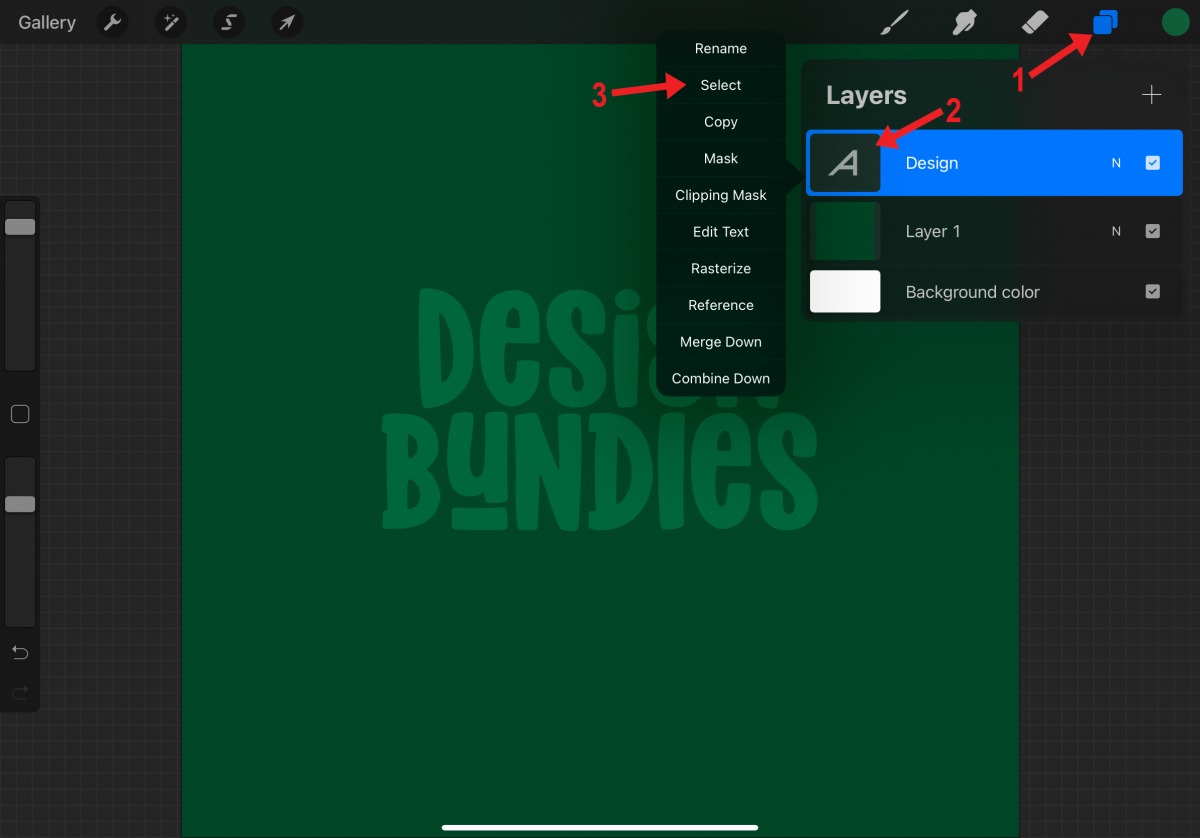
Steps to Cut Out an Image in Procreate
Are you looking to create stunning cut-out images for your digital artwork? Look no further than Procreate – an incredibly powerful and versatile software that can help you achieve professional-level results. In this article, we will walk you through the steps to cut out an image in Procreate, allowing you to seamlessly remove the background and focus on the subject of your artwork.
- Importing the image into Procreate: The first step is to import the image you want to cut out into Procreate. You can do this by selecting the ‘Import’ option within the app and choosing the image file from your device’s gallery. Once imported, the image will appear on your canvas ready for editing.
- Selecting the brush tool: Next, select the brush tool from the toolbar on the left side of the screen. Procreate offers a wide range of brushes to choose from, so you can select the one that best fits your editing needs. For cutting out an image, a fine, precise brush with tapered edges works well.
- Tracing the outline of the image: With the brush tool selected, start tracing the outline of the subject in the image. Take your time and follow the contours of the object as accurately as possible. Procreate offers features like zooming in and out, as well as rotating the canvas, to make your tracing process more precise and convenient.
- Using the eraser tool to remove unwanted parts: Once you have traced the outline of the image, switch to the eraser tool. Use this tool to carefully remove the background and any unwanted parts of the image. You can adjust the size and opacity of the eraser tool to achieve better control and precision.
By following these simple steps in Procreate, you can cut out an image and create a clean, isolated subject for your artwork. Remember to take your time, zoom in for accuracy, and use the appropriate brushes and eraser tools to achieve the desired results. With practice and experimentation, you can refine your cutting-out skills and create stunning digital artwork.
Fine-tuning the Cut Out Image
Once you’ve successfully cut out an image in Procreate, you can take your editing to the next level by fine-tuning the image. This involves adjusting the opacity and transparency, refining the edges, and applying special effects or filters. Let’s explore these steps in more detail:
1. Adjusting the opacity and transparency: One way to enhance the cut out image is by adjusting its opacity and transparency. This allows you to control how the cut out image blends with other layers or backgrounds. You can increase the opacity for a more solid and prominent image, or decrease it for a more subtle and transparent effect. This adjustment can be made using the layer opacity settings in Procreate.
2. Refining the edges of the cut out image: After cutting out an image, it’s common to have rough or jagged edges. To achieve a more polished and professional look, you can refine these edges. Procreate provides various tools, such as the eraser tool or the selection tool, that can help you clean up any unwanted artifacts or uneven edges. You can carefully trace along the edges and remove any imperfections to make the cut out image appear seamless.
3. Applying special effects or filters: To add a touch of creativity to your cut out image, you can experiment with special effects or filters available in Procreate. These effects can dramatically change the overall look and feel of the image. Whether it’s adding a vintage filter, applying a blur effect, or experimenting with color adjustments, the options are endless. Take your time to play around with different effects and see which one enhances your cut out image in the most visually appealing way.
By fine-tuning the cut out image in Procreate, you can elevate your editing skills and create stunning visuals that leave a lasting impact. Remember, the key is to experiment, be creative, and have fun while exploring the various tools and options Procreate has to offer.
Exporting the Cut Out Image
Once you have successfully cut out an image in Procreate, the next step is to export it. Procreate offers a variety of options for saving your cut out image in different formats and sharing it on social media or other platforms. Let’s explore these options:
1. Saving the image in different formats
Procreate allows you to save your cut out image in various formats, depending on your specific needs. Here are some commonly used formats:
- JPEG: This format is widely supported and is suitable for images that do not require transparency. It offers a good balance between image quality and file size.
- PNG: PNG format supports transparency, making it perfect for images that have a complex or transparent background. It retains more detail but may result in larger file sizes compared to JPEG.
- TIFF: TIFF format is known for its lossless compression, meaning it retains the highest level of image quality. It is commonly used for professional printing or archival purposes.
- PSD: If you want to retain all the layers and editing capabilities, you can save your cut out image as a PSD (Photoshop Document) file. This format is ideal if you plan to continue editing the image in other software.
To save your cut out image in Procreate, simply go to the “Actions” menu, select “Share,” and then choose the desired format from the available options. Give your file a meaningful name and select the location where you want to save it.
2. Sharing the image on social media or other platforms
Procreate makes it easy to share your cut out image directly to social media platforms or other apps. Here’s how:
- Using the Procreate Share Sheet: Tap on the “Actions” menu, select “Share,” and then choose the platform you want to share to. Procreate will automatically generate a preview of your cut out image and provide options to add captions or tags before publishing.
- Exporting to the Files App: If you prefer to manually share your cut out image, you can export it to the Files app on your device. From there, you can access the image and share it through various apps or platforms.
- Copying and Pasting: Another quick way to share your cut out image is by copying it and pasting it directly into another app or platform that supports image pasting, such as messaging apps or email.
By leveraging these sharing options in Procreate, you can effortlessly showcase your cut out image on social media, collaborate with others, or integrate it into your creative projects.
Conclusion
In conclusion, learning to cut out images in Procreate can be a game-changer for any artist or designer. The software offers a powerful set of tools and features that make the process quick and efficient. Whether you want to remove backgrounds, isolate objects, or create composite images, Procreate provides the necessary tools to achieve professional-grade results.
By utilizing techniques such as using the selection tools, refining edges, and leveraging the power of layers, you can achieve clean and precise cutouts. The flexibility and versatility of Procreate allow you to experiment with different styles and approaches to image cutouts, opening up endless creative possibilities.
Investing time to master the art of cutting out images in Procreate will undoubtedly enhance your digital artwork and design projects. So grab your iPad, open up Procreate, and start exploring the world of image cutouts!
FAQs
1. Why should I cut out an image in Procreate?
Cutting out an image in Procreate allows you to isolate the subject from its background, making it easier to create digital compositions, apply different backgrounds, or use the image in various artwork projects.
2. Can I cut out images with complex backgrounds in Procreate?
Yes, you can cut out images with complex backgrounds in Procreate. However, it may require more time and precision compared to simpler backgrounds. Procreate provides various tools and techniques that can help you achieve accurate cutouts, even with intricate backgrounds.
3. What tools can I use to cut out an image in Procreate?
Procreate offers several tools and features that can assist in cutting out images, such as the Selection tool, QuickShape tool, Pen tool, and the Eraser tool. Each of these tools has its own unique capabilities and can be used depending on the complexity of the image and the desired outcome.
4. Is it possible to refine the edges of a cutout image in Procreate?
Yes, Procreate provides tools and options to refine the edges of a cutout image. The Selection tool allows you to modify the selection outline, while the Smudge tool can help you smooth out any rough edges. Additionally, Procreate offers adjustment options like Feather and Gaussian Blur, which can further enhance the appearance of the cutout.
5. Can I export the cutout image from Procreate with a transparent background?
Yes, Procreate supports exporting images with a transparent background. Once you have cut out the image and refined the edges, you can export it as a PNG file, which will preserve the transparency. This allows you to seamlessly incorporate the cutout image into other design projects or use it as a stand-alone element.