
If you've ever wanted to capture the action on your iPhone 11's screen, whether it's to demonstrate a process, share a memorable moment, or troubleshoot an issue, you're in luck. Screen recording on iPhone 11 allows you to do just that. This feature enables you to create a video of your screen activity, making it incredibly useful for a variety of purposes. Whether you're a tech enthusiast, a social media aficionado, or a professional seeking to enhance your presentations, the screen recording feature on the iPhone 11 can be a game-changer. In this article, we'll explore the ins and outs of screen recording on iPhone 11, providing you with a comprehensive guide to unlock its full potential. So, how do you get screen recording on your iPhone 11? Let's dive in and find out!
Inside This Article
- Setting Up Screen Recording
- Using the Control Center
- Recording Your Screen
- Saving and Sharing Your Recording
- Conclusion
- FAQs
Setting Up Screen Recording
Setting up screen recording on your iPhone 11 is a breeze. Whether you want to capture a tutorial, showcase a new app, or simply record a memorable moment, the screen recording feature allows you to do so effortlessly. Before you start recording, you’ll need to ensure that the feature is readily accessible on your device.
To set up screen recording on your iPhone 11, you can navigate to the Control Center settings. This allows you to add the screen recording icon to the Control Center for quick and convenient access. Once added, you can easily initiate screen recording with just a few taps, making it a seamless process to capture whatever is happening on your screen.
After setting up the screen recording feature on your iPhone 11, you’ll be ready to start recording your screen whenever the need arises. This versatile tool opens up a world of possibilities, enabling you to effortlessly capture and share your screen content with ease.
Using the Control Center
Utilizing the Control Center on your iPhone 11 to initiate screen recording is a breeze. The Control Center is a convenient hub for accessing various features and functions of your device, including screen recording.
To access the Control Center, simply swipe down from the top-right corner of the screen. This action will reveal a panel containing a selection of essential shortcuts and tools, such as Wi-Fi, Bluetooth, brightness controls, and more.
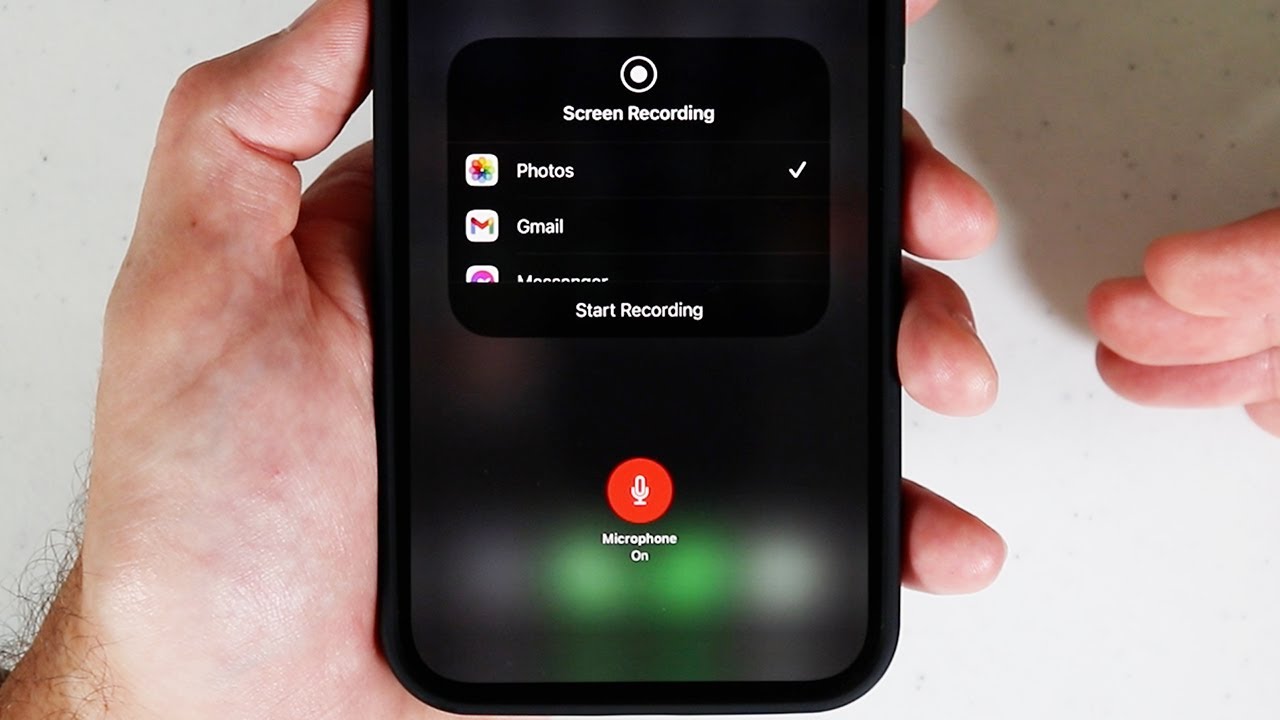
Once the Control Center is displayed, you will notice a circular record button. This is the gateway to initiating your screen recording. Tapping this button will commence the recording process, allowing you to capture the desired content on your iPhone 11’s screen.
Moreover, it’s worth noting that the Control Center can be customized to include the screen recording shortcut for even quicker access. This customization feature enables you to tailor the Control Center to suit your preferences and streamline the screen recording process.
Recording Your Screen
Once you have set up screen recording on your iPhone 11, capturing your screen is a breeze. Here’s how to get started:
1. Navigate to the screen or app that you want to record.
2. Swipe down from the top-right corner of the screen to access the Control Center.
3. Tap the screen recording icon, which looks like a solid circle surrounded by a dotted circle.
4. A three-second countdown will appear, giving you time to navigate back to the screen or app you want to record.
5. Once the countdown is complete, the recording will begin, and a red status bar will appear at the top of your screen to indicate that the recording is in progress.
6. To stop the recording, simply tap the red status bar at the top of the screen and select “Stop” from the pop-up menu.
7. Your recording will be saved to the Photos app, where you can view, edit, and share it with ease.
Saving and Sharing Your Recording
After you’ve captured an important moment or demonstrated a process through screen recording on your iPhone 11, it’s time to save and share your recording. Here’s how to do it:
1. Saving the Recording: Once you stop the screen recording, it will be automatically saved to your Photos app. You can access it by opening the Photos app and navigating to the “Recents” album. Your screen recording will be there, ready for viewing and sharing.
2. Sharing the Recording: To share the recording with others, open the Photos app and select the screen recording from the “Recents” album. Tap the “Share” button, and choose the platform through which you’d like to share the recording, such as Messages, Mail, or social media apps. You can also choose to share it with AirDrop to send it to nearby Apple devices.
3. Editing the Recording: If you want to make any edits to the recording before sharing it, you can do so directly from the Photos app. Tap “Edit” and use the editing tools to trim the recording, add annotations, or make any other adjustments to enhance it before sharing.
4. Choosing the Quality: When sharing the recording, you can choose the quality at which it will be shared. This is particularly useful if you want to reduce the file size for easier sharing or maintain the highest quality for a professional presentation.
By following these steps, you can effortlessly save, share, and even enhance your screen recordings on your iPhone 11, ensuring that your valuable content reaches the right audience with ease.
Conclusion
Screen recording on iPhone 11 is a powerful feature that allows users to capture and share their device’s screen activities with ease. Whether you’re demonstrating a new app, providing tech support, or simply sharing a memorable moment, the screen recording function offers a convenient way to capture and communicate information. By accessing the Control Center and customizing the screen recording settings, users can tailor their recording experience to suit their specific needs. With the ability to record both audio and visual content, the iPhone 11’s screen recording feature is a versatile tool for various personal and professional purposes. As technology continues to evolve, this functionality exemplifies the iPhone 11’s commitment to empowering users with innovative and practical features.
FAQs
Q: Can I record my iPhone screen without using any third-party apps?
A: Yes, you can easily record your iPhone screen without the need for third-party apps. The built-in screen recording feature on iPhone 11 allows you to capture your screen activity effortlessly.
Q: Can I add audio to my screen recordings on iPhone 11?
A: Absolutely! With the screen recording feature on iPhone 11, you can record both the visuals and the audio from your device. This includes capturing in-app sounds, music, and even your own voice using the built-in microphone.
Q: How can I access the screen recording feature on iPhone 11?
A: Accessing the screen recording feature on iPhone 11 is simple. You can enable it through the Control Center by customizing the included controls and adding the screen recording icon. Once added, you can start recording with just a tap.
Q: Can I edit my screen recordings on iPhone 11 before sharing them?
A: Yes, iPhone 11 offers built-in editing tools for screen recordings. After capturing your screen activity, you can trim the recording, add annotations, and even include text overlays to customize your content before sharing it with others.
Q: Are there any limitations to screen recording on iPhone 11?
A: While the screen recording feature on iPhone 11 is incredibly versatile, it's important to note that certain apps or content may restrict recording. Additionally, factors such as available storage space and battery life can impact the duration of your recordings.