
Are you eager to capture your iPhone 13 screen in action? Whether you want to record a tutorial, save a memorable moment, or troubleshoot a pesky issue, screen recording on your iPhone 13 is a valuable feature. With the ability to record both audio and visual content, you can effortlessly share your screen activities with others. In this article, you will discover the step-by-step guide on how to screen record on your iPhone 13. From enabling the feature to accessing the recording controls, you will be equipped with the knowledge to make the most of this functionality. Let's dive in and unlock the potential of screen recording on your iPhone 13.
Inside This Article
- Getting Started
- Using the Built-in Screen Recorder
- Recording with QuickTime on Mac
- Using Third-Party Apps
- Editing and Sharing Your Screen Recording
- Conclusion
- FAQs
Getting Started
So, you’ve got your hands on the latest iPhone 13, and you’re eager to explore its impressive features. One of the most useful capabilities of the iPhone 13 is its built-in screen recording function. Whether you want to capture a memorable gaming moment, create a tutorial, or save a video from social media, the screen recording feature can come in handy. Let’s dive into the basics of how to get started with screen recording on your iPhone 13.
First things first, ensure that your iPhone 13 is updated to the latest iOS version. This is crucial as the screen recording feature may have received enhancements and bug fixes in the latest update. To check for updates, go to Settings > General > Software Update. If there’s an available update, download and install it to ensure smooth functionality of the screen recording feature.
Next, familiarize yourself with the location of the screen recording button. By default, the screen recording button is not visible in the Control Center. You’ll need to add it manually. To do this, go to Settings > Control Center > Customize Controls. Locate “Screen Recording” in the list of available controls and tap the green plus button next to it to add it to the Control Center.
Once you’ve added the screen recording button to the Control Center, you’re all set to start capturing your screen activities. With these initial steps completed, you’re now ready to explore the various methods of using the screen recording feature on your iPhone 13.
Using the Built-in Screen Recorder
One of the most convenient features of the iPhone 13 is its built-in screen recording capability. With this feature, you can capture anything on your screen, from gameplay to app tutorials, without the need for third-party apps.
To begin using the built-in screen recorder, start by opening the Control Center. You can do this by swiping down from the top-right corner of the screen on iPhone models with Face ID, or swiping up from the bottom of the screen on models with a Home button.
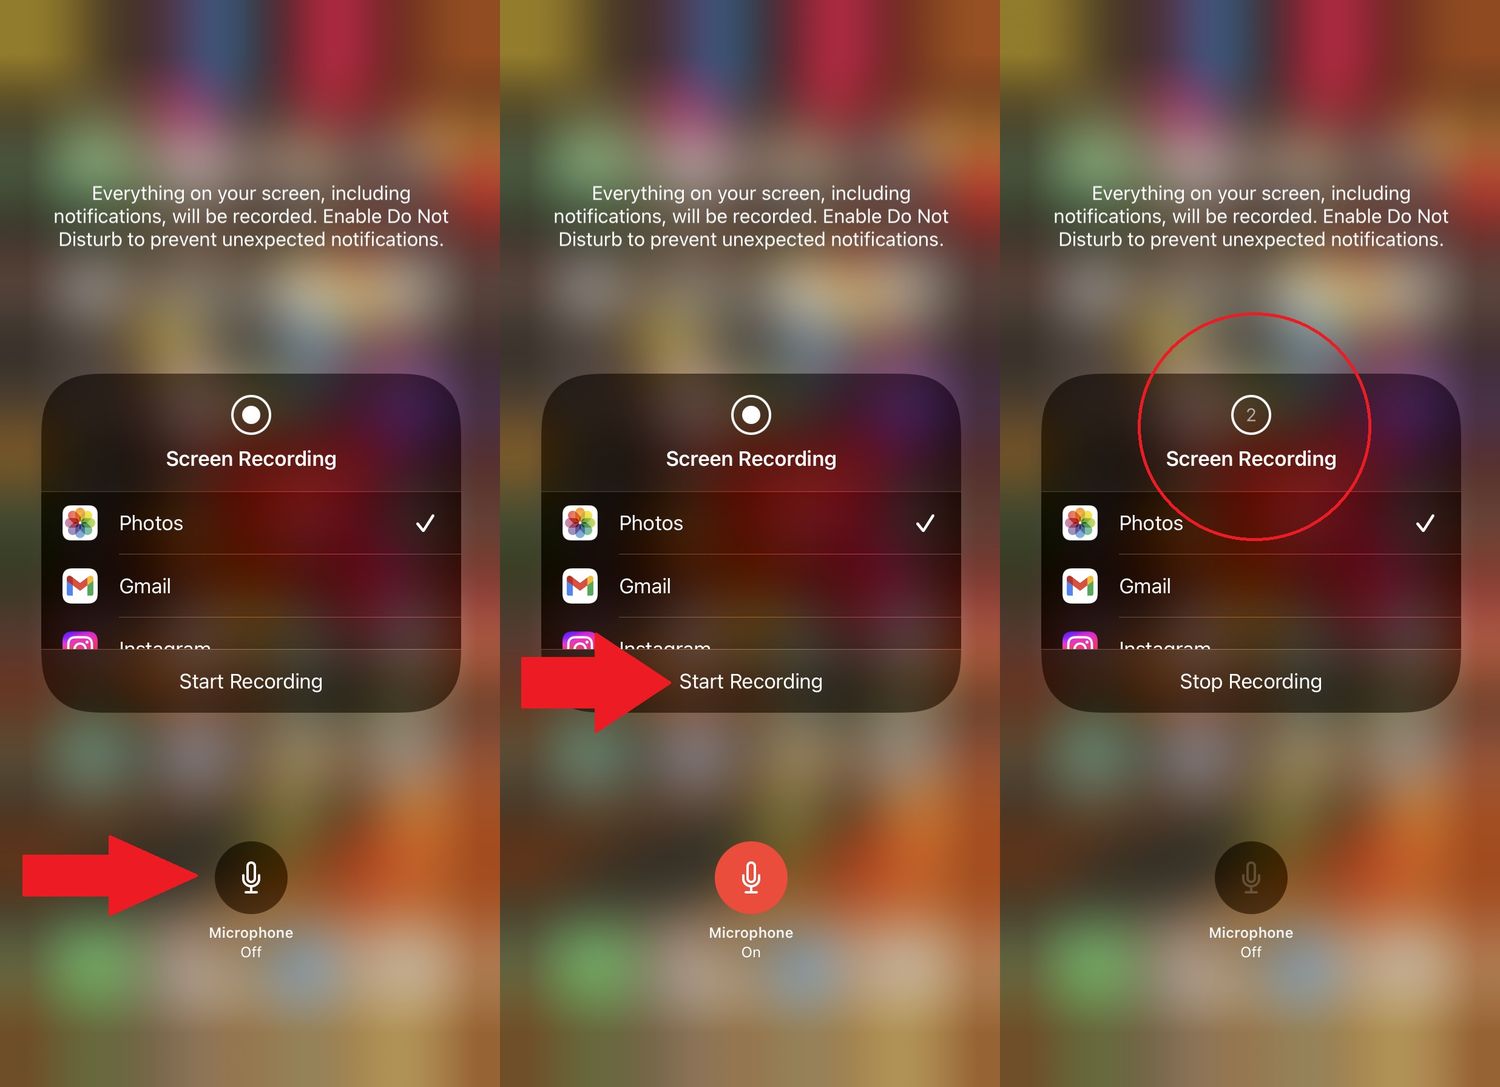
Once the Control Center is open, locate the Screen Recording icon, which looks like a solid circle surrounded by a dotted circle. Tap this icon to initiate the screen recording process.
After tapping the Screen Recording icon, a countdown will appear, giving you a few seconds to prepare. Once the countdown reaches zero, the recording will begin, and a red status bar will appear at the top of the screen to indicate that the recording is in progress.
When you’re finished recording, simply tap the red status bar at the top of the screen and select “Stop” from the pop-up menu. Your screen recording will then be saved to your Photos app, where you can view, edit, and share it as desired.
Recording with QuickTime on Mac
If you’re a Mac user, you can utilize QuickTime, Apple’s built-in multimedia software, to capture your iPhone 13 screen. The process is straightforward and doesn’t require any additional downloads or installations. QuickTime allows for seamless screen recording and offers basic editing capabilities, making it a convenient option for Mac users.
To begin, connect your iPhone 13 to your Mac using a lightning cable. Once connected, open QuickTime Player on your Mac. Next, navigate to the “File” menu and select “New Movie Recording.” This will prompt QuickTime to detect your connected iPhone 13 and display its screen as the source for the recording. Click on the arrow next to the record button to ensure that your iPhone 13 is selected as both the video and audio source.
After confirming the source, click the record button to initiate the screen recording. Once you’ve captured the desired content, simply click the stop button to end the recording. QuickTime will then save the recording to your Mac, allowing you to review and edit the footage as needed.
Using Third-Party Apps
If the built-in screen recording feature doesn’t meet your requirements, you can explore third-party apps available on the App Store. These apps often offer advanced features and customization options that cater to specific recording needs. A quick search on the App Store will reveal a plethora of options, each with its own unique set of features and capabilities.
When choosing a third-party app for screen recording, consider factors such as user ratings, reviews, and compatibility with your device. Look for apps that offer intuitive interfaces, flexible recording settings, and seamless integration with other platforms for easy sharing and editing.
Popular third-party screen recording apps include DU Recorder, Go Record, and Screen Recorder +. These apps typically provide additional functionalities such as video editing tools, customizable settings for video resolution and frame rates, and the ability to add annotations and overlays to your recordings.
Before downloading a third-party app, take the time to read user reviews and explore the app’s features to ensure it aligns with your recording needs. Additionally, be mindful of any in-app purchases or subscription fees associated with advanced features, as some apps may offer free basic recording capabilities with optional premium upgrades.
Editing and Sharing Your Screen Recording
Once you’ve captured a fantastic screen recording on your iPhone 13, the next step is to fine-tune it and share it with others. Fortunately, the iPhone’s built-in tools and third-party apps offer various options for editing and sharing your masterpiece.
After recording, you can trim the beginning and end of the video to remove any unnecessary content. To do this, simply open the recording in the Photos app, tap “Edit,” and use the trimming tool to adjust the start and end points. This ensures that your screen recording is polished and concise.
Furthermore, you can enhance your screen recording by adding annotations, text, or even voiceovers using editing apps available on the App Store. These tools provide a creative way to highlight important details or provide context to your recording.
Once your screen recording is edited to perfection, it’s time to share it with your audience. You can easily send the recording via Messages or email directly from the Photos app. Alternatively, you can upload it to a cloud storage service, such as iCloud or Google Drive, and share the link with others.
If you’re looking to share your screen recording on social media platforms, many third-party apps offer seamless integration with popular services like Instagram, Facebook, and YouTube. These apps provide convenient sharing options, allowing you to showcase your screen recording to a wider audience with just a few taps.
Remember, the key to successful screen recording is not just in capturing the content, but also in presenting it effectively. By leveraging the editing and sharing capabilities of your iPhone 13, you can ensure that your screen recordings leave a lasting impression on your viewers.
Conclusion
Screen recording on an iPhone 13 is a remarkably useful feature that allows you to capture and share moments from your device effortlessly. Whether you’re showcasing a new app, capturing a memorable gameplay session, or creating a tutorial, the screen recording function provides a versatile tool for various purposes. By simply accessing the Control Center and tapping the screen recording icon, you can instantly start capturing your screen activities. With the ability to record audio simultaneously, it’s an ideal way to create engaging content. The flexibility and simplicity of this feature make it a valuable addition to the iPhone 13’s capabilities, empowering users to express themselves and share their experiences with ease.
Sure, here are the FAQs section with the requested HTML tags:
html
FAQs
How do I screen record on my iPhone 13?
To screen record on your iPhone 13, simply swipe down from the top-right corner to access the Control Center, then tap the Screen Recording icon. Your screen recording will begin after a 3-second countdown.
Where can I find my screen recordings on iPhone 13?
After you finish recording your screen, you can find the video in the Photos app under the “Recents” album.
Can I record audio while screen recording on iPhone 13?
Yes, you can record audio while screen recording on your iPhone 13 by long-pressing the Screen Recording icon in Control Center and enabling the microphone audio.
How do I stop a screen recording on my iPhone 13?
To stop a screen recording on your iPhone 13, simply tap the red status bar at the top of your screen and confirm that you want to stop the recording.
Can I edit my screen recordings on iPhone 13?
Yes, you can edit your screen recordings on iPhone 13 using the built-in editing tools in the Photos app or by using third-party video editing apps from the App Store.