
The iPhone 13 is a powerhouse of a device, packed with cutting-edge features and functionalities. One feature that users often find handy is the ability to screen record on their iPhones. Whether you want to capture a memorable moment in a game, create a tutorial, or save a video for future reference, screen recording is a powerful tool that can come in handy in numerous situations.
In this article, we will explore the step-by-step process of how to screen record on the iPhone 13. From accessing the screen recording feature to customizing settings, we will cover everything you need to know to make the most out of this convenient feature.
So, if you’re ready to take your iPhone 13 experience to the next level and become a master of screen recording, let’s dive in and uncover the secrets to capturing your screen like a pro!
Inside This Article
- Setting up screen recording on iPhone 13
- Recording your screen with built-in screen recorder
- Customizing screen recording settings on iPhone 13
- Accessing and managing your recorded screen videos on iPhone 13
- Conclusion
- FAQs
Setting up screen recording on iPhone 13
Screen recording on the iPhone 13 is a useful feature that allows you to capture and share what’s happening on your device. Whether you want to record a tutorial, show off your gaming skills, or simply save a memorable moment, screen recording is a handy tool at your disposal.
To set up screen recording on your iPhone 13, follow these simple steps:
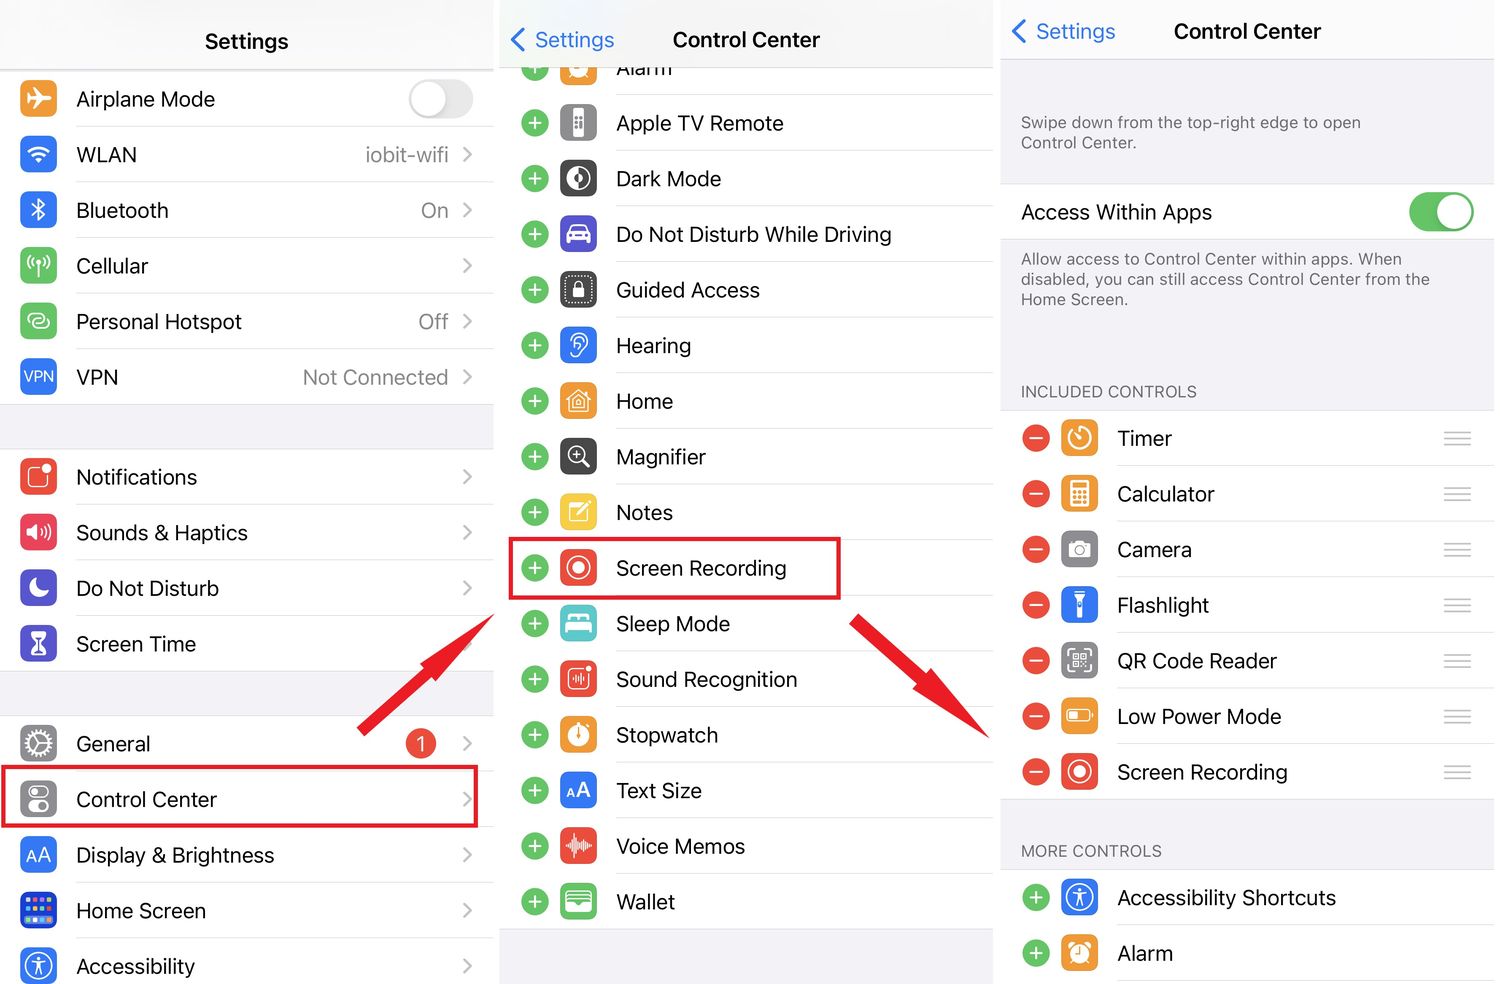
- Open the Settings app on your iPhone 13.
- Scroll down and tap on “Control Center.”
- Under the “More Controls” section, find “Screen Recording” and tap the green plus (+) button next to it to add it to your Control Center.
- Close the Settings app.
Now that you have added screen recording to your Control Center, you can easily access it whenever you need to record your screen on the iPhone 13. Simply swipe down from the top-right corner of your screen to open the Control Center.
Recording your screen with built-in screen recorder
If you’re looking to capture and share your iPhone 13 screen activities, the built-in screen recorder is your go-to tool. With just a few taps, you can start recording anything from gameplay, app demonstrations, to video calls. Here’s how to use the built-in screen recorder on your iPhone 13:
1. Open the Control Center by swiping down from the top-right corner of the screen (or swipe up from the bottom on devices with a Home button).
2. Locate the Screen Recording icon, which looks like a white circle nested inside a larger circle, and tap on it.
3. A countdown timer will appear, giving you a few seconds to prepare what you want to record. If you want to include audio in your screen recording, long-press the Screen Recording icon to access the microphone options and choose the desired source.
4. Once the timer counts down, the recording will start, and a red status bar will appear at the top of the screen to indicate that the screen recording is in progress.
5. To stop the recording, tap on the red status bar. Alternatively, you can return to the Control Center and tap the Screen Recording icon again to stop the recording.
6. After stopping the recording, a notification will appear, allowing you to instantly view the recorded video or access it later from the Photos app.
Remember, the iPhone 13’s built-in screen recorder not only captures everything on your screen but also records any audio playing through your device. This makes it ideal for creating tutorials, sharing gaming accomplishments, or highlighting app features.
Keep in mind that the screen recording feature is not available for certain apps or during certain activities, such as screen mirroring. Additionally, some app developers may restrict screen recording functionality within their apps for privacy reasons.
Now that you know how to use the built-in screen recorder on your iPhone 13, let your creativity soar and start capturing and sharing your screen’s best moments!
Customizing screen recording settings on iPhone 13
Screen recording on the iPhone 13 offers a great way to capture and share your device’s display. While the default settings are suitable for most users, customizing the screen recording settings can enhance your recording experience. Here’s how you can customize the screen recording settings on your iPhone 13:
1. Open the Control Center: To access the screen recording settings, start by opening the Control Center. Swipe down from the top right corner of your iPhone 13’s screen to reveal the Control Center.
2. Tap the Screen Recording button: In the Control Center, you’ll see a screen recording button, which looks like a circle within a circle. Tap on this button to open the screen recording options.
3. Adjust the settings: Once you’re in the screen recording options, you can customize various settings according to your preferences. Here are the key settings you can adjust:
- Microphone audio: By default, the iPhone 13 records both the screen and microphone audio. However, if you want to exclude microphone audio from your recordings, simply tap the microphone icon to turn it off.
- Enable or disable app sounds: If you want to include the audio from the apps you’re using during the screen recording, make sure the toggle for “App sounds” is switched on. If you prefer to mute the app sounds, toggle it off.
- Adjust screen recording frame rate: The frame rate determines how smooth your recorded video will appear. To adjust the frame rate, tap on the “Frame Rate” option and select the desired rate from the available options.
- Record in high efficiency: The option to record in high efficiency allows you to save space on your device by using a more efficient file format. Toggle this option on if you want to take advantage of this space-saving feature.
- Show touch gestures: If you want to highlight your touch gestures in the recording, toggle on the “Show Touches” option. This can be helpful if you’re creating a tutorial or a demonstration video.
4. Start screen recording: Once you’ve customized the settings to your liking, simply tap the “Start Recording” button to begin capturing your iPhone 13’s screen. You’ll see a three-second countdown before the recording begins.
5. Stop screen recording: To stop the screen recording, you can either tap the red status bar at the top of the screen and choose “Stop,” or you can open the Control Center again and tap the screen recording button to end the recording.
6. Access your recorded videos: After you’ve finished recording, your video will be saved to your Photos app. You can access and manage your recorded screen videos just like any other video in your library.
By customizing the screen recording settings on your iPhone 13, you can tailor the recording experience to suit your specific needs and preferences. Whether you’re capturing gameplay, creating tutorials, or sharing your screen with friends and family, these customization options will help you create high-quality recordings that truly stand out.
Accessing and managing your recorded screen videos on iPhone 13
Once you’ve successfully recorded your screen on your iPhone 13, you may be wondering how to access and manage your recorded videos. Luckily, Apple has made it easy to find and organize your screen recordings. Here’s a step-by-step guide to help you access and manage your recorded videos on your iPhone 13.
1. To access your recorded screen videos, go to the Photos app on your iPhone 13. This is where all your recorded videos and photos are stored.
2. Inside the Photos app, tap on the “Albums” tab located at the bottom of the screen. This will give you access to different photo and video albums.
3. Scroll down until you find the “Media Types” section and tap on “Videos. This will filter the albums to only show your video recordings.
4. Look for the album titled “Screen Recordings” and tap on it. This is where all your recorded screen videos will be saved by default.
5. Within the “Screen Recordings” album, you will see all your recorded screen videos listed in chronological order. Tap on the video you want to view or manage.
6. Once you’ve selected a video, you can watch it by tapping on the play button. You can also edit the video using the built-in video editing tools in the Photos app.
7. If you want to share your recorded screen video with others, tap on the share button (represented by an arrow pointing upwards) located at the bottom-left corner of the screen. From here, you can choose to share the video via Messages, Mail, AirDrop, or any other compatible app.
8. If you no longer need a recorded screen video and want to delete it, simply select the video and tap on the trash bin icon. Confirm your action by tapping “Delete Video”. Remember to be cautious when deleting videos, as they cannot be recovered once deleted.
That’s it! You now know how to access and manage your recorded screen videos on your iPhone 13. Whether you want to watch, edit, share, or delete your screen recordings, the Photos app provides all the necessary tools for easy management. Start exploring your recorded videos and make the most out of your iPhone 13’s screen recording feature!
Conclusion
Screen recording on the iPhone 13 is a powerful feature that allows users to capture and share their device’s screen activity. Whether you want to create tutorials, record gaming sessions, or save important information, screen recording can come in handy in various situations.
The intuitive Screen Recording feature on the iPhone 13 makes the process seamless and user-friendly. With just a few taps, you can start recording your screen and even include audio commentary. The ability to customize settings such as resolution and framerate ensures that you get the best possible recording quality.
Whether you’re a tech enthusiast or a content creator, knowing how to screen record on the iPhone 13 is an essential skill. It opens up a world of possibilities for creating engaging and informative content. So, don’t hesitate to explore this feature and make the most out of your iPhone 13’s capabilities.
FAQs
1. Can I screen record on the iPhone 13?
Yes, you can definitely screen record on the iPhone 13. The latest iPhone models, including the iPhone 13, come equipped with a built-in screen recording feature that allows you to capture everything happening on your screen.
2. How do I start screen recording on the iPhone 13?
To start screen recording on the iPhone 13, follow these simple steps:
- First, go to the screen you want to capture.
- Swipe down from the top right corner of your screen to access the Control Center.
- Look for the “Record” button, which looks like a circle with a dot inside.
- Tap on the “Record” button to start recording your screen.
- A timer will appear at the top of your screen, indicating that the recording has started.
- To stop the recording, go back to the Control Center and tap on the “Stop” button.
3. Where can I find my screen recordings on the iPhone 13?
Once you have finished recording your screen on the iPhone 13, you can find the recording in the Photos app. Simply open the Photos app and look for the “Screenshots” or “Screen Recordings” album. Your screen recordings will be saved there, and you can easily access and manage them from that location.
4. Can I edit my screen recordings on the iPhone 13?
Yes, you can edit your screen recordings on the iPhone 13. After you have finished recording your screen, you can open the recording in the Photos app and use the editing tools available. You can trim the recording, add captions or annotations, and even apply filters to enhance the overall appearance of the video. Once you are satisfied with the edits, you can save and share your screen recording as desired.
5. Are there any limitations to screen recording on the iPhone 13?
While screen recording on the iPhone 13 is a powerful feature, there are a few limitations to keep in mind. Firstly, some apps or content may have restrictions that prevent them from being recorded. Additionally, screen recordings do not capture audio from the device’s internal microphone, so if you want to include audio in your recordings, it is recommended to use an external microphone. Lastly, screen recordings may take up a significant amount of storage space, so it is advisable to regularly manage and delete old recordings to free up storage on your iPhone 13.