Inside This Article
In this article, we will delve into the importance of maintaining privacy on your iPhone, explore the process of clearing the search history, and highlight the multitude of benefits that arise from regularly deleting your search history. By the end, you’ll be equipped with the knowledge to safeguard your privacy and take charge of your digital footprint.
Key Takeaways
- Activating Private Browsing mode in Safari prevents your iPhone from storing browsing history, cookies, and other website data, enhancing your privacy while browsing the internet. This eliminates the need to regularly tap clear browsing data and provides a convenient way to maintain privacy during online sessions.
- Disabling Siri’s search suggestions remove the potential for Siri to provide search recommendations based on your browsing history. By turning off this feature, you can keep your search queries private and prevent any unintentional exposure to your browsing habits.
Why Is It Important to Delete Search History on iPhone?
Let’s explore why it’s important to delete history and the potential risks associated with storing it.
Potential Privacy Risks Associated with Storing Search History
When you perform searches on your iPhone, whether through the Safari browser or other search-enabled apps, the device keeps a record of your history. Your Safari browsing history includes the websites you visited, the search terms you used, and even the time and date of each search. This data can be vulnerable to privacy breaches and may be accessed by unauthorized individuals or organizations.
Storing search history on your iPhone poses a potential risk of data exposure and can compromise your privacy. Hackers, identity thieves, or even intrusive advertisers could potentially gain access to this information, leading to unwanted consequences such as targeted advertisements, data misuse, or even identity theft. By deleting history regularly, you minimize the chances of this sensitive data falling into the wrong hands.
Search History Can Reveal Personal Information
Your history can provide valuable insights into your interests, preferences, and even your personal life. The websites you visit and the search terms you use often reflect your hobbies, medical concerns, financial interests, or even sensitive information like your location or contacts. This makes your search history a goldmine of personal data.
Imagine a scenario where someone gains access to your iPhone and explores your search history. They could gain knowledge about your online activities, potentially exposing private matters that you intended to keep confidential. By deleting your history, you effectively erase these traces, reducing the risk of personal information falling into the wrong hands.
Impact on Personalized Search Results
Search engines and apps use your search history to provide personalized search results and recommendations. While this can enhance your online experience, it also means that your past searches influence the content you encounter. This can create a filter bubble, where you’re only exposed to information aligned with your previous searches, potentially limiting your perspectives.
By deleting history, you break free from the confines of personalized results and regain a broader view of the online world. This enables you to discover new content, explore diverse viewpoints, and ensure a more balanced and unbiased online experience.
Different Ways to Delete Search History on iPhone
When it comes to deleting search history on your iPhone, there are several methods you can follow depending on the apps you use. Let’s explore three common methods that will help you clear your history effectively.
Method 1: Clearing Safari Browser History
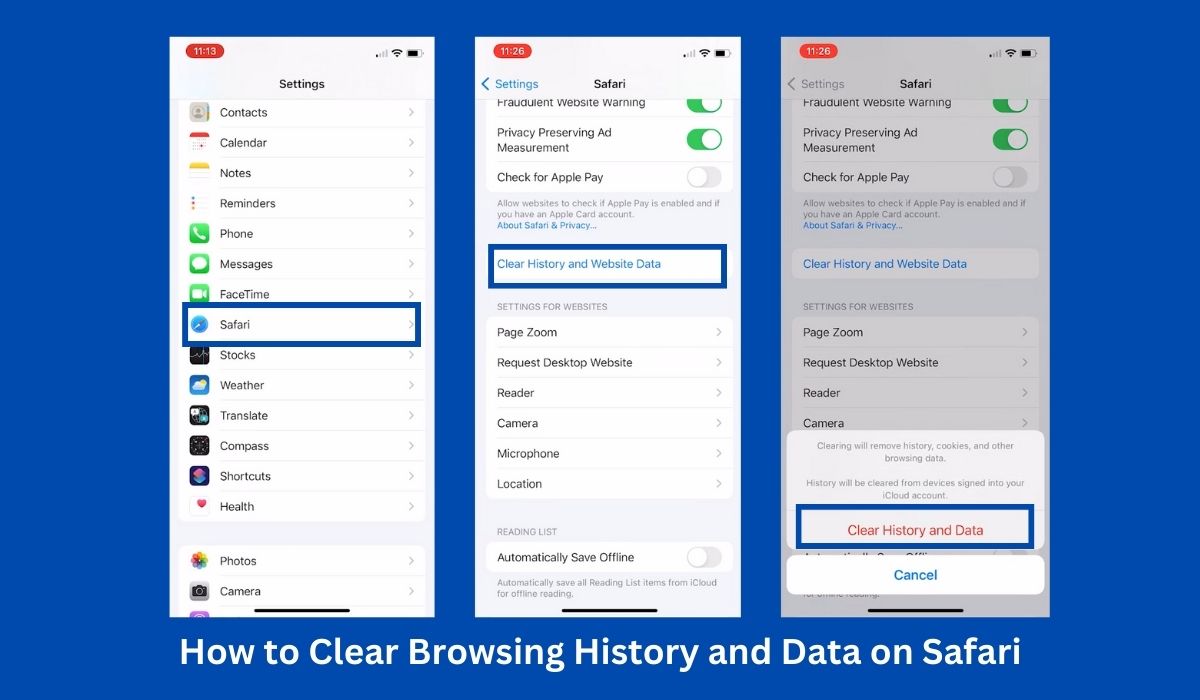
Step 1: Go to Settings App
Launch the Settings app and scroll down until you reach the systems apps. Look for Safari.
Step 2: Select Safari
After clicking on “Safari”, scroll down the page and look for “Clear History and Website Data.” Tap on it.
Step 3: Confirm Safari Browser History Deletion
A pop-up window will appear asking you to confirm the action. Tap “Clear History and Data” to proceed.
Method 2: Clearing Safari Browser History Based on Time Periods
Step 1: Open the Safari app
Launch the Safari browser on your iPhone by tapping its icon on the home screen. Safari is the default web browser on iOS devices.
Step 2: Access the Browsing History
Go to browsing history by tapping the bookmarks icon (which looks like an open book icon) located at the bottom of the Safari screen. On the bookmarks page, you’ll see a clock icon labeled “History”. Tap on it to access your browsing history.
Step 3: Clearing the Browsing History
To clear your entire browsing history, tap the “Clear” button at the bottom right corner of the screen. A drop-down menu will appear providing options to delete browsing history on specific time periods.
If you prefer to delete specific items, swipe left on individual entries and tap the “Delete” button that appears to delete the history.
Method 3: Deleting Siri & Dictation History
Apple also keeps a history of your Siri dictations to guide future interactions and improve how the assistant handles requests. Although your Siri dictations and other data are kept anonymous and cannot be used for marketing, it is advisable to clear them once in a while.
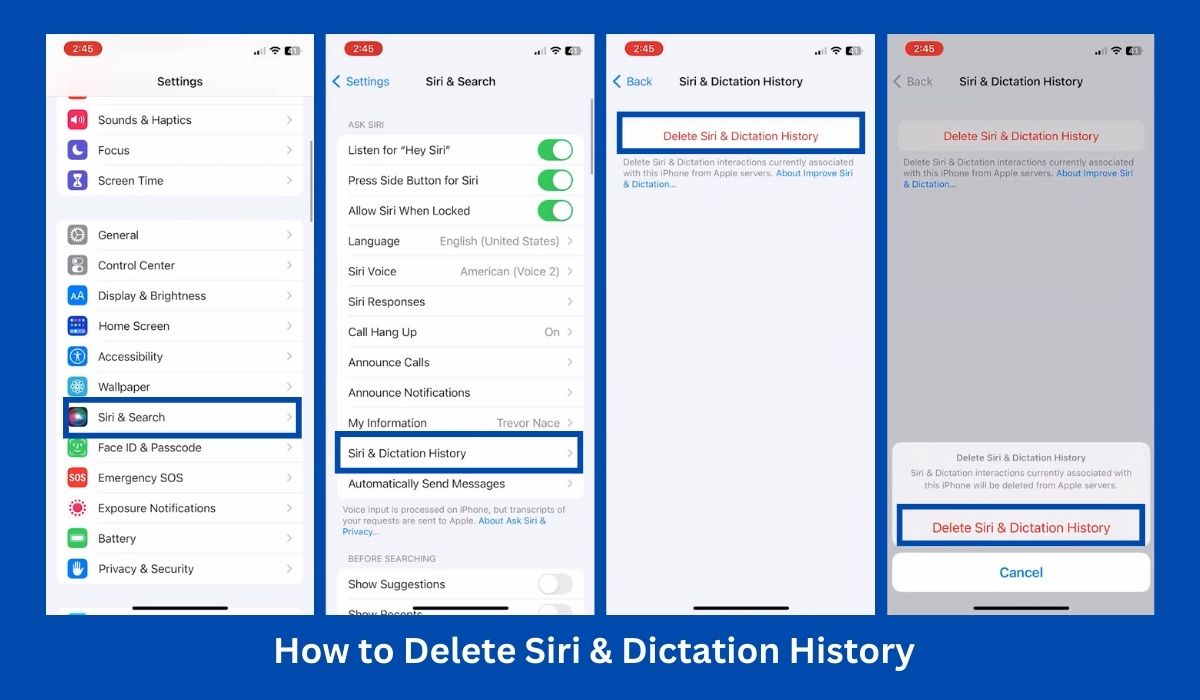
Step 1. Launch Settings App
Open the Settings app on your iPhone and look for “Siri & Search”.
Step 2: Select Siri & Dictation History
Toward the bottom of the Siri & Search page, you will see an option called “Siri & Dictation History”. Tap on it.
Step 3. Click on Delete Siri & Dictation History
A pop-up window will appear with a message that says “Siri & Dictation history currently associated with this iPhone will be deleted from Apple servers.” Tapping on “Delete Siri & Dictation History” will confirm the deletion.
Clearing Search History in Other Apps With Search Functionality
Various apps on your iPhone, such as Google Maps and YouTube, have their own search histories. It’s essential to clear the search history within these apps individually to ensure comprehensive privacy.
Deleting Search History in the Google App
Step 1: Open the Google app
Locate the Google app on your device’s home screen and tap on it to launch the app.
Step 2: Access the search history
Look for your profile picture or initials at the top right corner of the app interface. Tap on it to open a menu. From the menu, select “Search history.”
Step 3: Clearing the search history
Within the Search History section, you will see a list of your recent Google search history. Select the specific history you want to delete. Alternatively, you have the option to delete a specific time period in your search history.
Step 4: Delete Google search history for all time
To delete your entire search history from the beginning, tap on “Delete all time” in the prompt mentioned above.
Clearing Google Play store app’s history has a slight variation, but the process is similar overall.
Clearing Search History on Google Maps
Step 1: Open the Google Maps app
Locate the Google Maps app on your device’s home screen and tap on it to launch the app. Make sure you are signed in to your Google account.
Step 2: Access the Settings
Tap on your profile picture or initials, usually located in the top right corner of the screen. From the menu that appears, select “Settings.”
Step 3: Navigate to Maps history
Within the Settings menu, look for the “Maps history” option. Tap on it to access your search history in Google Maps.
Step 4: Open the Delete activity menu
In the search bar at the top of the screen, you will see a “More” button. Tap on it to expand the options, then select “Delete activity by.”
Step 5: Choose a date range
Under the “Delete by date” section, you can select a specific date range for which you want to delete the search history. Tap on the date range to modify it if needed.
Step 6: Delete the search history
After selecting the desired date range, tap on the “Delete” button.
Clearing Search History on YouTube
Step 1: Launch the YouTube app
Tap on your profile icon at the top right corner.
Step 2: Access the Settings
Go to “Settings.”
Step 3: Clearing the search history
Tap “Clear history” to delete your YouTube search history.
Additional Tips to Enhance Privacy on iPhone
In addition to deleting your history, there are several other steps you can take to enhance your privacy. Follow these additional tips to further safeguard your personal information:
Using Private Browsing Mode
One effective way to protect your privacy while browsing the internet on your iPhone is by using the Private Browsing mode. When enabled, this mode prevents Safari from storing your browsing data and cookies. To activate Private Browsing, simply open Safari, tap the tab icon at the bottom-right corner of the screen and select “Private” from the options.
Disabling Siri’s Search Suggestions
Siri, the intelligent virtual assistant on your iPhone, can provide search suggestions based on your browsing history. If you prefer to keep your search queries private, it’s a good idea to disable Siri’s search suggestions. To do this, go to “Settings,” tap on “Siri & Search,” and toggle off the “Suggestions in Search” option. By disabling this feature, Siri won’t offer suggestions based on your history.
Managing App Permissions and Location Settings
To further protect your privacy, it’s essential to manage app permissions and location settings on your iPhone. Review the permissions granted to each app and disable any unnecessary access to your personal data. You can do this via the Settings app.
Additionally, carefully consider which apps should have access to your precise location and adjust the location settings accordingly. By doing so, you can prevent apps from collecting excessive location data and potentially compromising your privacy.
Conclusion
In summary, it is crucial to delete search history on your iPhone to protect your privacy and personal information. Storing history poses privacy risks, as unauthorized individuals or organizations can access the data. Search history can reveal personal information and expose sensitive details. Deleting search history also prevents personalized search results from limiting your exposure to diverse perspectives, ensuring a more balanced online experience. Overall, regularly deleting history on your iPhone safeguards your privacy, maintains control over your information, and promotes a more inclusive online environment. You may also delete cache and cookies on your iPhone to better enhance your device’s performance.


