
When setting up a new email on your iPhone, you can effortlessly stay connected and have access to your messages on the go. Whether you’re setting up a personal email account or configuring a work email, the process is relatively simple and can be completed within a few minutes.
In this article, we’ll guide you through the step-by-step process of setting up a new email on your iPhone. From choosing the right email provider to configuring the settings on your device, we’ll provide you with all the information you need to get your email up and running smoothly. With your new email set up on your iPhone, you’ll be able to send and receive messages, manage your inbox, and stay connected no matter where you are.
Inside This Article
- Setting Up Email Accounts on iPhone
- Method 1: Adding an Email Account Using the Mail App
- Method 2: Adding an Email Account Manually
- Troubleshooting Email Setup Issues on iPhone
- Conclusion
- FAQs
Setting Up Email Accounts on iPhone
Setting up email accounts on your iPhone is a simple and straightforward process. Whether you use a popular email service like Gmail or Outlook, or have a custom email setup using your own domain, the iPhone’s Mail app makes it easy to access all your email accounts from one convenient location.
To get started, follow the steps below to add your email account to your iPhone using the Mail app.
- Open the Settings app on your iPhone. It is represented by a gear icon.
- Scroll down and tap on “Mail” or “Mail, Contacts, Calendars”, depending on your iPhone model.
- Tap on “Add Account”. You will see a list of popular email services like iCloud, Google, Yahoo, and more. If your email service is not listed, tap on “Other” to add it manually.
- Select your email service provider from the list and enter your email address and password. The iPhone will attempt to automatically configure the email settings for you. If successful, your email account will be added to the Mail app. If not, proceed to the next step.
- If the automatic configuration fails, you will need to enter the email settings manually. Tap on “Other” and select “Add Mail Account”. Enter your name, email address, password, and a description for the account. Tap “Next” to proceed.
- Choose between POP or IMAP. POP downloads emails to your device and removes them from the server, while IMAP syncs your emails across multiple devices. Enter the incoming and outgoing mail server details provided by your email service provider.
- Tap “Next” to verify your email account settings. If they are correct, your email account will be added to the Mail app on your iPhone.
Congratulations! You have successfully set up your email account on your iPhone. You can now access and manage your emails directly from the Mail app.
If you encounter any issues during the setup process or face trouble sending or receiving emails on your iPhone, check the troubleshooting section below.
Method 1: Adding an Email Account Using the Mail App
Setting up a new email account on your iPhone is a quick and easy process, thanks to the Mail app. Whether you use Gmail, Yahoo, Outlook, or any other popular email provider, you can seamlessly integrate your email account with your iPhone’s Mail app.
To add an email account using the Mail app, follow these simple steps:
- Open the Settings app on your iPhone.
- Scroll down and tap on “Mail.”
- Tap on “Accounts.”
- Tap on “Add Account.”
- Select your email provider from the list. If your email provider is not listed, tap on “Other”.
- Enter your email address and password, then tap “Sign In” or “Next.”
After entering your email address and password, the Mail app will automatically attempt to configure your email settings. In most cases, it will successfully set up your account without any additional input required from you.
Once your email account is added, you can customize the settings as per your preferences. You can choose how often the Mail app checks for new emails, set notifications, and even customize the signature for your outgoing emails.
Now that you’ve learned how to add an email account to your iPhone using the Mail app, you can easily access all your emails in one convenient place. Whether it’s for personal or business use, having your email on your iPhone ensures that you never miss an important message!
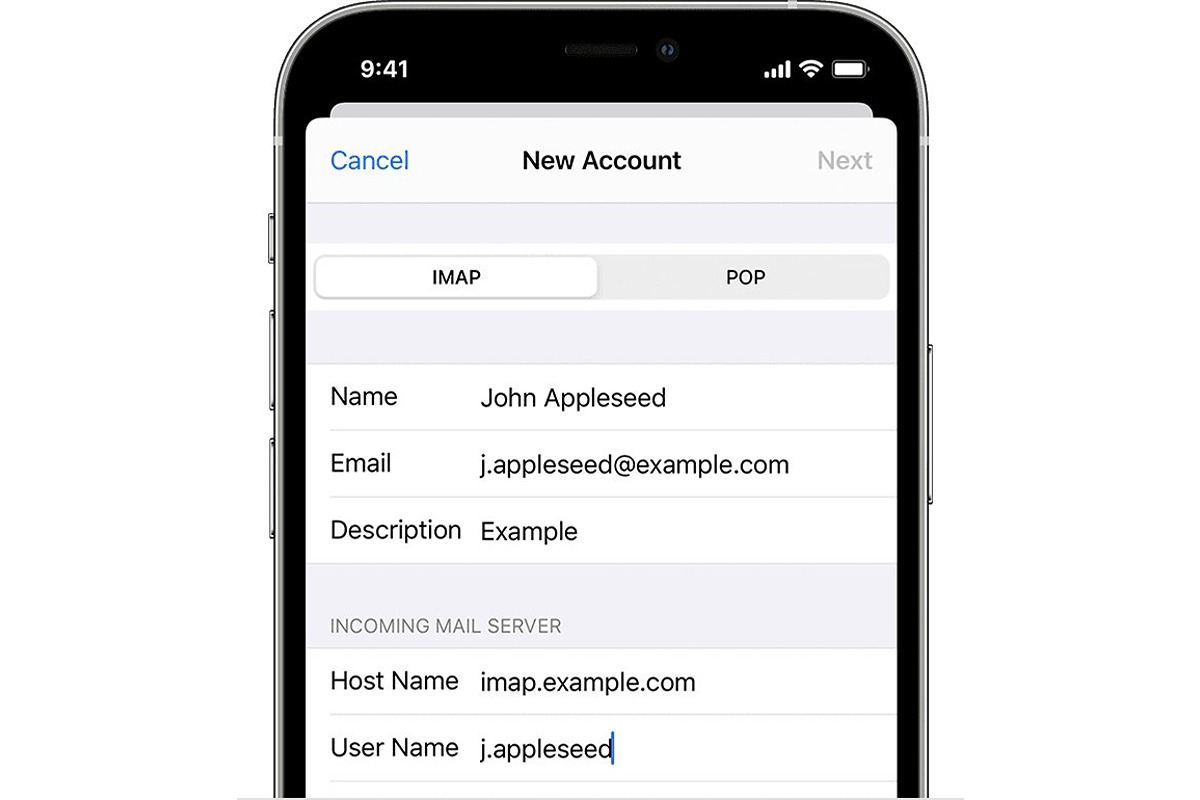
Method 2: Adding an Email Account Manually
If you prefer to manually add an email account to your iPhone, follow these steps:
- Go to the “Settings” app on your iPhone’s home screen.
- Scroll down and tap on “Mail” to access the Mail settings.
- Tap on “Accounts” to view your current email accounts.
- Under the “Accounts” section, tap on “Add Account”.
- You will see a list of popular email providers. However, if your email provider is not listed, tap on “Other”.
- Select “Add Mail Account” and enter your name, email address, password, and a description for the account.
- You can choose between IMAP or POP for your account. IMAP is recommended as it allows you to sync your emails across multiple devices.
- Enter the incoming and outgoing mail server information. If you are not sure about the server details, you can contact your email provider for assistance.
- Once you have filled in all the required information, tap on “Next” to verify your account.
- Your iPhone will try to connect to the email server. If the connection is successful, you will see a green tick mark next to each server field.
- After the verification process is completed, you can choose what content you want to sync with your iPhone, such as Mail, Contacts, Calendars, and Notes.
- Tap on “Save” to save the settings and complete the manual email account setup.
Once the setup is complete, you can open the Mail app on your iPhone to start sending and receiving emails through your newly added email account.
Troubleshooting Email Setup Issues on iPhone
Setting up email on your iPhone is usually a straightforward process. However, there may be times when you encounter some issues during the setup process. Don’t worry, we’ve got you covered! In this guide, we will walk you through some common troubleshooting steps to help you resolve any email setup problems on your iPhone.
1. Check Your Internet Connection: Before you begin troubleshooting, make sure you have a stable internet connection. Issues with email setup can often be caused by a weak or unstable network connection.
2. Confirm Your Email Settings: Double-check the email settings you entered during the setup process. Ensure that your incoming and outgoing server settings are correct, including the server address, port number, email address, and password. Incorrect settings can prevent your email account from being set up correctly.
3. Restart Your iPhone: Sometimes, a simple restart can resolve various issues, including email setup problems. Press and hold the power button until the slider appears, then slide to power off. Wait for a few seconds, then turn your iPhone back on and try setting up your email account again.
4. Update Your iPhone Software: Outdated software can sometimes cause compatibility issues with email setup. Make sure your iPhone is running the latest iOS version. Go to “Settings,” then “General,” and select “Software Update” to check for any available updates.
5. Disable VPN or Proxy Settings: If you are using a VPN or proxy on your iPhone, try disabling it temporarily and then attempt to set up your email account again. VPN or proxy settings can interfere with your email setup process.
6. Reset Network Settings: Resetting your network settings can help fix any issues related to network connections. Go to “Settings,” then “General,” and select “Reset.” Tap on “Reset Network Settings” and enter your passcode if prompted. Confirm your decision and wait for your iPhone to restart. Note that this will remove your saved Wi-Fi networks and passwords, so make sure you have them written down or saved elsewhere.
7. Contact Your Email Provider: If you have tried all the above steps and are still unable to set up your email account, it may be necessary to reach out to your email service provider for further assistance. They can help you troubleshoot specific issues related to your email account.
By following these troubleshooting steps, you should be able to overcome any email setup issues you encounter on your iPhone. Remember to double-check your settings, ensure a stable internet connection, and keep your software up to date. Happy emailing!
Setting up a new email on your iPhone is a simple and straightforward process that allows you to stay connected and manage your emails on the go. Whether you have a personal or professional email account, the iPhone provides a user-friendly interface and a range of features to ensure a seamless email experience.
By following the steps outlined in this guide, you can quickly configure your email settings, add multiple accounts, and synchronize your messages across devices. From accessing attachments to organizing your mailbox, the iPhone’s email functionality caters to your needs and helps streamline your communication.
With the ability to receive notifications, search for specific emails, and compose messages effortlessly, managing your email has never been easier. Stay productive and keep in touch with colleagues, friends, and family by setting up a new email account on your iPhone today!
FAQs
1. How do I set up a new email account on my iPhone?
Setting up a new email account on your iPhone is a relatively straightforward process. Here’s how you can do it:
– Open the “Settings” app on your iPhone.
– Scroll down and tap on “Mail”.
– Tap on “Accounts”, followed by “Add Account”.
– Select your email provider from the list or choose “Other” if your provider is not listed.
– Enter your email address and password, then tap “Next”.
– Wait while your iPhone verifies your account information.
– On the next screen, you can choose what content you want to sync with your iPhone, such as mail, contacts, and calendars.
– After selecting your preferences, tap “Save”.
– Your email account is now set up on your iPhone, and you can access it through the Mail app.
2. Can I set up multiple email accounts on my iPhone?
Yes, you can set up multiple email accounts on your iPhone. The process is the same for each email account you want to add. Simply follow the steps outlined in the previous question to add each email account individually.
3. How do I delete an email account from my iPhone?
If you no longer want to keep an email account on your iPhone, you can easily delete it. Here’s how:
– Open the “Settings” app on your iPhone.
– Scroll down and tap on “Mail”.
– Tap on “Accounts”.
– Select the email account you want to remove.
– Tap on “Delete Account” and confirm your choice.
– The email account will be removed from your iPhone, and you won’t be able to access it through the Mail app anymore.
4. Can I change the email signature on my iPhone?
Yes, you can customize the email signature that appears at the end of your outgoing emails on your iPhone. Here’s how you can do it:
– Open the “Settings” app on your iPhone.
– Scroll down and tap on “Mail”.
– Tap on “Signature”.
– Enter your desired email signature.
– You can set a default signature for all your email accounts or use different signatures for each account.
– Tap “Back” to save your changes.
– From now on, your emails will be sent with the new signature you’ve set.
5. How do I manage notifications for my email accounts on my iPhone?
You have control over how you receive notifications for your email accounts on your iPhone. To manage notifications, follow these steps:
– Open the “Settings” app on your iPhone.
– Scroll down and tap on “Notifications”.
– Tap on “Mail”.
– Select the email account you want to manage notifications for.
– You can customize the alert style, sounds, and badges for each email account.
– Once you’ve configured the settings, they will be saved automatically.
– You can repeat these steps for each email account to customize the notification settings to your liking.