
In the age of digital communication, screen recording has become an indispensable feature for smartphone users. Whether you want to capture a tutorial, record a gaming session, or save important information for later, being able to screen record on your iPhone 12 can be extremely helpful. As one of the latest and most popular smartphones on the market, the iPhone 12 offers a seamless and user-friendly experience when it comes to capturing your screen. In this article, we will guide you through the process of screen recording on your iPhone 12, step by step. From enabling the screen recording function to saving and sharing your recordings, we will cover everything you need to know. So, let’s dive in and explore how you can unlock the screen recording capabilities of your iPhone 12.
Inside This Article
- Setting up screen recording on iPhone 12
- Accessing the Control Center
- Initiating screen recording on iPhone 12
- Managing and stopping screen recording on iPhone 12
- Conclusion
- FAQs
Setting up screen recording on iPhone 12
Screen recording on the iPhone 12 allows you to capture and save videos of your device’s screen in real-time. Whether you want to create a tutorial, record gameplay, or share your screen with others, the screen recording feature is a valuable tool. In this guide, we will walk you through the steps to set up screen recording on your iPhone 12.
To begin using screen recording on your iPhone 12, you need to enable the feature in your device’s Control Center. Here’s how:
- Open the Settings app on your iPhone 12.
- Scroll down and tap on “Control Center”.
- Tap on “Customize Controls”.
- Find “Screen Recording” in the list of available controls and tap on the green plus icon next to it. This will add the screen recording button to your Control Center.
Now that you have enabled screen recording in your Control Center, you can easily start recording your iPhone 12’s screen. Here’s what you need to do:
- Swipe down from the top right corner of your iPhone 12 to open the Control Center.
- Tap on the screen recording button, which looks like a circle inside a square.
- A three-second countdown will appear, giving you a moment to prepare.
- To record your entire screen, simply tap anywhere on the screen. If you want to record a specific area, press and hold the screen recording button, and then tap “Start Recording” from the popup menu.
While screen recording, you have the option to customize certain settings. Here’s how you can do it:
- While screen recording is in progress, a red status bar will appear at the top of your screen to indicate that the recording is active.
- To access recording options, swipe up from the bottom of the screen to open the Control Center.
- You can tap on the red recording indicator to bring up a menu with additional options.
- From the menu, you can choose to enable or disable microphone audio, show or hide touches on the screen, and adjust the screen recording quality.
To stop the screen recording, you have a couple of options:
- Tap on the red status bar at the top of the screen and then tap “Stop Recording” from the popup menu.
- Alternatively, you can return to the Control Center and tap on the screen recording button again, which will turn the recording off.
Once you have stopped the screen recording, the video will be saved to your iPhone 12’s Photos app. You can access and edit the recording like any other video on your device.
Now that you know how to set up screen recording on your iPhone 12, you can start capturing and sharing your screen with ease. Whether it’s for work or entertainment purposes, screen recording opens up new possibilities for showcasing your iPhone’s capabilities.
Accessing the Control Center
Screen recording on your iPhone 12 is a handy feature that allows you to capture and save the activity happening on your device’s screen. To begin, you’ll need to access the Control Center. The Control Center is a centralized hub that provides quick access to various settings and features of your iPhone.
To access the Control Center on your iPhone 12, simply swipe down from the top right corner of the screen. This gesture will reveal the Control Center overlay, which contains a range of icons representing different functions and utilities. Take a moment to familiarize yourself with the Control Center interface; it offers a convenient way to access frequently used features with just a swipe.
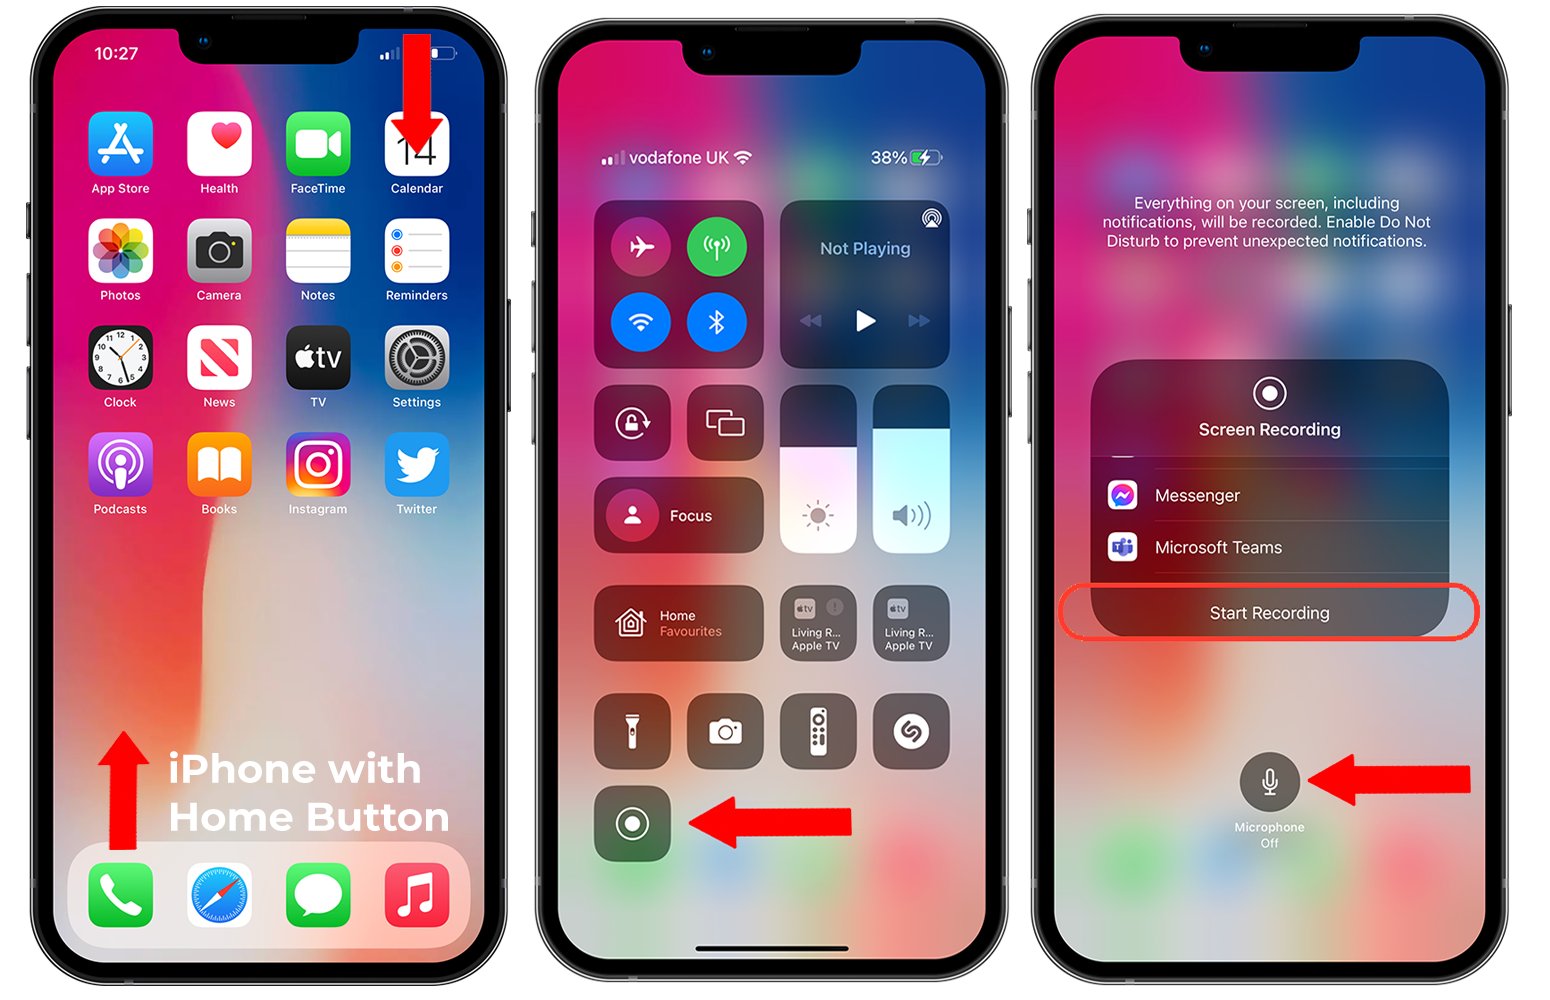
Alternatively, if you have an iPhone with a Home button, swipe up from the bottom of the screen to access the Control Center. The process may vary slightly depending on the model of your iPhone, but the general action remains the same.
Once you’ve successfully accessed the Control Center, you’re one step closer to recording your screen on the iPhone 12. Let’s move on to the next section to learn how to start the screen recording process.
Initiating screen recording on iPhone 12
Screen recording on your iPhone 12 can be incredibly useful for capturing important moments, creating tutorials, or sharing fun clips with your friends and family. With just a few simple steps, you can easily initiate screen recording directly from your iPhone 12. Let’s take a look at how it’s done!
To start screen recording on your iPhone 12, you first need to enable the Screen Recording feature in the Control Center. Here’s how:
1.
Swipe down from the top right corner of your iPhone 12 to open the Control Center.
2.
Tap on the “Screen Recording” icon, which looks like a circle inside a circle.
3.
If you don’t see the “Screen Recording” icon in the Control Center, you may need to add it first. Scroll to the bottom of the Control Center and tap on “Customize Controls”.
4.
Under the “More Controls” section, you’ll find “Screen Recording” – tap on the green plus icon next to it to add it to your Control Center.
5.
Once you’ve added it, you can drag the “Screen Recording” icon to your desired position in the Control Center.
Now that you have enabled the Screen Recording feature in the Control Center, it’s time to start recording your screen. Follow these steps:
1.
Open the app or screen that you want to record. This can be anything from a game to a video call.
2.
Swipe down from the top right corner to open the Control Center.
3.
Tap on the “Screen Recording” icon. You’ll see a three-second countdown before the recording begins.
4.
During the recording, the status bar will turn red, indicating that the screen is being recorded.
If you want to customize the screen recording options, you can do so by long-pressing the Screen Recording icon in the Control Center. This will bring up additional options such as recording audio, toggling microphone on or off, and adjusting the frame rate.
To stop the screen recording, simply tap on the red status bar at the top of the screen and confirm that you want to stop recording. The video will be saved to your Photos app, where you can easily access and share it with others.
With the ability to screen record on your iPhone 12, you’ll have a powerful tool at your fingertips. Whether you’re capturing important information or preserving memorable moments, screen recording is a feature that can enhance your overall iPhone experience.
Managing and stopping screen recording on iPhone 12
Screen recording on your iPhone 12 can be a vital tool for capturing important moments, sharing tutorials, or simply documenting something for future reference. However, once you’ve started a screen recording, you may find yourself wondering how to manage and stop the recording when you’re finished. Fear not! In this guide, we’ll walk you through the steps to effectively manage and stop screen recording on your iPhone 12.
Once you’ve started a screen recording on your iPhone 12, you can easily manage it from the Control Center. Simply swipe down from the top-right corner of the screen (or swipe up from the bottom on older iPhone models) to access the Control Center. Look for the screen recording icon, which appears as a circle within a circle, and tap on it.
By default, the screen recording will continue until you manually stop it. However, you also have the option to pause, resume, or even enable microphone audio during the recording. When you tap on the screen recording icon in the Control Center, you’ll see a menu with options such as “Start Recording,” “Microphone Audio,” and “Pause/Resume.” Simply tap on the desired option to make adjustments as needed.
If you’ve enabled microphone audio during the screen recording and you wish to disable it, simply tap on the microphone icon in the control bar at the top of your screen. This will mute the microphone and prevent any audio from being recorded. Don’t worry – you can easily enable it again if needed.
When you’re ready to stop the screen recording, you can do so in a few ways. One method is to tap on the red recording indicator at the top of your screen, which will bring up a confirmation message asking if you want to stop the recording. Simply tap “Stop” to end the recording. Alternatively, you can return to the Control Center and tap on the screen recording icon again, which will display a “Stop Recording” button.
Once you’ve stopped the screen recording, a notification will appear at the top of your screen, indicating that the recording has been saved to your Photos app. You can then access the recording by opening the Photos app and navigating to the “Recents” album. From there, you can edit, share, or delete the recording as desired.
That’s it! Now you know how to effectively manage and stop screen recording on your iPhone 12. Whether you’re capturing important moments or creating instructional videos, screen recording can be a powerful tool. Armed with this knowledge, you’ll be able to effortlessly control your screen recordings and make the most of your iPhone 12’s capabilities.
Conclusion
Screen recording on the iPhone 12 is a useful feature that allows you to capture important moments, create engaging content, and share your screen with others. With just a few simple steps, you can start recording your screen and have the ability to save and share your recordings effortlessly.
Whether you want to create a tutorial, showcase a gaming session, or capture a memorable video call, the screen recording feature on the iPhone 12 provides a seamless and convenient way to do so. The ability to customize your recording settings and include audio makes it even more versatile.
Keep in mind that screen recording may be restricted in certain apps to protect your privacy and prevent unauthorized use. However, most apps and the home screen can be recorded without any limitations.
So go ahead, explore the screen recording feature on your iPhone 12, and unlock a whole new world of possibilities to capture and share your experiences with ease.
FAQs
1. Can I screen record on my iPhone 12?
Yes, you can screen record on your iPhone 12. The latest iPhone models, including the iPhone 12, come with a built-in screen recording feature that allows you to capture anything happening on your device’s screen.
2. How do I enable screen recording on my iPhone 12?
To enable screen recording on your iPhone 12, follow these steps:
– Open the Control Center by swiping down from the top right corner of your screen (or swipe up from the bottom on older models).
– Tap on the Screen Recording icon, which looks like a solid circle within a circle.
– You may be prompted to add the Screen Recording control to your Control Center if you haven’t done so already. If prompted, tap “Customize Controls” and then tap the “+” button next to “Screen Recording.”
3. Can I record both audio and video while screen recording on my iPhone 12?
Yes, you can record both audio and video while screen recording on your iPhone 12. By default, screen recording captures any ambient audio, as well as audio from the device’s microphone. However, if you want to record external audio, such as voice-overs or music, you will need to adjust your device’s audio settings accordingly.
4. Where can I find my screen recordings on my iPhone 12?
After you finish recording your screen on iPhone 12, the video will be saved to your Photos app. To access your screen recordings, open the Photos app, go to the “Albums” tab, and look for the “Screenshots & Screen Recordings” album. Your screen recordings will be stored there.
5. How long can I screen record on my iPhone 12?
There is no designated time limit for screen recording on the iPhone 12. You can record your screen for as long as you have sufficient storage space available on your device. Keep in mind that recording longer videos will consume more storage, so it’s always a good idea to regularly check your storage and delete any unnecessary recordings to free up space.