
Are you wondering how to send photos from your phone to your email? In this digital age, capturing and sharing moments through photos is a common practice. Whether you want to share a stunning landscape, a precious family moment, or an important document, emailing yourself the photo is a convenient and reliable method. In this article, we will guide you through the step-by-step process of sending photos from your phone to your email. From selecting the right email client to attaching the photos, we will cover all the necessary details to ensure a smooth and hassle-free experience. So, if you’re ready to master this essential skill, let’s dive in and learn how to effortlessly send photos from your phone to your email.
Inside This Article
- How to Send Photos From Phone to Email
- Method 1: Using Email App
- Method 2: Using File Sharing Apps
- Method 3: Using Cloud Storage Services
- Method 4: Using Messaging Apps
- Conclusion
- FAQs
How to Send Photos From Phone to Email
With the increasing popularity of smartphones and their powerful cameras, capturing memorable moments has become incredibly effortless. However, there are times when you might want to share those precious photos with friends, family, or even yourself via email. In this article, we will explore different methods to send photos from your phone to an email account, allowing you to conveniently share and preserve those special memories.
Method 1: Using Email App
The most common and straightforward way to send photos from your phone to email is through the built-in email app on your device. Follow these simple steps:
- Launch the email app on your phone. It could be Gmail, Yahoo, Outlook, or any other email client you use.
- Compose a new email by tapping on the “Compose” or “+” button.
- Enter the recipient’s email address in the “To” field.
- Add a subject line if desired.
- In the email body, tap on the attachment icon (usually depicted as a paperclip).
- Choose the option to attach files or photos.
- Select the desired photos from your phone’s gallery or file manager.
- Once the photos are selected, tap on the “Send” button to send the email with the attached photos.
Method 2: Using File Sharing Apps
If you want to send multiple photos in one go or the file size of the photos is large, using a file sharing app can be a more convenient option. Here’s how to do it:
- Install a file sharing app like Google Drive, Dropbox, or WeTransfer on your phone.
- Open the app and create a new folder or select an existing one to store your photos.
- Upload the photos from your phone’s gallery or file manager to the designated folder.
- Generate a shareable link or choose the option to send the folder via email.
- Copy the shareable link or enter the recipient’s email address.
- Send the email, and the recipient will receive a link to download the photos from the shared folder.
Method 3: Using Cloud Storage Services
Cloud storage services offer a convenient way to store, organize, and share your photos. Here’s how you can use them to send photos to email:
- Sign up for a cloud storage service like Google Photos, iCloud, or OneDrive.
- Upload the photos you want to send to the cloud storage.
- Open the cloud storage app on your phone or access it through a web browser.
- Select the photos you want to send.
- Choose the option to share the photos via email.
- Enter the recipient’s email address and send the email.
- The recipient will receive an email with a link to view and download the shared photos from the cloud storage.
Method 4: Using Messaging Apps
If you prefer a more instant and direct method of sharing photos, you can use popular messaging apps like WhatsApp, Facebook Messenger, or Telegram. Here’s how:
- Open the messaging app on your phone.
- Select the contact or group you want to send the photos to.
- Tap on the attachment icon (usually depicted as a paperclip or a camera).
- Select the photos you want to send from your phone’s gallery.
- Tap on the “Send” button to share the photos instantly with the recipient.
With these methods at your disposal, sending photos from your phone to email has never been easier. Whether you want to share a single photo or a whole album, you can choose the most suitable method based on the number of photos, file size, and convenience. Start sharing those cherished moments with the people you care about, or simply save them to your own email account for safekeeping.
Method 1: Using Email App
Sending photos from your phone to email is a simple and convenient way to share your memories or important images with others. One of the easiest methods to accomplish this is by using the email app on your mobile device.
To get started, open the email app on your phone and compose a new email. Enter the recipient’s email address in the appropriate field and give your email a subject. Next, tap on the attachment icon, which is usually represented by a paperclip or a “+” sign.
A window will open, allowing you to browse through your phone’s storage and select the photos you wish to send. Tap on each photo to select it, or if your email app supports it, you may have the option to select multiple photos at once.
Once you have selected the photos, tap on the “Attach” or “Done” button, depending on your email app. The selected photos will now be attached to your email. You can add a message or any additional information you want to include, and then simply send the email.
It’s important to keep in mind that some email apps may have file size limitations for attachments. If the photos you want to send are too large, you may need to consider resizing or compressing them before attaching them to the email.
Additionally, be aware that sending a large number of photos through email may take longer and could potentially affect your data usage, especially if you are using a cellular network to send the email. If you are concerned about data usage, it may be more efficient to use alternative methods such as file sharing apps or cloud storage services.
Method 2: Using File Sharing Apps
Sending photos from your phone to email can be made easier and more convenient with the help of file sharing apps. These apps allow you to quickly transfer and share files between devices. Here’s how you can use file sharing apps to send photos from your phone to email:
Step 1: Choose a File Sharing App
Start by selecting a file sharing app that suits your needs. There are several popular options available, such as Dropbox, Google Drive, WeTransfer, and Send Anywhere. Install the app on your phone if you haven’t already.
Step 2: Upload Photos to the App
Open the file sharing app and navigate to the option to upload files. Select the photos you want to send from your phone’s gallery or file manager and upload them to the app.
Step 3: Generate Shareable Link
Once the photos are uploaded, the file sharing app will generate a shareable link. This link allows anyone with the link to access and download the photos. Click on the share option and choose the method to share the link.
Step 4: Send the Link via Email
Open your email app and compose a new email. Paste the shareable link into the body of the email. You can also provide some context or add a message if desired. Enter the recipient’s email address, subject, and click on the send button to send your email with the link to the photos.
Step 5: Notify the Recipient
After you send the email, it’s a good idea to inform the recipient that you have sent them a link to the photos via email. This way, they will be aware of the email and can check their inbox for the link.
Using file sharing apps to send photos from your phone to email eliminates the need for large file attachments and ensures smooth and efficient delivery of the photos.
Method 3: Using Cloud Storage Services
In addition to email attachments and file-sharing apps, another convenient way to send photos from your phone to email is by using cloud storage services. Cloud storage allows you to upload and store your photos online, making them easily accessible from any device with an internet connection.
Here are the steps to send photos from your phone to email using cloud storage services:
- Select a cloud storage service: There are several popular cloud storage services available, such as Google Drive, Dropbox, and Microsoft OneDrive. Choose the one that suits your needs and preferences.
- Download and install the cloud storage app: On your phone, go to the app store and search for the cloud storage service you have chosen. Download and install the app on your device.
- Create an account or sign in: Open the app and create a new account if you don’t have one already. If you have an account, simply sign in using your credentials.
- Upload the photos: Once you are logged in, look for an option to upload files or photos. Tap on it and select the photos you want to send to email from your phone’s gallery.
- Generate a shareable link: After the photos are uploaded, most cloud storage services provide an option to generate a shareable link. This link allows the recipient to access and download the photos.
- Copy the shareable link: Tap on the shareable link and select the option to copy it to your clipboard.
- Compose an email: Open your email app and start composing a new email. Enter the recipient’s email address, subject, and message if desired.
- Paste the shareable link: In the body of the email, tap on the area where you would like to insert the link. Then, long-press the area and select the option to paste the shareable link.
- Send the email: Double-check the email content and make sure the shareable link is included. Once everything looks good, tap on the send button to send the email with the cloud storage link.
Using cloud storage services not only allows you to send photos to email, but it also provides a convenient way to store and backup your photos securely. You can access your photos anytime, anywhere, and easily share them with others by simply sending the shareable links.
Method 4: Using Messaging Apps
Another convenient way to send photos from your phone to email is by using messaging apps. These apps not only allow you to send instant messages but also provide the option to share files, including photos. Below, we will explore two popular messaging apps that you can utilize for this purpose.
1. WhatsApp: WhatsApp is a widely used messaging app that offers easy file-sharing capabilities. Follow these steps to send photos from your phone to email using WhatsApp:
- Open WhatsApp and select the conversation where you wish to send the photos.
- Tap on the attachment icon (typically a paperclip or a “+” sign) to access the file-sharing options.
- Select the “Gallery” or “Photos” option to choose the photos you want to send.
- Once you have selected the photos, tap on the send button to share them with the recipient.
- In the recipient’s email, they will receive the photos as attachments, ready to be downloaded and saved.
2. Facebook Messenger: If you are an active user of Facebook and its messaging platform, Messenger, you can easily send photos from your phone to email using the app. Here’s how:
- Open the Facebook Messenger app and start a conversation with the person you want to send the photos to.
- Tap on the camera icon or the “+” button to access the media options.
- Select “Photos & Videos” to browse through your device’s photo gallery.
- Choose the photos you want to share and tap on the send button.
- The recipient will receive the photos in their email as attachments.
Using messaging apps not only provides a quick and convenient way to send photos from your phone to email, but it also allows for instant communication with the recipient. Whether you prefer WhatsApp or Facebook Messenger, both apps offer seamless integration of file sharing and messaging functionalities, making it effortless to share your memorable moments via email.
Conclusion
In conclusion, knowing how to send photos from your phone to email is an essential skill in the age of digital communication. Whether you want to share a memorable moment with a friend or backup important photos for safekeeping, email is a reliable and easy method to accomplish this task. By following the step-by-step instructions outlined in this article, you can confidently send photos from your phone to email without any hassle.
Remember to always check your internet connection and ensure that your email account is properly set up to send and receive emails. Additionally, be mindful of the file size of your photos, as some email providers may have limitations. If necessary, compress the images or send them in multiple emails.
Now that you have mastered this skill, you can share your favorite moments with your loved ones and protect your precious memories for years to come. Happy emailing!
FAQs
1. How do I send photos from my phone to email?
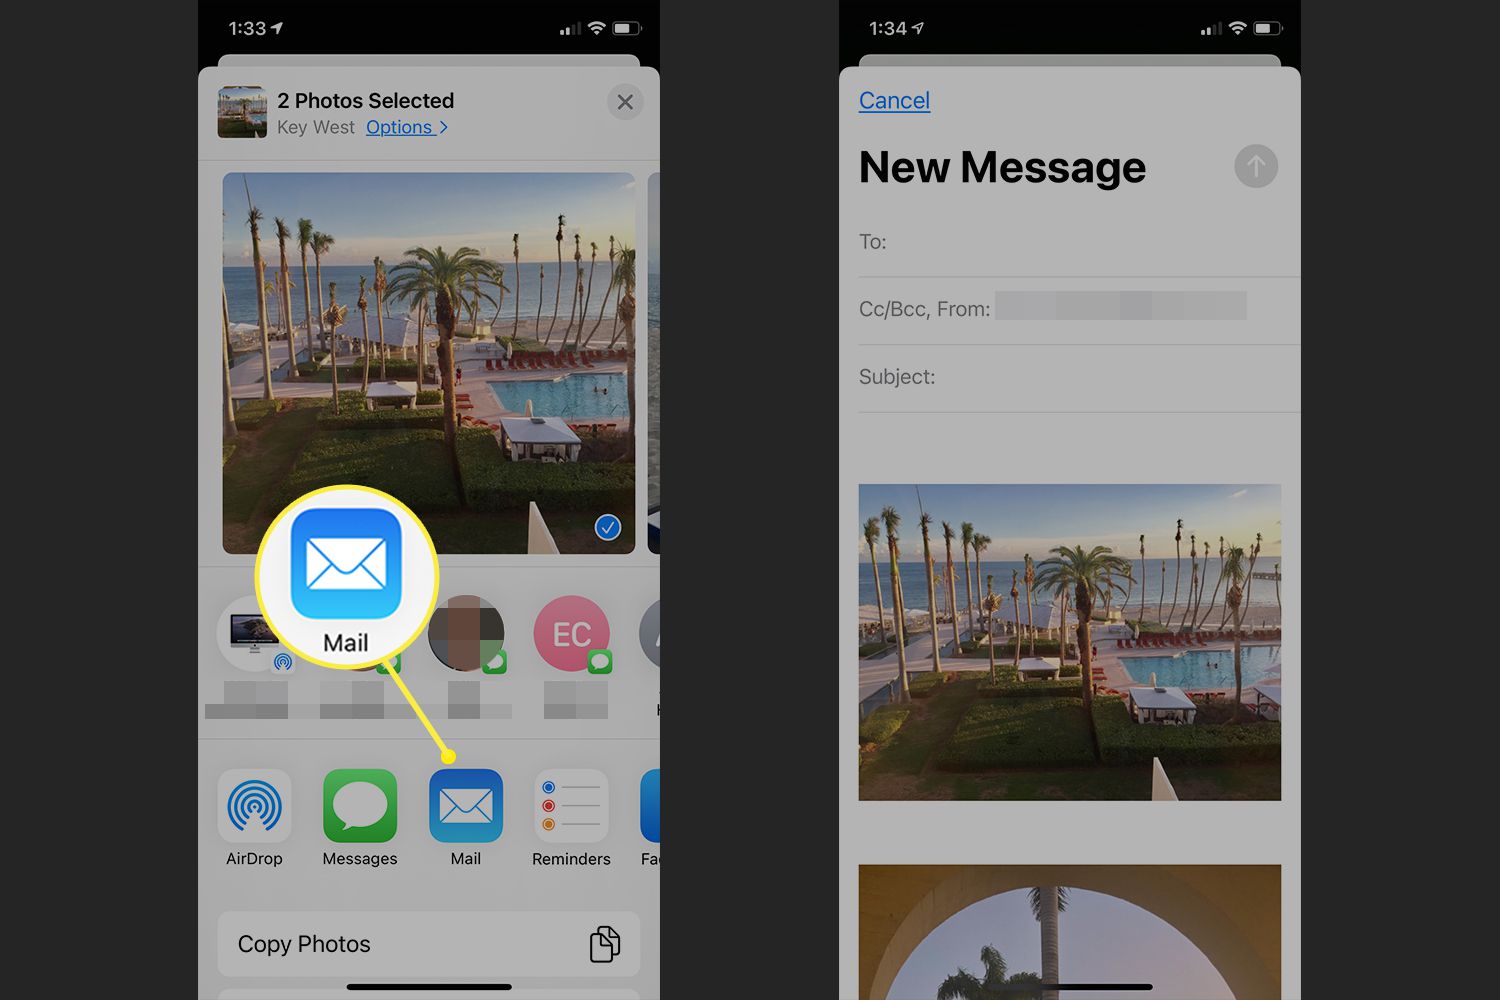
Sending photos from your phone to email is a straightforward process. First, open your phone’s photo gallery or camera app. Select the photo you want to send by tapping on it. Look for the share or export option, which is usually represented by an icon with an arrow pointing upwards or a share symbol. Tap on it, and a list of sharing options will appear. Choose email from the list and enter the recipient’s email address. Add a subject and any additional message if desired. Finally, tap on the send button to deliver the photo to the specified email address.
2. Can I send multiple photos to email at once?
Yes, most smartphones allow you to select and send multiple photos to email at once. In your phone’s photo gallery or camera app, you can usually long-press on a photo to select it. Once you have selected one photo, you can tap on other photos to add them to the selection. Look for the share or export option, and then choose email to send all the selected photos in a single email.
3. Is there a size limit for sending photos through email?
Yes, there is usually a size limit for sending photos through email. Email service providers and email clients often impose file size limitations to prevent large attachments from clogging up the recipient’s inbox. The file size limit for sending photos can vary depending on the email provider or client you use. In most cases, the maximum file size for email attachments ranges from 10MB to 25MB. If your photo exceeds the file size limit, you may need to resize or compress it before sending it via email.
4. Are there any alternative methods to send photos from phone to email?
Yes, apart from directly sending photos from your phone’s gallery or camera app, there are alternative methods to send photos to email. One option is to use a cloud storage service like Google Drive, Dropbox, or iCloud. These services allow you to upload photos from your phone to the cloud and then provide you with an option to share them via email by generating a link to the photo. Another alternative is to use a file transfer app, such as Xender or Shareit, which enable you to transfer files, including photos, between your phone and computer. Once the files are transferred to your computer, you can then attach them to an email.
5. How can I ensure that the photos I send through email are in high quality?
To ensure that the photos you send through email are in high quality, it is recommended to check the settings of your email client or provider. Some email clients and providers may automatically compress or downsize attachments to reduce file size. To preserve the quality of the photos, you can try using a file transfer service or cloud storage to share a link to the photo instead of attaching the photo directly to the email. Additionally, if you have the option to choose the file size or quality when sending photos from your phone, select the highest quality setting to maintain the original resolution and clarity of the photos.