
Are you a digital artist looking to learn how to fill in a shape in Procreate? Look no further! Procreate is a powerful and popular drawing app for iPad that offers a wide range of creative tools and features. One essential technique every artist should know is how to fill in a shape with color or texture to add depth and visual interest to their artwork. Whether you’re a beginner or an experienced artist, mastering this skill will greatly enhance your Procreate artwork. In this article, we will guide you through the step-by-step process of filling in a shape in Procreate, covering everything from selecting the shape, choosing the perfect color, and adding shading and highlights for a stunning result. So, let’s dive in and unlock the secret to filling in shapes in Procreate!
Inside This Article
- Choosing a Shape to Fill
- Creating a New Layer
- Using the Fill Tool
- Customizing the Fill Options
- Conclusion
- FAQs
Choosing a Shape to Fill
When it comes to filling in a shape in Procreate, there are a variety of options to choose from. Let’s explore some of these options to help you make the best choice for your artwork.
The first step in filling a shape is to select the shape you want to fill. Procreate offers a wide range of pre-defined shapes, such as squares, circles, triangles, and more. You can also create your own custom shapes using the drawing tools available in the app. Consider the overall design and composition of your artwork when choosing a shape to fill.
Think about the purpose of the filled shape in your artwork. Is it meant to be a background element, a focal point, or a part of a larger illustration? This will help you determine the size, position, and color of the shape to achieve the desired effect.
Consider the style and mood you want to convey. If you’re going for a bold and vibrant look, you might opt for bright and contrasting colors. On the other hand, if you prefer a more subtle and muted style, you might choose softer and harmonious colors for the filled shape.
Additionally, think about the materials or textures you want to mimic. Procreate offers various brushes and textures that can be applied to the filled shape, giving it a realistic or artistic effect. Experiment with different brush styles and textures to see what works best for your artwork.
Finally, don’t be afraid to play around with different options and combinations. Procreate allows you to experiment and make adjustments easily, so feel free to explore different shapes, colors, styles, and effects until you achieve the desired result.
Creating a New Layer
One of the fundamental aspects of working with Procreate is the ability to create and manage layers. Layers allow you to work on different elements of your artwork independently, making it easy to make adjustments without affecting the rest of your work. In this section, I will guide you through the process of creating a new layer in Procreate.
To begin, open your artwork in Procreate and navigate to the Layers menu. You can access the Layers menu by tapping on the icon located at the top right corner of your screen, which looks like two overlapping squares.
Once you’re in the Layers menu, you will see the existing layers in your artwork displayed as a stack. To create a new layer, simply tap on the “+” button located at the top right corner of the Layers menu. This will instantly add a new layer above the current active layer.
By default, the new layer will be named “Layer X,” where X is a number indicating the order of the layer in the stack. If you want to rename the layer, simply tap on the layer name and enter a new name of your choice.
Now that you have created a new layer, you can start working on it without worrying about affecting the layers below. To switch between layers, simply tap on the layer you want to work on in the Layers menu. The selected layer will become active, allowing you to make edits or additions.
Creating multiple layers in Procreate gives you the flexibility to work on different parts of your artwork separately. It allows you to experiment with different colors, textures, and effects without compromising the original elements. By utilizing layers effectively, you can easily make adjustments or undo changes without affecting the rest of your artwork.
Remember to save your work frequently to avoid any loss of progress. You can do this by tapping on the wrench icon located at the top left corner of your screen, selecting the “Canvas” option, and then tapping on “Save” or “Save a copy.” This will ensure that you have a backup of your artwork.
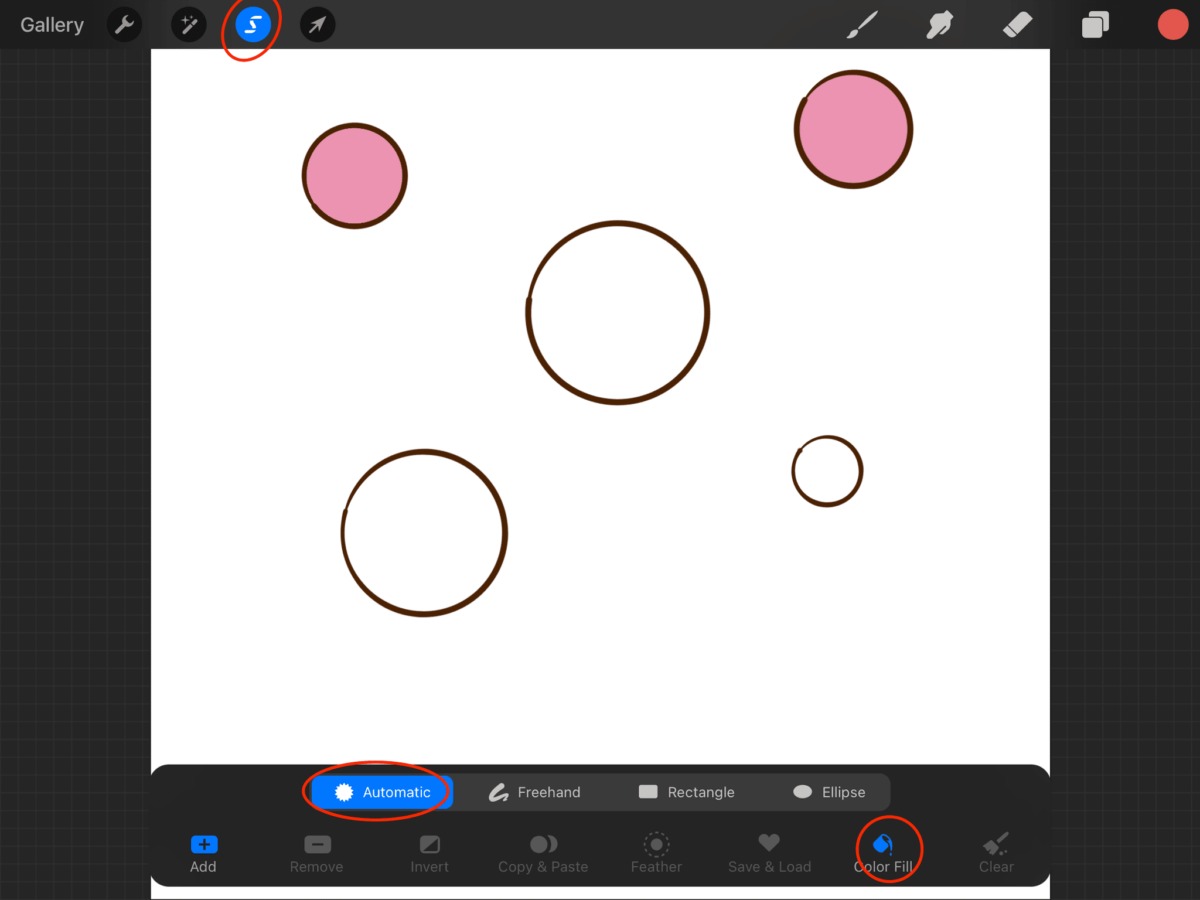
Using the Fill Tool
When it comes to filling in a shape in Procreate, one of the easiest and most efficient methods is to use the Fill Tool. This tool allows you to quickly add color to an enclosed area, making it perfect for filling in solid shapes or backgrounds.
To use the Fill Tool, start by selecting the shape you want to fill. You can do this by using the Selection Tool to create a precise selection around the shape, or you can simply tap on the shape to activate it. Once the shape is selected, choose the Fill Tool from the toolbar.
With the Fill Tool selected, you can then choose the desired color for the fill. Procreate provides a wide range of color options, allowing you to match the fill color with your design or illustration. Simply tap on the color selector and select the color you want.
Once you have chosen the color, tap anywhere inside the shape, and the Fill Tool will instantly fill it with the selected color. The tool is smart enough to recognize the boundaries of the shape, ensuring a clean and accurate fill without any overlap onto neighboring elements.
Additionally, the Fill Tool provides some advanced options to refine your fill. You can adjust the opacity of the fill, giving you the flexibility to create transparent or semi-transparent fills. You can also choose whether to fill the shape with a solid color or use a gradient fill for a more dynamic effect.
Using the Fill Tool in Procreate saves you time and effort, allowing you to quickly add color to your shapes. Experiment with different colors and opacity settings to achieve the desired look and feel for your artwork.
Customizing the Fill Options
When it comes to filling in shapes in Procreate, customizing the fill options allows you to add a personal touch to your artwork. Procreate offers a range of options to customize the fill, giving you more control over the appearance and style of your shapes. Whether you want to experiment with different colors, gradients, or textures, Procreate has got you covered.
One of the ways you can customize the fill options is by adjusting the opacity. This allows you to control the transparency of the fill, giving your shape a more subtle or vibrant look. By lowering the opacity, you can create transparent or semi-transparent fills, which can be useful when layering multiple shapes or creating a softer effect.
In addition to opacity, you can also adjust the blending mode of the fill. Procreate offers a variety of blending modes, such as multiply, screen, overlay, and more. These blending modes can significantly alter the appearance of the fill, allowing you to create unique color combinations and effects. Experimenting with different blending modes can give your artwork a distinctive look.
If you prefer to apply a gradient fill to your shape, Procreate provides a gradient tool that enables you to create smooth color transitions. You can choose from a range of preset gradients or create your own custom gradient. By adjusting the angle, scale, and color stops, you can achieve the desired gradient effect that adds depth and dimension to your shape.
If you want to take customization even further, you can import your own textures or patterns to use as fills. Procreate supports various file formats, such as PNG, JPG, and TIFF, allowing you to add unique textures or patterns to your shapes. This opens up a world of possibilities for creating intricate and textured designs.
Furthermore, Procreate allows you to save your customized fill options as a preset, making it quick and easy to apply the same fill to multiple shapes. This is particularly useful when working on complex illustrations or repetitive patterns, as it saves time and ensures consistency throughout your artwork.
With the ability to customize the fill options in Procreate, you have the freedom to unleash your creativity and bring your artistic visions to life. Whether you’re looking to achieve a specific color scheme, experiment with gradients, or add unique textures, Procreate empowers you with the tools to create visually stunning artwork.
Procreate is a powerful digital art app that offers a wide range of features and tools for artists and designers. In this article, we explored the process of filling in a shape in Procreate. We learned how to use the Selection tool to define the area to be filled, and how to choose and apply colors using the Fill tool. We also discovered different techniques and options for filling in shapes, such as utilizing layers, adjusting opacity, and using clipping masks.
By mastering the art of filling in shapes in Procreate, artists can add depth, texture, and dimension to their artwork. Whether it’s creating vibrant illustrations, designing stunning graphics, or adding details to digital paintings, Procreate provides a seamless and intuitive experience. With its user-friendly interface and extensive array of tools, artists can unleash their creativity and bring their ideas to life.
So, whether you’re a professional digital artist or a hobbyist exploring the world of digital art, Procreate is an invaluable tool that opens endless creative possibilities. Now that you’re equipped with the knowledge of filling in shapes, it’s time to dive in, experiment, and create amazing artwork in Procreate!
FAQs
1. Can I fill in a shape in Procreate?
Yes, you can fill in a shape in Procreate by using the Paint Bucket tool. Simply select the shape you want to fill and choose a color to apply the fill.
2. How do I select a shape in Procreate?
To select a shape in Procreate, use the selection tool and draw around the desired shape. You can adjust the selection by resizing, rotating, or moving it.
3. Can I change the fill color of a shape in Procreate?
Absolutely! After selecting the shape, tap on the color palette and choose a new color. The new color will replace the previous fill color of the shape.
4. What if I want to fill a shape with a gradient in Procreate?
Procreate provides the option to fill a shape with a gradient. After selecting the shape, tap on the “Layers” tab and create a new layer. Then, use the gradient tool to apply a gradient fill to the shape.
5. Is it possible to remove the fill color of a shape in Procreate?
Yes, you can remove the fill color of a shape in Procreate. Select the shape, tap on the color palette, and choose the transparent color option. This will remove the fill color, leaving the shape empty.