Sure, here's the introduction wrapped in a
tag:
If you’ve ever wanted to capture a memorable moment on your iPhone 12, whether it’s a high score in a game, a video call with a loved one, or a step-by-step tutorial, you’ll be glad to know that recording your screen is a breeze. With the ability to record both audio and video, you can effortlessly create engaging content or simply save important information for later. In this article, we’ll explore the steps to record your iPhone 12 screen, uncovering the built-in features that make it possible and the additional tools that can enhance your recording experience. Whether you’re a social media enthusiast, a tech-savvy individual, or someone who simply wants to explore the capabilities of their iPhone, you’re in for an enlightening journey into the world of screen recording on the iPhone 12.
Inside This Article
- Setting Up Screen Recording
- Recording Your iPhone 12 Screen
- Saving and Sharing Your Screen Recording
- Conclusion
- FAQs
Setting Up Screen Recording
Before you begin recording your iPhone 12 screen, it’s essential to ensure that the screen recording feature is readily accessible from the Control Center. To do this, navigate to the “Settings” app on your iPhone 12 and select “Control Center.
Once in the “Control Center” settings, tap “Customize Controls.” Here, you can add “Screen Recording” to the “Include” section by tapping the green plus icon next to it. This action will add the screen recording icon to the Control Center, making it easily accessible when you need it.
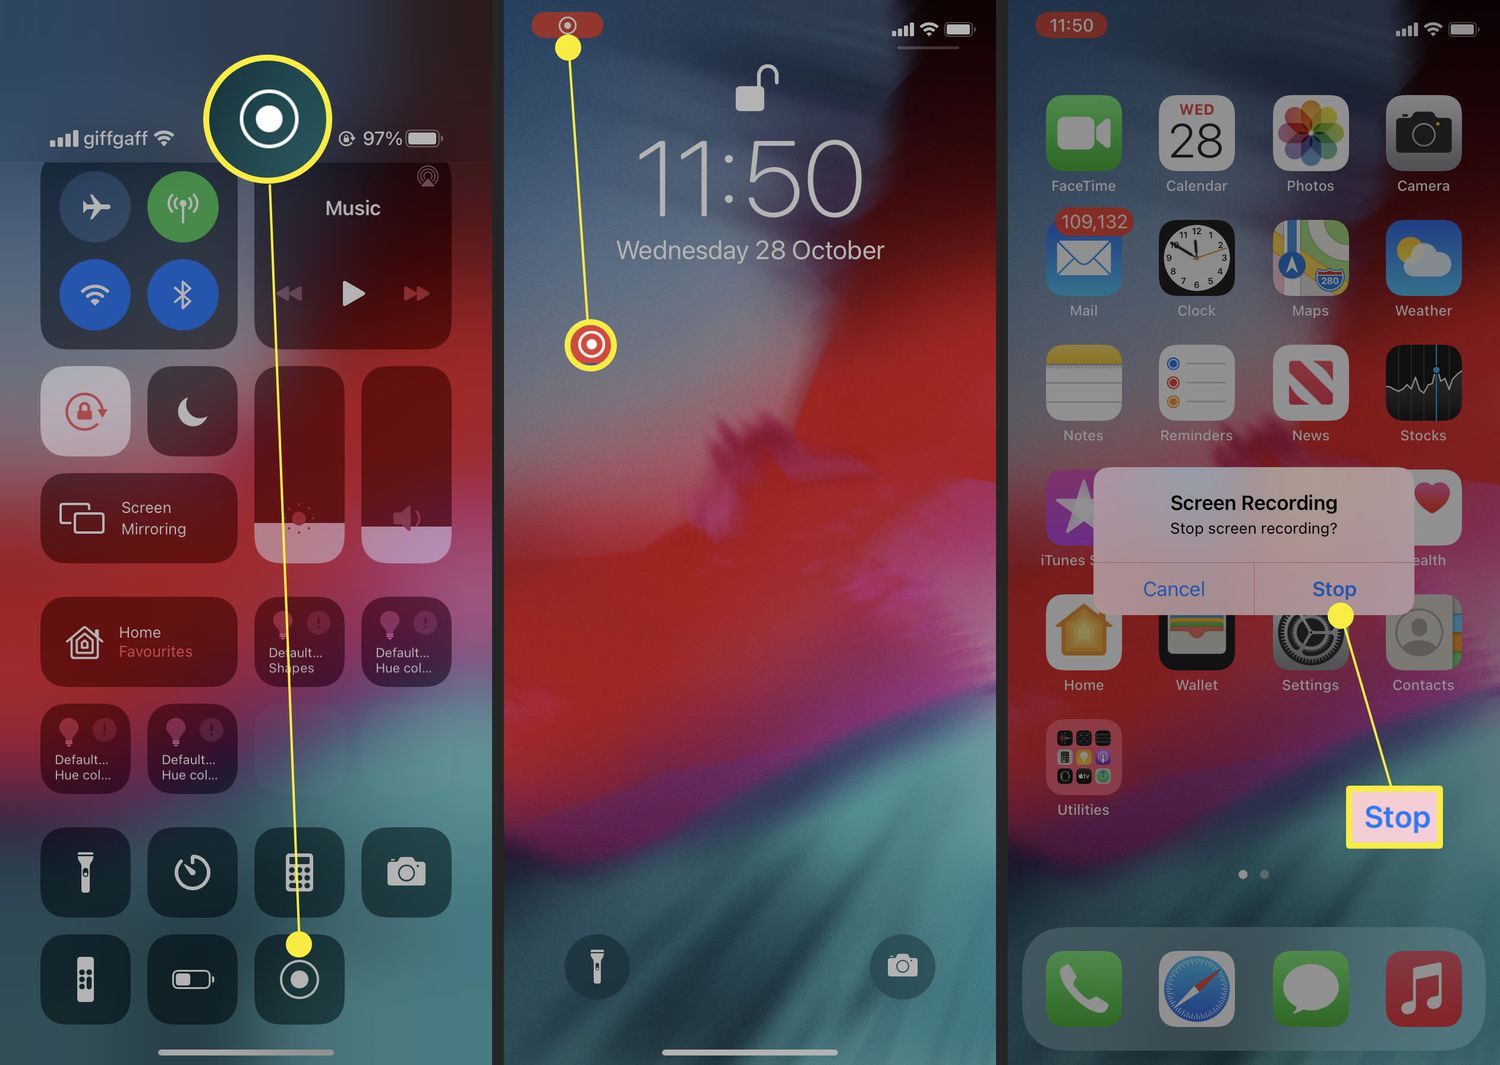
After adding “Screen Recording” to the Control Center, you can exit the settings and swipe down from the top-right corner of the screen (or swipe up from the bottom of the screen, depending on your iPhone model) to access the Control Center. The screen recording icon, represented by a solid circle within a circle, should now be visible and ready for use.
Recording Your iPhone 12 Screen
Once you’ve set up screen recording on your iPhone 12, capturing your screen is a breeze. Simply swipe down from the upper-right corner to access the Control Center. You’ll find the screen recording button, which looks like a solid circle surrounded by a ring. Tap this button to start recording.
After tapping the screen recording button, a countdown will appear, giving you a few seconds to prepare. Once the countdown finishes, your iPhone 12 will start recording everything that happens on your screen. This includes any taps, swipes, or other interactions you make during the recording.
While recording, a red bar will appear at the top of your screen, indicating that the recording is in progress. This bar is visible in all apps and will be captured in your recording. When you’re finished recording, simply tap the red bar at the top of the screen and select “Stop” to end the recording.
Saving and Sharing Your Screen Recording
Once you’ve finished recording your iPhone 12 screen, you’ll want to save and share your masterpiece. After stopping the recording, the video will automatically be saved to your Photos app, where you can view, edit, and share it with ease.
To access your screen recording, simply open the Photos app and navigate to the “Screenshots” album. Your screen recording will be waiting for you there, ready to be viewed and shared with your friends, family, or followers on social media.
When it comes to sharing your screen recording, the options are plentiful. You can send it via messaging apps, upload it to your favorite social media platforms, or even email it to someone. The choice is yours, and the process is as simple as sharing any other media file from your iPhone.
If you want to enhance your screen recording before sharing it, you can use the editing tools within the Photos app. Trim the video, add annotations, or include a voiceover to make your recording even more engaging before sharing it with the world.
Additionally, you can also utilize third-party apps for further editing and customization. There are numerous apps available on the App Store that offer advanced video editing features, allowing you to add filters, music, and special effects to your screen recording.
Remember to consider the privacy and sensitivity of the content in your screen recording before sharing it. Always obtain consent when recording conversations, and be mindful of the information displayed on your screen to ensure that you’re sharing content responsibly.
Conclusion
Recording your iPhone 12 screen can be a valuable tool for capturing important moments, creating engaging content, or troubleshooting technical issues. With the built-in screen recording feature and the option to customize settings and add audio, you have the flexibility to tailor your recordings to suit your specific needs. Whether you’re sharing gameplay highlights, demonstrating app features, or providing step-by-step tutorials, the ability to record your screen on the iPhone 12 opens up a world of possibilities. By following the simple steps outlined in this guide, you can harness the power of screen recording and unlock a new level of creativity and productivity with your iPhone 12.
FAQs
Q: Can I record my iPhone 12 screen without using third-party apps?
Q: What is the maximum duration for recording the iPhone 12 screen?
Q: Will recording the iPhone 12 screen affect its performance or battery life?
Q: Can I record the screen while using other apps on my iPhone 12?
Q: How can I share the recorded screen video from my iPhone 12?
