
**
**If you've ever wanted to capture a memorable moment on your iPhone 13, whether it's a hilarious video from a social media platform, a fascinating conversation from a video call, or a remarkable gaming achievement, knowing how to screen record on your iPhone 13 can be incredibly useful. This feature allows you to create a video recording of your screen, including audio, making it an excellent tool for sharing experiences, troubleshooting, or simply having fun. In this article, we'll explore the step-by-step process of how to screen record on your iPhone 13, along with some useful tips and tricks to make the most of this feature. So, let's dive in and uncover the exciting world of screen recording on your iPhone 13!
Inside This Article
- Setting Up Screen Recording
- Recording Your Screen
- Editing and Sharing Your Recording
- Conclusion
- FAQs
Setting Up Screen Recording
Screen recording on your iPhone 13 is a powerful feature that allows you to capture and share activities on your device. Before you start recording, it’s essential to ensure that screen recording is readily accessible from your Control Center. To do this, you’ll need to add the screen recording feature to your Control Center for quick and easy access.
To set up screen recording, navigate to your device’s Settings app and tap on “Control Center.” From there, select “Customize Controls.” Here, you can add the screen recording feature by tapping the green plus icon next to “Screen Recording.” Once added, the screen recording icon will now appear in your Control Center, making it convenient to initiate recordings with just a swipe and tap.
After adding screen recording to your Control Center, you’re all set to start capturing your screen activities effortlessly. This simple setup process ensures that the screen recording feature is readily available whenever you need it, allowing you to record and share your favorite moments, tutorials, or any on-screen activity with ease.
Recording Your Screen
Once you’ve set up screen recording on your iPhone 13, capturing your screen activity becomes a breeze. Whether you want to save a video call, demonstrate a new app feature, or share a gaming achievement, the screen recording feature offers versatility and convenience.
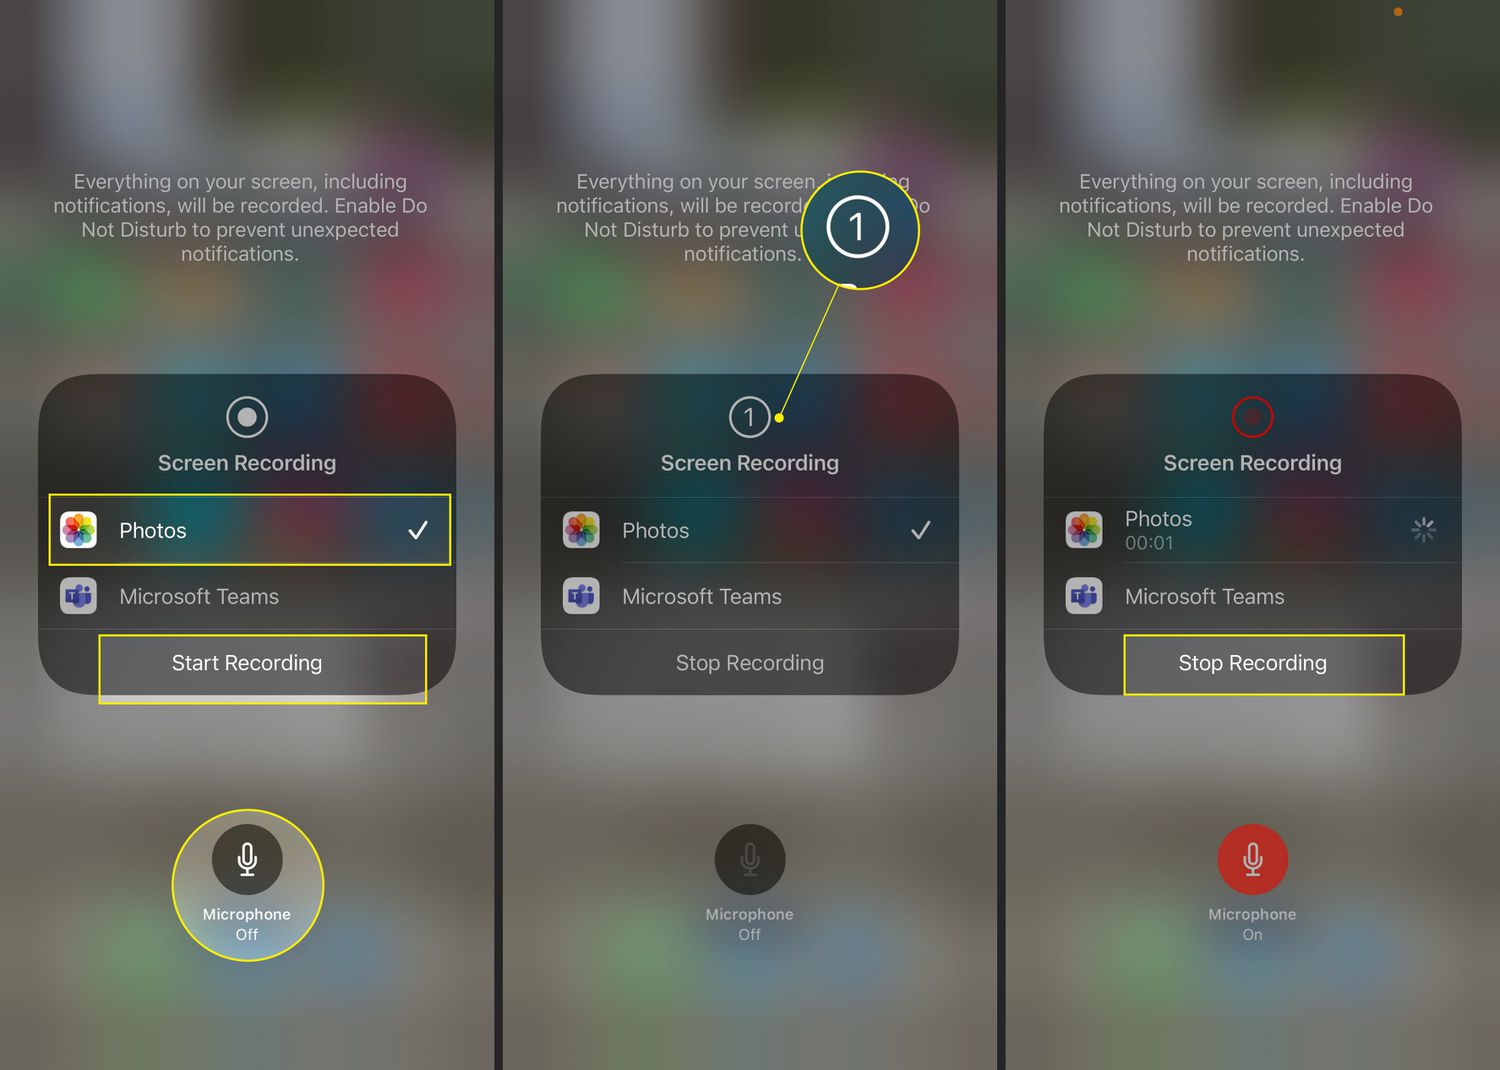
To initiate the recording process, simply navigate to the screen or activity you wish to capture. Then, swipe down from the top-right corner of the screen to access the Control Center. Here, you’ll find the screen recording icon, represented by a circle within a circle. Tap this icon to commence the recording.
Upon tapping the screen recording icon, a countdown timer will appear, giving you a brief moment to prepare. Once the timer elapses, the recording will commence, and a red indicator will appear at the top of the screen, signifying that the screen is being captured.
During the recording, your iPhone 13 will capture everything that occurs on the screen, including gestures, taps, and audio. This allows you to create comprehensive recordings that effectively convey the intended message or demonstration.
Editing and Sharing Your Recording
Once you’ve finished recording your screen on your iPhone 13, you may want to edit and share the recording with others. Fortunately, the iPhone 13 offers a variety of tools and options for editing and sharing your screen recordings, allowing you to customize and distribute your content with ease.
After recording, you can access the video in the Photos app. From there, you can trim the recording to remove any unwanted sections. Simply open the recording, tap “Edit,” and use the handles to adjust the start and end points. This feature is particularly useful for refining your content before sharing it.
Once you’re satisfied with the edited recording, you can easily share it with others. Tap the “Share” button, and you’ll have the option to send the recording via Messages, Mail, AirDrop, or various social media platforms. Additionally, you can upload the recording to cloud storage services or share it with other apps installed on your iPhone 13.
Furthermore, if you want to enhance your recording with additional elements such as text, annotations, or music, you can utilize third-party editing apps available on the App Store. These apps provide advanced editing features, allowing you to personalize your screen recordings to your liking before sharing them with your audience.
Conclusion
In conclusion, learning how to screen record on your iPhone 13 can greatly enhance your ability to capture and share moments from your device. Whether you want to create tutorials, share exciting gameplay, or simply save memorable conversations, the screen recording feature offers a versatile tool for various purposes. With just a few simple steps, you can access this functionality and start recording your screen with ease. By familiarizing yourself with the screen recording process, you can unlock a new dimension of creativity and convenience on your iPhone 13. Embrace the power of screen recording and unleash your potential to effortlessly capture and share your digital experiences.
FAQs
Q: How do I screen record on my iPhone 13?
A: To screen record on your iPhone 13, simply swipe down from the top right corner to access the Control Center. Then, tap the Screen Recording icon, which looks like a solid circle within a circle. Your screen recording will begin after a 3-second countdown.
Q: Can I screen record with audio on my iPhone 13?
A: Yes, you can screen record with audio on your iPhone 13. After starting the screen recording, long-press or 3D Touch the Screen Recording icon in the Control Center, then tap the microphone icon to turn on audio recording.
Q: Where are the screen recordings saved on my iPhone 13?
A: By default, screen recordings are saved in the Photos app on your iPhone 13. You can access them by opening the Photos app and navigating to the "Screen Recordings" album.
Q: How can I edit my screen recordings on my iPhone 13?
A: You can edit your screen recordings using the built-in Photos app on your iPhone 13. Simply open the recording in the Photos app, tap "Edit," and use the editing tools to trim or enhance the recording.
Q: Are there any third-party apps for screen recording on iPhone 13?
A: While the iPhone 13 comes with a built-in screen recording feature, there are third-party apps available on the App Store that offer additional functionalities for screen recording, such as advanced editing options and customizable settings.