
Are you eager to capture and share your iPhone 11 screen activities with your friends or followers? You're in luck! With the built-in screen recording feature on the iPhone 11, you can effortlessly create engaging tutorials, share gameplay highlights, or save memorable video chats. Whether you're a tech-savvy enthusiast or a casual user, mastering this functionality can greatly enhance your iPhone experience. In this article, we'll delve into the step-by-step process of how to record your iPhone 11 screen, empowering you to unleash your creativity and share your digital adventures with the world. So, let's embark on this exciting journey to unlock the full potential of your iPhone 11!
Inside This Article
- Preparing to Record
- Using the Built-in Screen Recording Feature
- Customizing Screen Recording Settings
- Editing and Sharing Screen Recordings
- Conclusion
- FAQs
Preparing to Record
Before you start recording your screen on your iPhone 11, it’s essential to ensure that your device is ready for the task. Here are a few steps to take before you begin recording:
1. Clear Space: Make sure you have enough available storage space on your iPhone to accommodate the screen recording. Large files can quickly fill up your device’s storage, so it’s wise to clear some space beforehand.
2. Charge Your Device: To avoid interruptions during the recording process, ensure that your iPhone 11 is sufficiently charged. Connecting it to a power source or having a full battery will help you capture your screen without any unexpected disruptions.
3. Close Unnecessary Apps: Closing any unnecessary apps running in the background can help optimize your iPhone’s performance during the screen recording. This can prevent lags or interruptions that may affect the quality of your recording.
By taking these simple preparatory steps, you can set the stage for a smooth and successful screen recording session on your iPhone 11.
Using the Built-in Screen Recording Feature
One of the standout features of the iPhone 11 is its built-in screen recording capability, which allows you to capture anything on your screen with ease. Whether you want to save a video clip, demonstrate a process, or record a gameplay session, the screen recording feature is a versatile tool at your disposal. With just a few taps, you can start capturing your screen in no time.
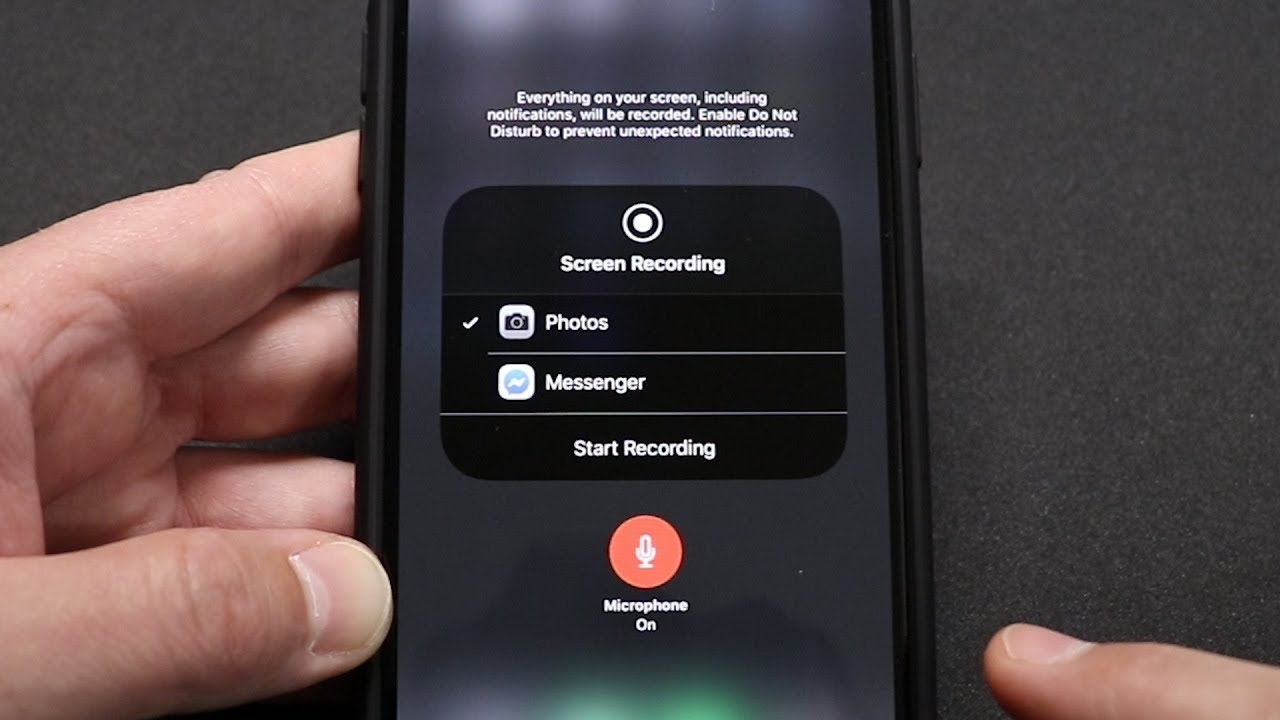
To initiate the screen recording, simply navigate to the Control Center by swiping down from the top-right corner of the screen. Here, you’ll find the screen recording icon, which looks like a solid circle surrounded by a dotted circle. Tap on this icon to start the recording process. You’ll see a three-second countdown, indicating that the recording is about to begin.
Once the countdown finishes, your iPhone 11 will start capturing everything that happens on the screen. This includes any gestures, taps, and audio, providing a comprehensive recording of your activities. To stop the recording, tap the red status bar at the top of the screen and confirm that you want to end the recording. The captured video will then be saved to your Photos app, ready for you to review, edit, or share as needed.
Customizing Screen Recording Settings
Customizing the screen recording settings on your iPhone 11 allows you to tailor the experience to your specific needs. To access these settings, begin by opening the “Settings” app on your device.
Next, scroll down and tap on “Control Center.” This is where you can add the screen recording feature to your Control Center if it’s not already there. Simply tap the green “+” icon next to “Screen Recording” to include it in your Control Center.
Once the screen recording feature is added to your Control Center, you can customize its settings by tapping and holding the “Screen Recording” icon in the Control Center. This will bring up additional options, including the ability to toggle the microphone audio on or off for your screen recordings.
If you want to include your voiceover or any other ambient sounds while recording your screen, ensure that the microphone icon is highlighted in white. Conversely, if you prefer to record the screen without audio, simply tap the microphone icon to turn it off.
Moreover, you can also adjust the video recording quality by 3D touching or long-pressing the “Screen Recording” icon in the Control Center. From there, you can select between high or standard video quality based on your preferences and storage capacity.
By customizing these screen recording settings, you can ensure that your recordings meet your exact specifications, whether it’s capturing crystal-clear visuals or including audio commentary for a more comprehensive presentation.
Editing and Sharing Screen Recordings
After successfully recording your iPhone screen, you may want to edit and share the recording with others. Fortunately, iOS provides built-in tools to help you perform these tasks seamlessly.
Firstly, you can trim the recorded video to remove any unnecessary parts before sharing it. To do this, open the Photos app, locate the screen recording, tap “Edit,” and then drag the yellow handles to adjust the start and end points of the video. Once you’re satisfied with the selection, tap “Done” to save the trimmed version.
Once the video is trimmed, you can easily share it with friends, family, or colleagues. Simply tap the “Share” button in the Photos app, choose the preferred sharing method (e.g., Messages, Mail, AirDrop), select the recipients, and then send the video. Alternatively, you can upload the recording to a cloud storage service or social media platform directly from the Photos app.
If you want to add some extra flair to your screen recording, you can use third-party video editing apps available on the App Store. These apps offer a wide range of editing tools, such as adding text, applying filters, including music, and more. Once you’ve edited the video to your liking, you can share it using the app’s built-in sharing options.
Sure, here's the conclusion section written in HTML:
html
Conclusion
Recording your iPhone 11 screen is a convenient and powerful feature that can be used for various purposes, from creating tutorials to capturing memorable moments. With the built-in screen recording tool and the ability to customize settings, you can easily capture high-quality videos directly from your device. Whether you’re sharing tips with friends or demonstrating a new app, the screen recording feature on the iPhone 11 offers a seamless and user-friendly experience. By following the simple steps outlined in this guide, you can unlock the full potential of your iPhone 11 and elevate your screen recording capabilities. Embrace the versatility of screen recording and explore the endless possibilities it offers for sharing and preserving your digital experiences.
FAQs
Q: Can I record my iPhone 11 screen without using any third-party apps?
A: Yes, you can. The iPhone 11 has a built-in screen recording feature that allows you to capture your screen activity without the need for additional apps.
Q: How much storage space does a screen recording typically consume on the iPhone 11?
A: The size of a screen recording file depends on the duration and content being recorded. On average, a one-minute screen recording can take up approximately 30 MB of storage space.
Q: Can I record audio along with the screen on my iPhone 11?
A: Yes, the screen recording feature on the iPhone 11 allows you to capture both the on-screen activity and audio from the device's microphone simultaneously.
Q: Is it possible to edit the screen recordings directly on the iPhone 11?
A: Yes, you can trim and edit your screen recordings using the built-in editing tools available in the Photos app on the iPhone 11.
Q: Can I share the screen recordings with others directly from my iPhone 11?
A: Absolutely. You can easily share your screen recordings via various platforms such as iMessage, email, or social media directly from your iPhone 11.