
If you’re a digital artist using Procreate, you’ve probably encountered the need to make layers transparent. Whether you want to create a blend effect, add shadows, or make changes to specific areas of your artwork, understanding how to make layers transparent is a crucial skill to master. In this article, we’ll explore step-by-step instructions on how to achieve this in Procreate, a powerful and popular digital art app for iPad. By transparently layering elements in your artwork, you can unlock a world of creative possibilities, giving your artwork depth, dimension, and a professional finish. So let’s dive in and learn how to make layers transparent in Procreate!
Inside This Article
- Understanding Layers in Procreate
- Making a Layer Transparent in Procreate
- Adjusting Transparency of Multiple Layers
- Adding Transparency to Specific Elements within a Layer
- Conclusion
- FAQs
Understanding Layers in Procreate
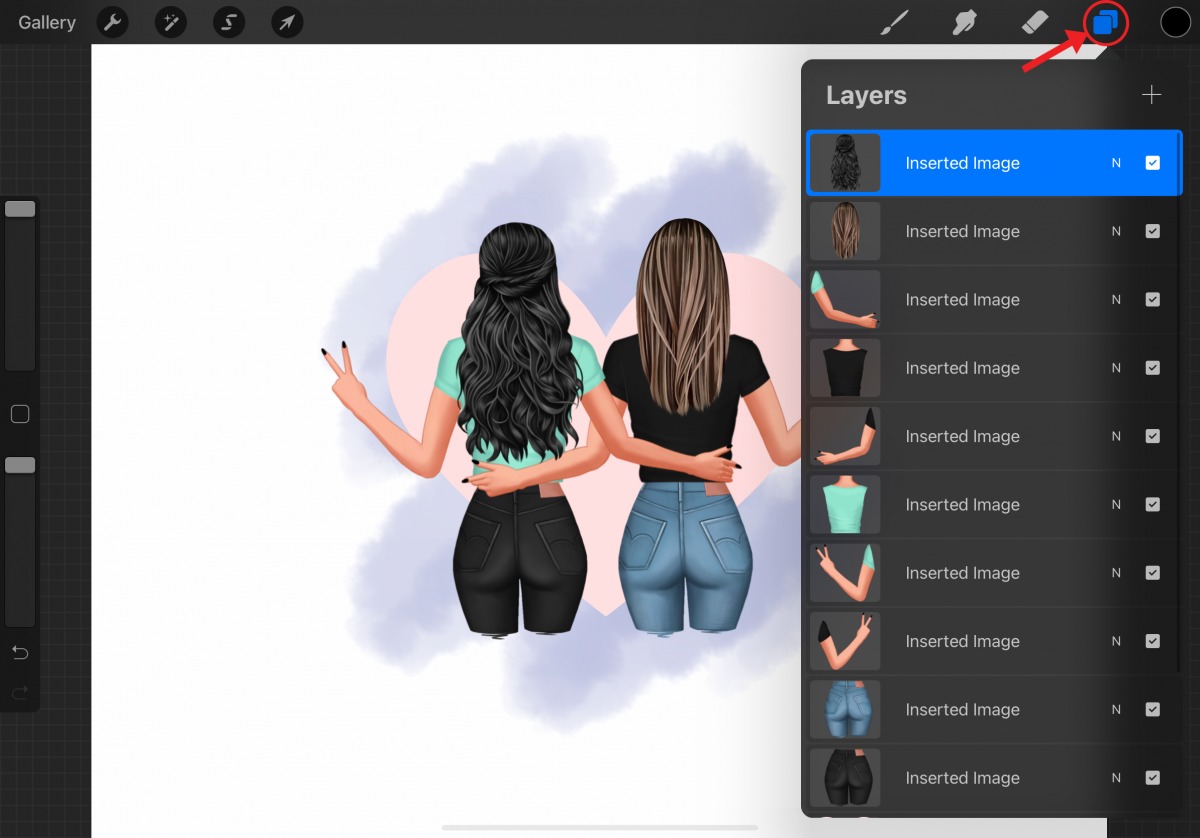
When working with digital art, understanding layers is essential, and this holds true for the popular digital art software, Procreate. Layers in Procreate function similarly to layers in traditional art, allowing you to work on different elements of your artwork individually without affecting the rest of the image.
Think of layers as transparent sheets stacked on top of each other. Each layer contains specific content, such as line art, colors, shading, or textures, which can be edited independently. This flexibility makes it easier to make changes, experiment with different effects, and create complex compositions.
Layers in Procreate are organized in a layer stack, with the top layer being the frontmost and the bottom layer being the background. You can rearrange the order of the layers to adjust their visibility and impact on the overall composition.
Working with layers in Procreate also allows you to easily make adjustments or corrections without affecting the rest of your artwork. For example, if you want to change the color of a specific element, you can do so on a separate layer, keeping the other elements intact.
Furthermore, layers in Procreate offer various blending modes, which determine how each layer interacts with the layers below it. These blending modes can enhance the overall look and feel of your artwork, from creating vibrant color effects to adding texture and depth.
Understanding how layers work in Procreate is crucial for achieving precise control over your digital artwork. By exploring the different possibilities and experimenting with layering techniques, you can unlock a whole new world of creativity and possibilities in your artistic endeavors.
Making a Layer Transparent in Procreate
Procreate is a powerful digital art app that allows artists to create stunning artwork on their iPads. One of the key features of Procreate is the ability to work with layers, which provides a level of flexibility and control over your artwork. If you want to make a layer transparent in Procreate, you can easily do so with just a few simple steps.
To begin, open your artwork in Procreate and locate the layer you want to make transparent. Tap on the layer to select it, and then tap on the “Settings” icon in the toolbar at the top of the screen. This will open the Layer Options menu.
In the Layer Options menu, you will see a variety of options for manipulating your layer. Look for the “Opacity” slider, which allows you to adjust the transparency of the layer. Drag the slider to the left to decrease the opacity and make the layer more transparent.
As you adjust the opacity, you will immediately see the layer becoming more transparent on your canvas. You can continue to adjust the slider until you achieve the desired level of transparency for your layer.
It’s important to note that changing the opacity of a layer in Procreate will not affect the transparency of any elements within the layer. If you have specific elements within the layer that you want to make transparent, you can use the eraser tool or the selection tool to remove or modify those elements.
If you want to adjust the transparency of multiple layers at once, you can do so by selecting multiple layers in the Layer Options menu. Simply tap and hold on one layer, then tap on any additional layers you want to select. Once you have selected all the desired layers, adjust the opacity slider to change the transparency of all the selected layers simultaneously.
It’s worth mentioning that layer transparency can also be used in creative ways to blend different elements of your artwork together. By making certain layers transparent and arranging them strategically, you can create unique and visually interesting effects in your artwork.
Adjusting Transparency of Multiple Layers
In Procreate, you have the flexibility to adjust the transparency of multiple layers simultaneously, allowing you to create stunning effects and achieve the desired level of opacity for your artwork.
Here’s how you can adjust the transparency of multiple layers in Procreate:
- Select the layers you want to adjust by tapping on the layers panel and choosing multiple layers at once. You can do this by tapping on the layer thumbnail or using the “Select” tool from the top toolbar.
- Once you have selected the desired layers, tap on the “Opacity” option in the Adjustments menu, which can be accessed by tapping on the wrench icon at the top of the screen.
- By default, the opacity slider will adjust the transparency of every selected layer simultaneously. Slide the opacity slider to the left to decrease transparency or to the right to increase transparency.
- You can also use the percentage value displayed next to the slider to fine-tune the transparency level. Simply tap on the value and enter a specific percentage.
- As you adjust the opacity, you will see the changes applied to all the selected layers in real time, allowing you to find the perfect balance of transparency.
- If you want to revert the transparency adjustments, you can simply reset the opacity to its original value by tapping on the “Reset” button next to the opacity slider.
This feature becomes particularly useful when you have multiple layers that need to share the same transparency or when you want to quickly make global adjustments to the opacity of your artwork.
By harnessing the power of adjusting transparency on multiple layers, you can elevate your artwork by creating depth, dimension, and visual interest.
Now that you know how to adjust the transparency of multiple layers in Procreate, you can experiment with different opacity levels to achieve the desired effects for your digital masterpieces.
Adding Transparency to Specific Elements within a Layer
One of the great features of Procreate is the ability to add transparency to specific elements within a layer. This allows you to create interesting effects and blend different elements seamlessly. Here’s how you can do it:
1. Start by selecting the layer on which you want to work. Make sure it is active and ready to be edited.
2. Tap on the “Blend” button located at the top of the screen. This will open a panel with various blending options.
3. Scroll down the panel until you find the “Opacity” slider. By default, it should be set to 100%, which means the layer is completely opaque.
4. Drag the “Opacity” slider to the left to decrease the opacity of the entire layer. As you do this, you will start to see the transparency increasing, allowing the layers below to show through.
5. To add transparency to specific elements within the layer, tap on the “Brush” icon located at the top of the screen.
6. Select a suitable brush from the Brush Library that has a soft edge or a blending effect. This will help you create smooth transitions between the opaque and transparent areas.
7. With the brush selected, start painting over the areas of the layer where you want to add transparency. As you do this, the opacity of those specific elements will decrease, revealing the layers below.
8. To control the level of transparency, you can adjust the pressure sensitivity of your Apple Pencil or stylus. Apply less pressure for a lighter transparency effect and more pressure for a denser one.
9. Remember to zoom in and work with precision when adding transparency to specific elements within a layer. This will give you better control over the outcome and ensure smooth transitions.
10. If you make a mistake or want to remove the transparency from a certain area, use the Eraser tool and gently erase the transparent parts. This will bring back the original opacity of those elements.
By adding transparency to specific elements within a layer, you can unleash your creativity and create unique compositions with depth and complexity. Experiment with different brushes, opacities, and layer combinations to achieve stunning effects in your Procreate artwork.
Procreate is an incredibly powerful tool for digital artists, and learning how to make layers transparent is an essential skill for creating stunning artwork. By following the simple steps outlined in this guide, you can easily adjust the opacity of your layers, allowing you to add depth, blend colors, and create unique visual effects.
Transparent layers give you more control over your artwork, enabling you to experiment with different compositions and techniques. Whether you want to create subtle overlays or bold overlays, Procreate’s layer transparency feature allows you to achieve the desired effect with ease.
So, start exploring the possibilities of transparent layers in Procreate today. Experiment, have fun, and watch your digital artwork come to life with the magic of transparency.
FAQs
1. How do I make a layer transparent in Procreate?
To make a layer transparent in Procreate, you can follow these steps:
a. Select the layer you want to make transparent by tapping on the layer in the Layers panel.
b. Swipe right on the layer to access the Layer Options menu.
c. In the Layer Options menu, tap on “Opacity”.
d. Adjust the opacity slider to decrease the opacity and make the layer more transparent. Sliding the opacity all the way to the left will make the layer completely transparent.
e. Once you’ve set the desired transparency, you can continue working on your project with the layer now appearing more translucent.
2. Can I adjust the transparency of a specific area in a layer?
Yes, you can adjust the transparency of a specific area within a layer by using Procreate’s masking feature. Here’s how:
a. Create a new layer above the layer you want to work on.
b. Use the selection tools (such as the lasso or the magic wand) to select the area of the layer you want to make transparent.
c. Once the area is selected, tap on the Layer Options menu and choose “Mask”.
d. The selected area will now be masked, and you can adjust its transparency by following the steps mentioned in the previous answer.
3. Is it possible to make multiple layers transparent at once?
Yes, you can make multiple layers transparent at once in Procreate by using Layer Blend Modes. Here’s what you need to do:
a. Select all the layers you want to make transparent by tapping on them in the Layers panel while holding down the Command key (or using the swipe gesture on each layer).
b. With the layers selected, tap on the Layer Options menu and choose “Blend Modes”.
c. In the Blend Modes menu, select a blending mode that suits your desired transparency effect. Experiment with different blending modes to see how they interact with the layers and adjust their opacity if necessary.
d. Once you’ve applied the desired blending mode, the selected layers will appear transparent based on the chosen blend mode.
4. Can I animate the transparency of a layer in Procreate?
Currently, Procreate does not have built-in animation capabilities. However, you can export your Procreate project to other animation software, such as Adobe After Effects or Apple’s Motion, to create animations with transparency effects. Once you’ve exported your layers as separate images or a video file, you can apply animation effects, including transparency, in the external software.
5. Does adjusting layer opacity affect the transparency of the brushes or applied effects?
No, adjusting the opacity of a layer in Procreate does not affect the transparency of the brushes or applied effects on that layer. The opacity setting only affects the overall transparency of the layer itself, not any specific brush strokes or effects that have already been applied. If you want to adjust the transparency of individual brush strokes or effects, you may need to use the eraser tool or apply different brush settings to achieve the desired effect.